Still scrolling through homemade advent calendar ideas while quietly doing the math on how few weekends are left before December? Same. Here’s the thing the prettiest ones have in common: they’re not complicated — they’re one good idea, executed properly.
We spent weeks combing through Etsy, Michaels, Target and an unhinged number of Pinterest boards to pull 30 ideas genuinely worth your evenings, from illuminated wooden villages with 24 tiny drawers to a single bare branch strung with brown paper packages. Budget and luxury versions get compared side by side, and supplies run from about $12 to $240 for something heirloom-worthy.
Why now? The 2026 holiday mood is handmade but not shabby — crisp kraft paper, warm micro-lights, felt with a sense of humor — which is exactly why these are getting saved thousands of times a day.
And stay until the end: we break down the most common mistakes that quietly ruin a calendar’s charm. 📌 Save this to Pinterest for later — you’ll want to revisit these ideas.
Heads up: this post contains affiliate links, which means we may earn a small commission at no extra cost to you.
1. Illuminated Wooden Winter Village With 24 Tiny Drawers
Here’s the detail that separates charming from cluttered: keep the lights at 2700K. Anything cooler turns warm wood grey and makes snowy roofs look like plastic. Run the battery pack behind the bottom drawer row so nothing dangles, and slip one bulb under each miniature house so the glow spills out of the windows instead of washing over the whole roofline.
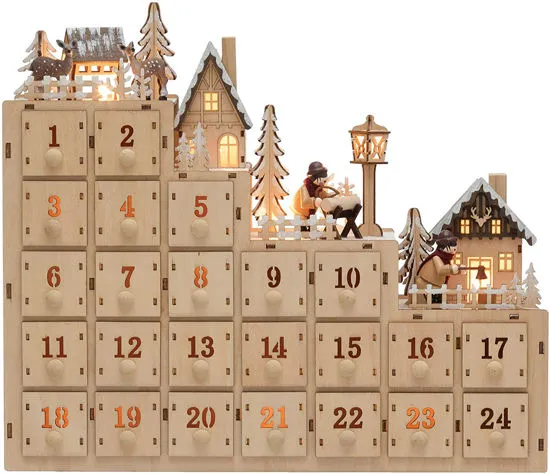
The scale gap does the heavy lifting. Twenty-four drawers give you rhythm; the deer, picket fence and street lamp give your eye a story to follow. Push the little figures and carved evergreens toward the front edge so they overlap the drawer line — that single move makes the whole thing read as a scene rather than a chest of drawers with knobs.
2. A Light-Up Village Advent Centerpiece For The Dining Table
Read the table as a ratio: 60 percent cream cloth, 25 percent deep red runner, 10 percent dark green, 5 percent silver from the crystal. Trade the red for bottle green and the table turns formal and quiet; trade the cream for oatmeal linen and it goes rustic. Keep the wood calendar itself neutral and the formula survives any swap.
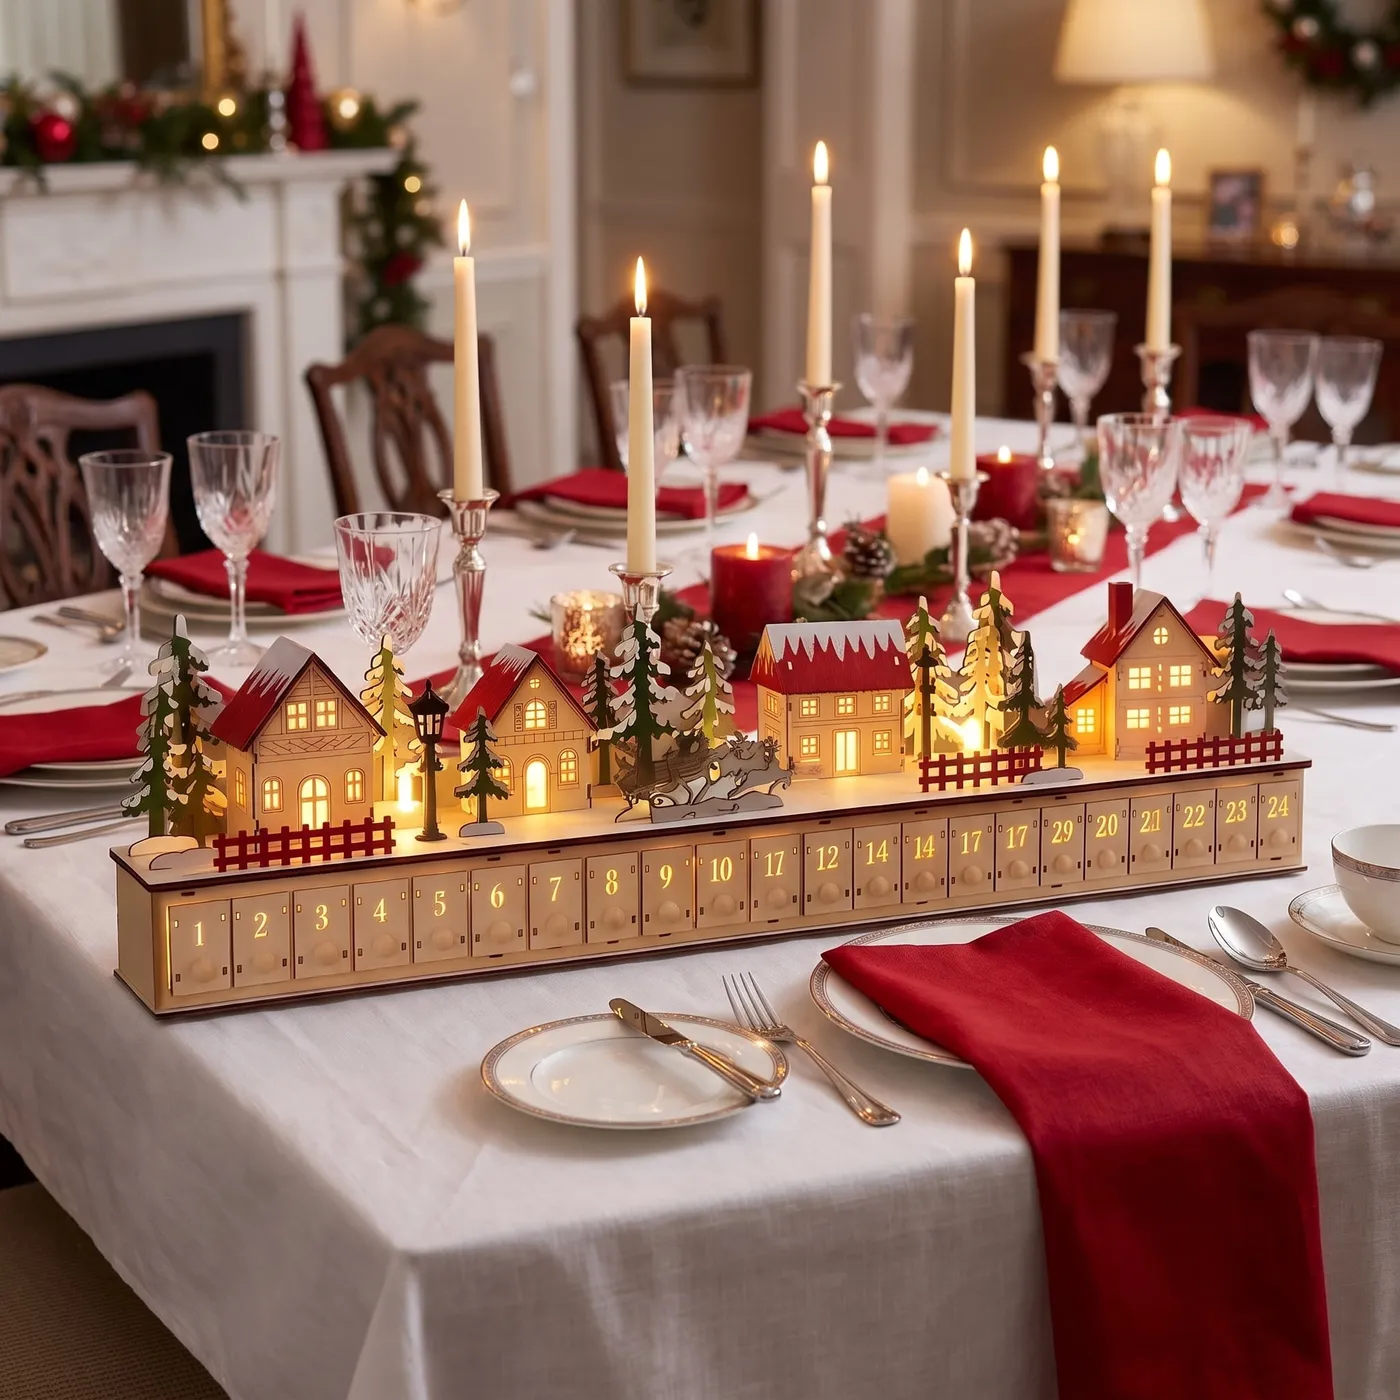
- Wooden village calendar with 24 numbered drawers: $70–$160
- Warm micro string lights and batteries: $10–$25
- White tablecloth, red runner, napkins: $30–$90
- Crystal or glass stemware, set of four: $20–$60
- Taper candles and holders: $8–$20
3. Kraft Paper House Boxes Clipped To A Paneled Wall
- Score and fold 24 house boxes from 200gsm kraft card — a bone folder keeps the corners sharp.
- Cut window shapes with a craft knife, then back a few with vellum so light glows through.
- Stamp numbers 1 to 24, punch two holes in each roof, and thread red-and-white baker’s twine.
- Pin the twine runs to the paneled wall with small brads, then clip each house on with a mini wooden clothespin.
- Wind warm string lights along the top and tuck in evergreen sprigs and dried orange slices.
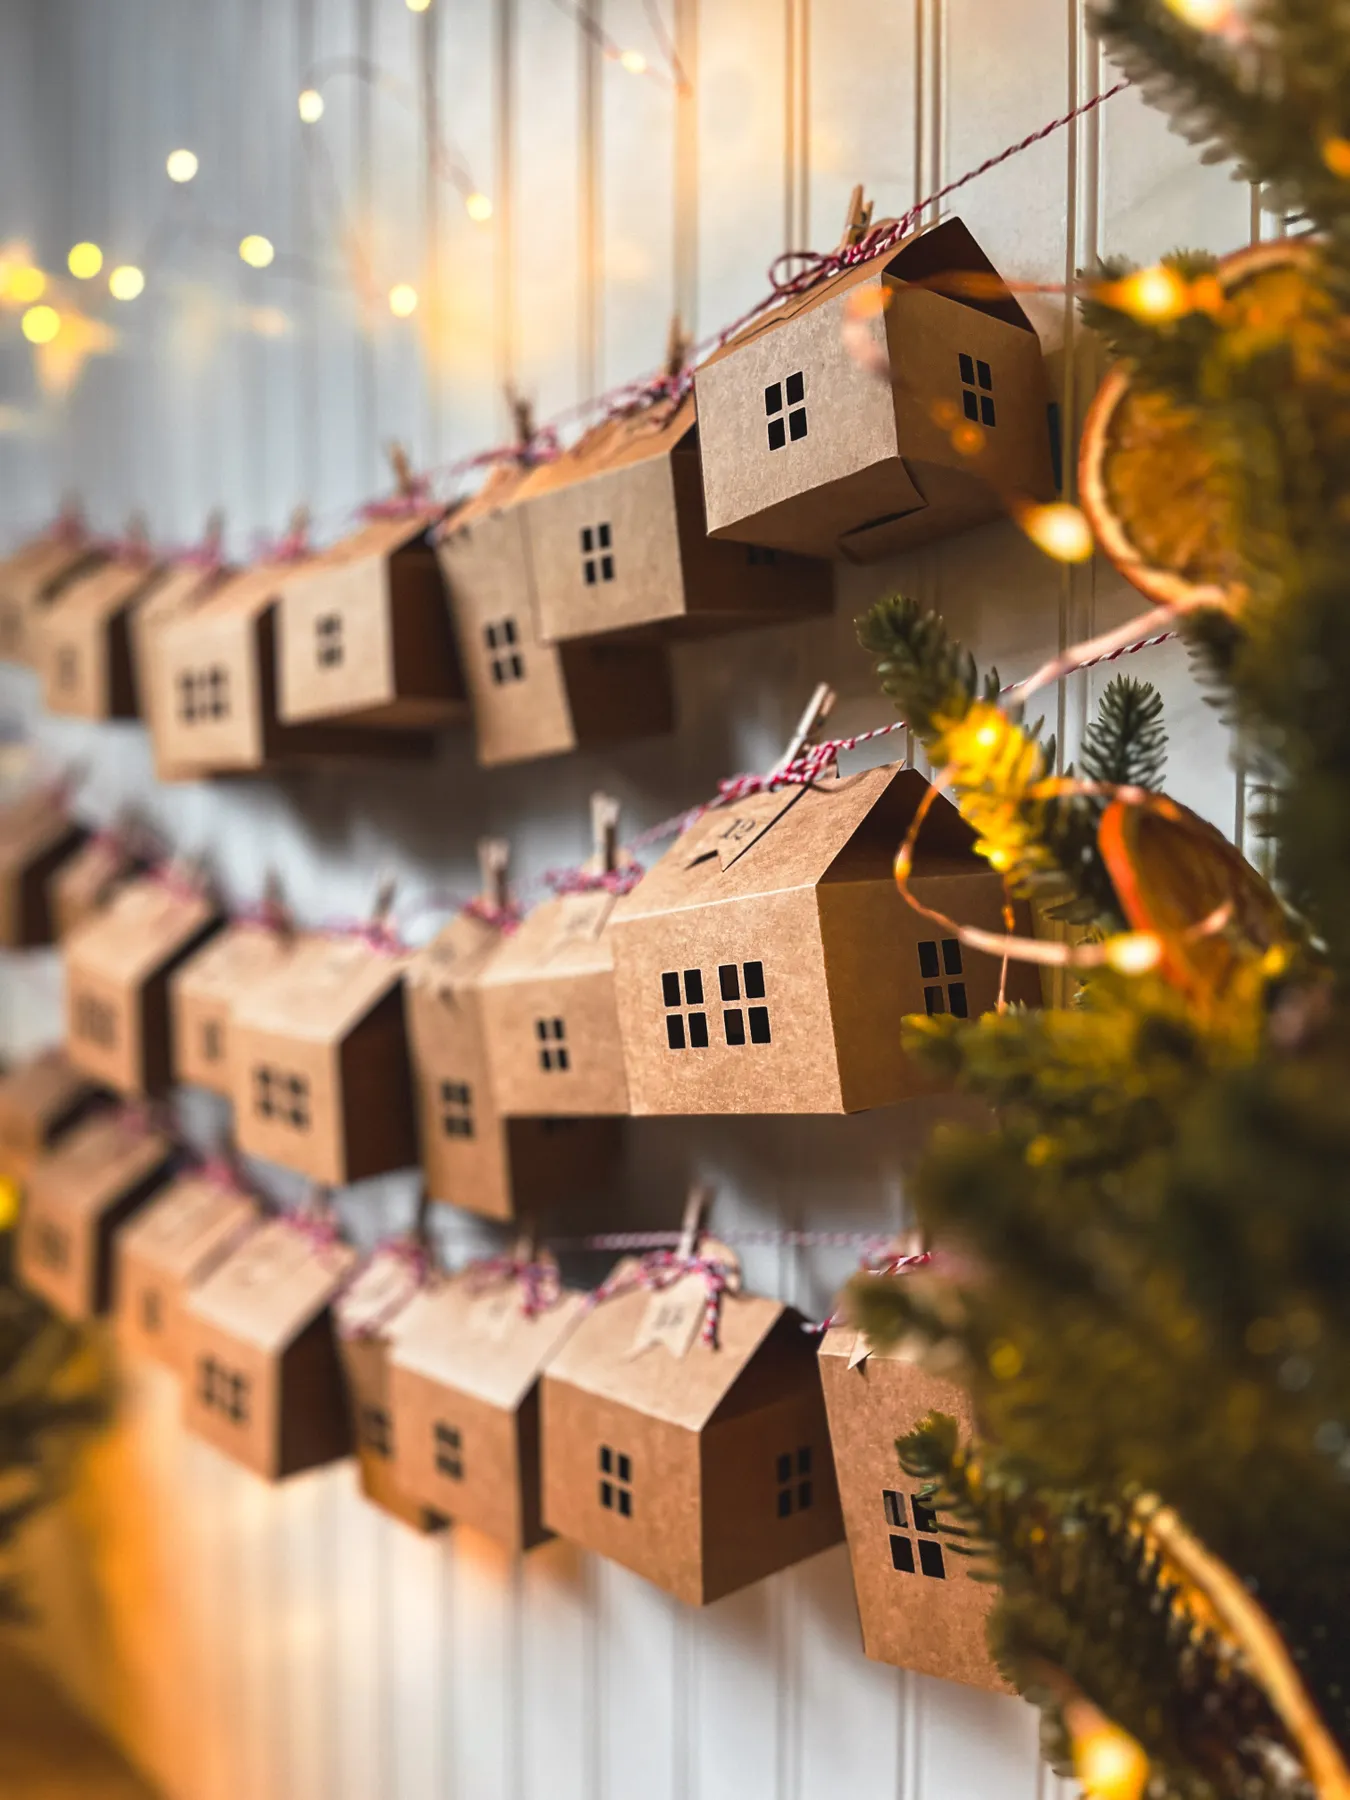
About three hours and $30–$45 in supplies for the whole set.
Paper houses are lighter than they look and emptier than they look, which is the trap. A bag of truffles in a card box will pull the roof line crooked by day four. Put heavy treats in the bottom three rows, skip the wall above a radiator, and never hang this where a door swings — creased kraft never recovers.
4. 24 White Drawers With Holly Garland On A Deep Red Wall
The deep red wall is the entire trick. Those creamy drawers would be perfectly nice on white and completely forgettable; against oxblood they read like a shop display. If you can’t commit to a whole wall, paint a single 40-inch panel behind the calendar and stop there — same punch, one afternoon. Compare with Idea #9, which uses the same house shape and an entirely different mood.
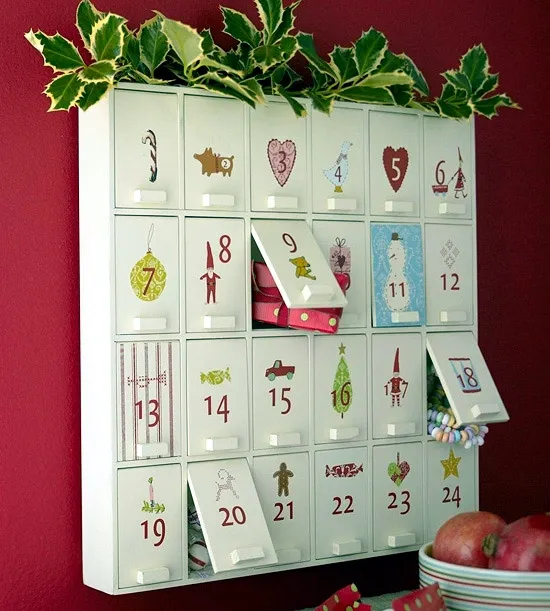
This look costs less than you’d think. Thrift a wooden typesetter’s drawer or a jewelry organizer for $8–$15, fill it with small white paper boxes, and print the festive illustrations as a sticker sheet at a copy shop. You land near $40 instead of the $180 a finished version runs — same red wall, same holly, same daily delight.
5. Red And Natural Wood Drawers Under A Miniature Village
This one wants a surface at least 40 inches wide and 14 inches deep — a console, a low sideboard, the top of an out-of-use radiator cover. Leave 6 inches of clear wall on each side so the village doesn’t visually collide with a lamp or a frame. In a narrow entry, skip it entirely and look at Idea #26 instead.
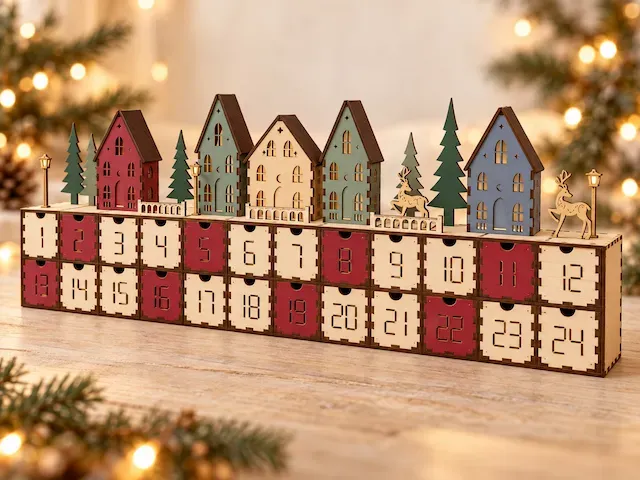
Alternate the red and natural drawers in a staggered rhythm rather than a checkerboard — the eye reads it as texture instead of a grid. Then check three measurements before you commit:
- Calendar width plus 12 inches of wall clearance
- Drawer depth against your console depth
- Top of the tallest house against your standing eye level
6. Dark Stained Wood Shelves With Wrapped Gifts And Tiny Houses
Wrapped gifts get handled twice a day for three weeks, so paper tears and tape gives up. Buy one extra roll of the same wrap and keep it nearby with a glue stick; you will use both. The stained board itself only needs a dry microfibre cloth — polish blooms white in the grain and makes the whole thing look dusty.
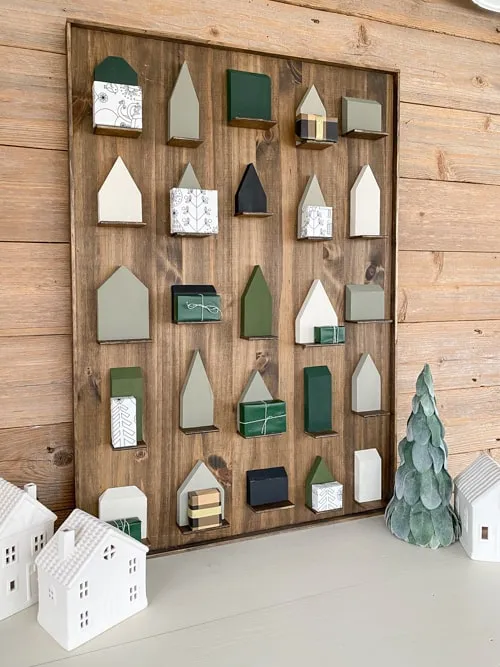
The color story here is doing something specific: sage and forest green packages against dark stained wood feel like a walk through the woods, not a sprint down a Christmas aisle. Repeating one shape — the little house cutout — across alternating shelves keeps your eye moving left to right without ever becoming a pattern.
7. Kraft Bags Hung In A Christmas Tree Shape On Rope
- Cut a dowel to width, tie two lengths of jute rope at each end, and check it with a level.
- Lay all 24 kraft bags on the floor in a triangle: six on the bottom row, counting down to one at the top.
- Punch two holes in each bag’s top edge and string them onto the rope with a knot between each.
- Tuck fresh evergreen sprigs between bags and tag the numbers with black-and-white labels.
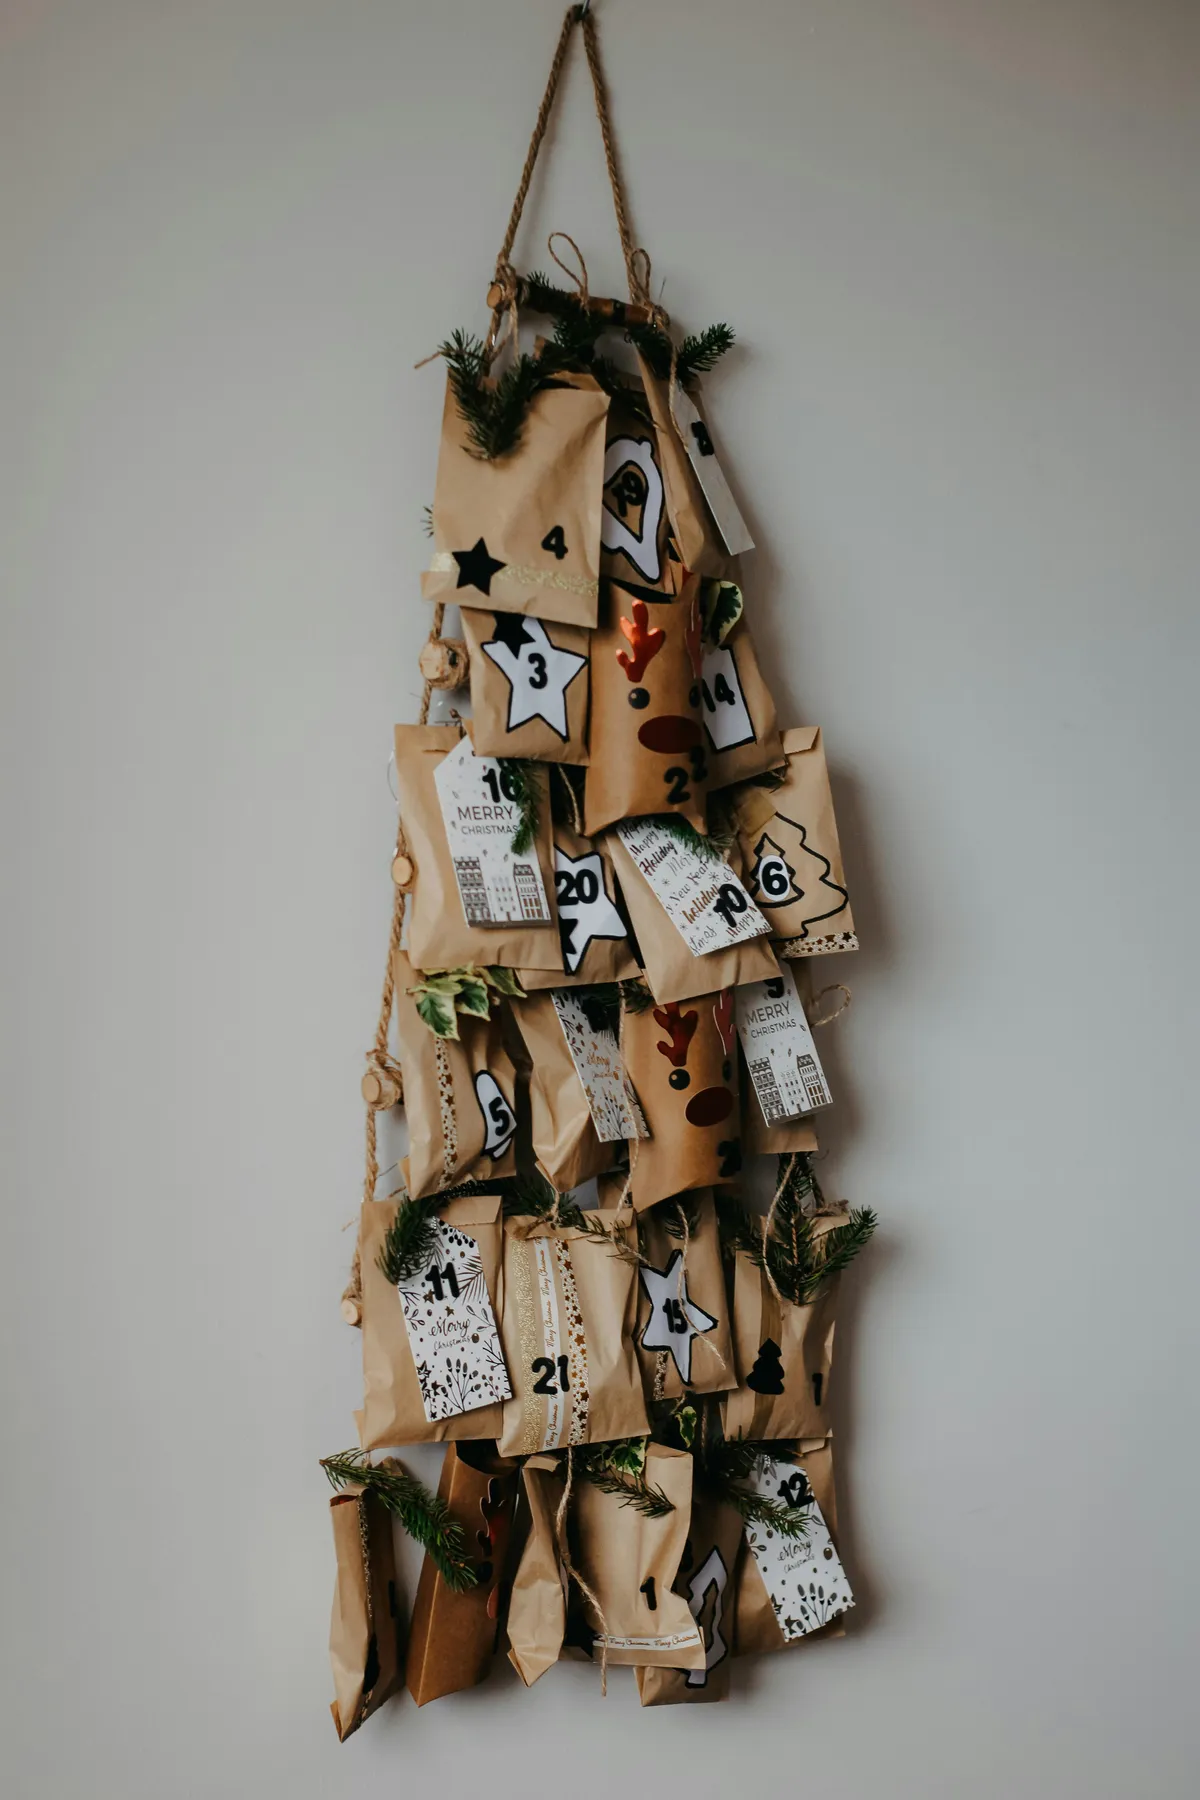
Roughly 90 minutes and $25 in supplies.
Space the bags 3 inches apart, not 2 — kraft paper needs air or the tree shape collapses into a brown blob. Hang the rig so the bottom row sits 42 inches off the floor: high enough to stay out of a toddler’s reach, low enough that adults don’t have to crouch.
8. A Tiered Pastel Village Dusted With Faux Snow
It’s the faux snow. Without it you have six mismatched houses in five colors having a polite disagreement; with a dusting across every roof and tier, they become one village. Sieve powdered snow over the assembled calendar from 12 inches up, and resist brushing off the excess — the uneven bits are what sell it.
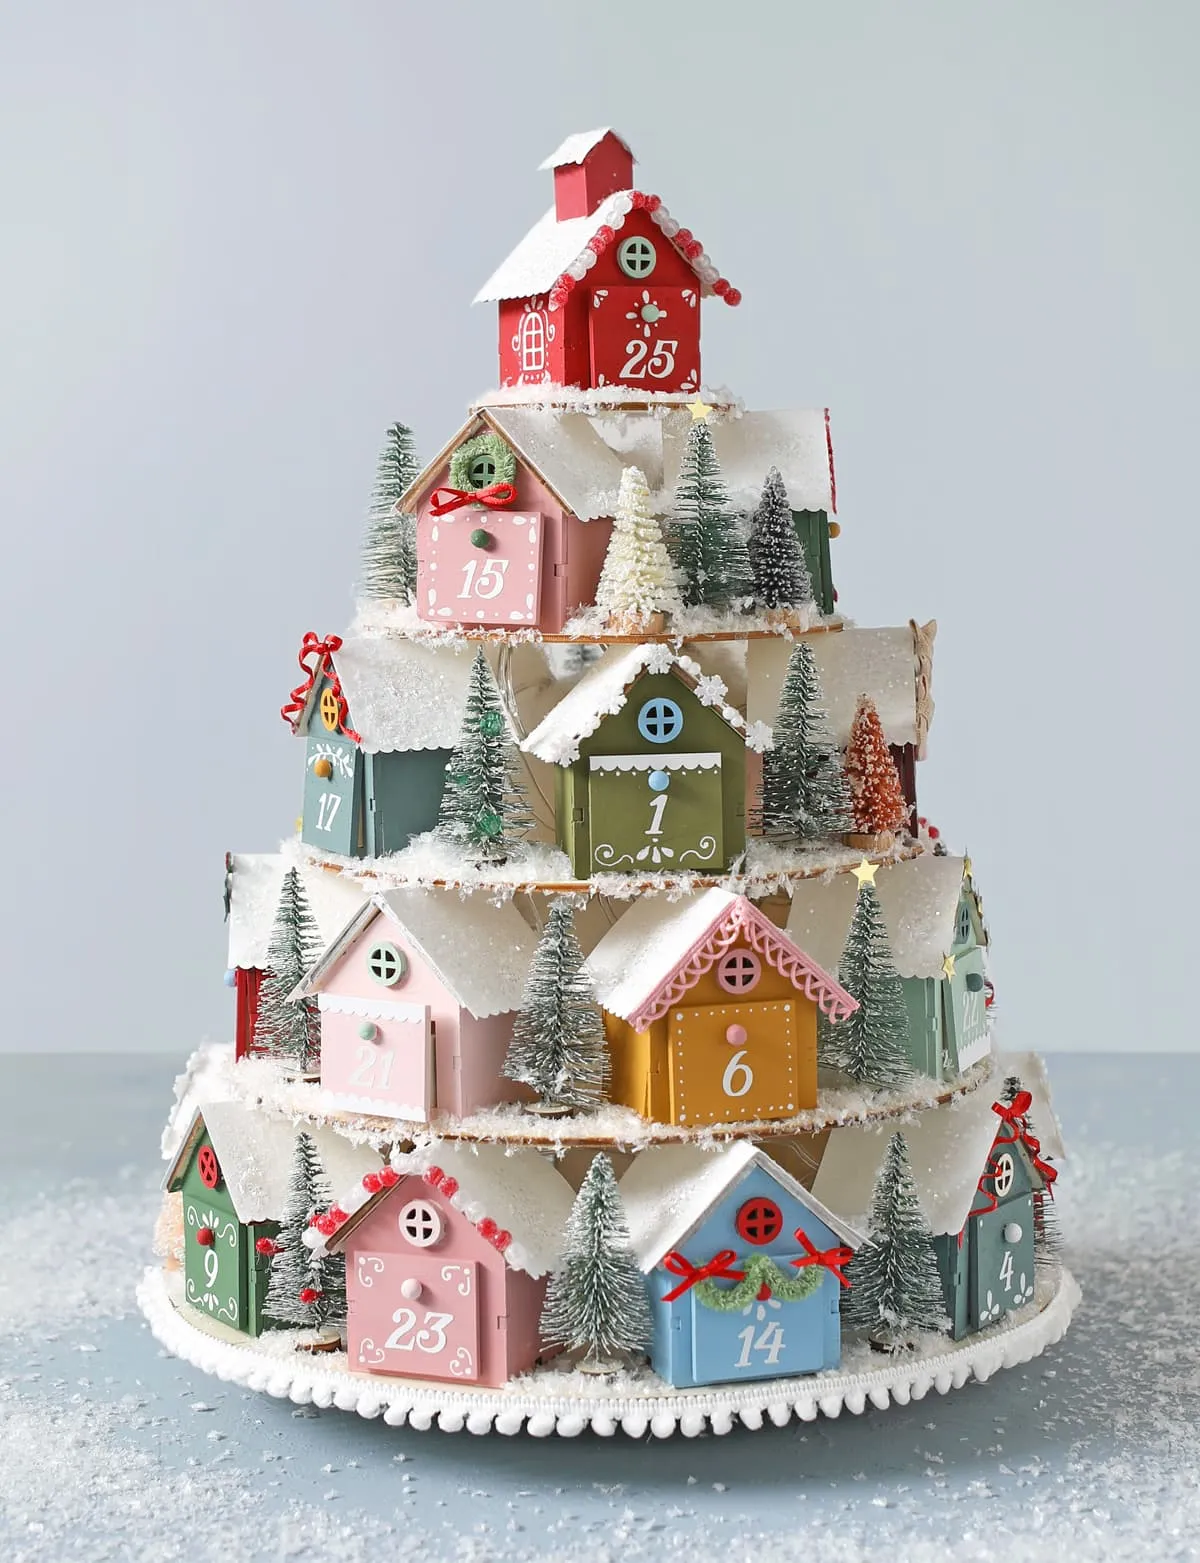
The palette holds at roughly 50 percent white, 30 percent pastel (pale pink, sage, mustard), 15 percent red from ribbons and tiny wreaths, 5 percent snow. Swap the pastels for jewel tones and you get a richer, more traditional village; keep the white base and red accents identical and it still reads as one family.
9. White House Calendar With A Chimney On A Rustic Table
White painted drawers show every fingerprint, and small hands will find all 24 of them daily. A satin finish wipes clean; matte does not. Check the knobs before December too — little wooden ones loosen after a few dozen pulls, and a dot of wood glue in November saves you hunting for one under the sideboard in week three.
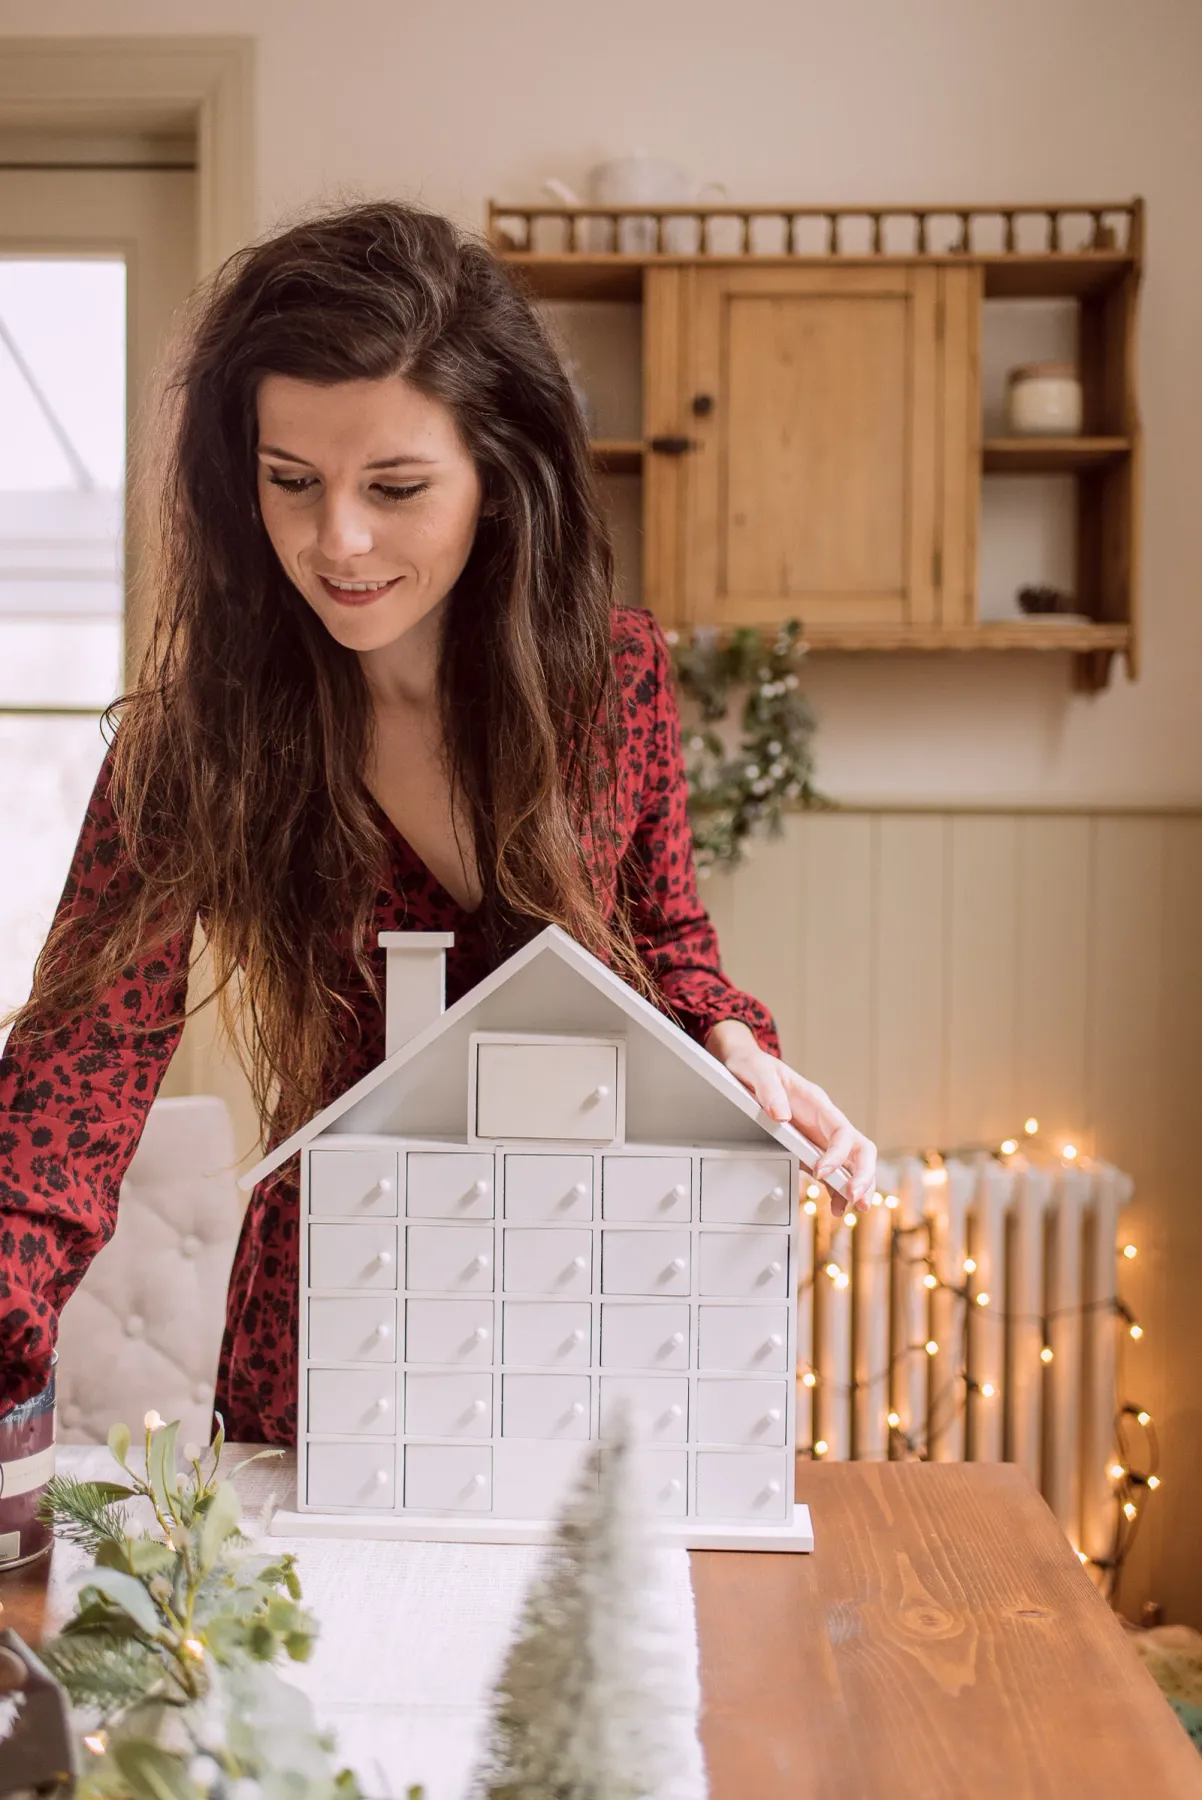
- House-shaped calendar with 24 drawers: $60–$140
- Textured white table runner: $15–$40
- Warm LED string lights: $8–$20
- Faux greenery with white berries: $10–$25
- Paint or touch-up pen for the drawers: $6–$12
10. Bright Felt Ornaments Numbered And Hung In The Pine
Contrast is the whole game with felt numbers. Stitch each patch in a color that appears nowhere else on that ornament — dark navy on hot pink, cream on purple — so the digit pops from six feet away. Two strands of silver thread and a whip stitch around the edge take four minutes per ornament and make them look shop-bought.
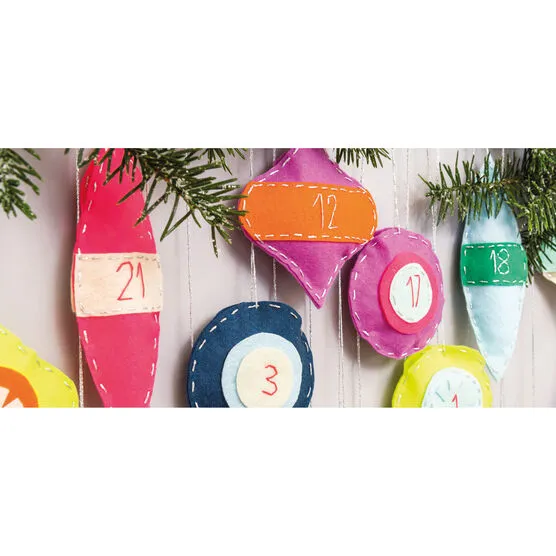
Felt squares run about 50 cents each at any craft store, and one pack of embroidery floss covers all 24 numbers. Add a spool of silver thread and you’re at roughly $22 for the entire calendar. Set that against $90-plus for a finished felt set and a movie-and-stitching evening starts sounding like a bargain.
11. A Single Bare Branch Holding Brown Paper Packages
A branch like this wants 36 to 48 inches of clear wall — shorter and the packages bunch, longer and it starts to read as driftwood. Center it at 66 inches so the lowest package hangs at eye level, and keep 18 inches clear below so nothing gets knocked by a shoulder. Tiny entryways do better with Idea #24, which needs about a foot of space.
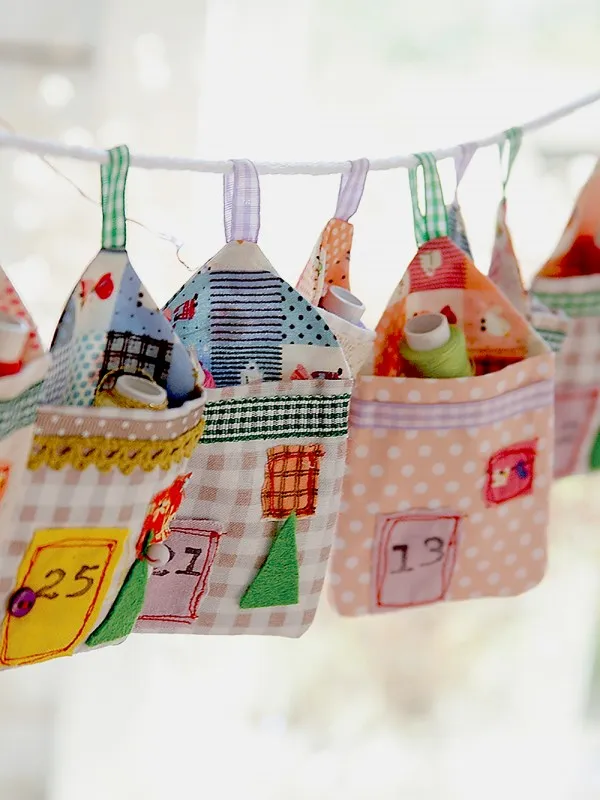
The bare branch is the point. Swap it for a garland, a ladder or a hoop and you’ve built a perfectly nice calendar with none of the tension. What makes this one work is the emptiness — brown paper and white string against nothing but wall. Resist adding ornaments. The restraint is the decoration.
12. Gingerbread House Calendar With Candy Cane Trim
- Paint the house body a warm gingerbread brown, two coats, and let it cure overnight.
- Mask diagonal stripes along the roofline with painter’s tape and brush on red and white candy cane trim.
- Dab glitter glue dots across the roof in pink, green and blue, working in sections so they don’t smear.
- Cut 24 doors and windows from card, number them, and attach with tiny red wooden knobs.
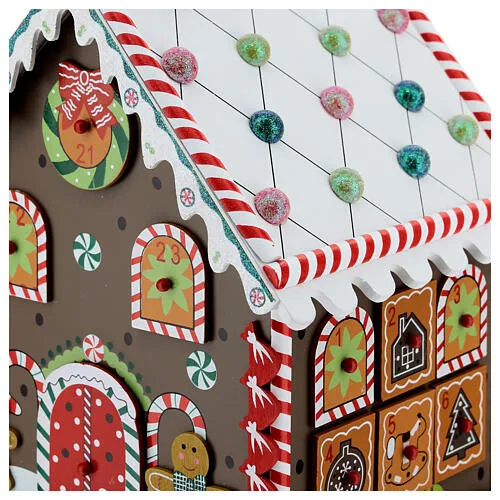
Two evenings, about $35 in paint and trim.
Gingerbread anything has been climbing since the candy-colored Christmas wave of 2024, and by 2026 the craft world fully embraced the slightly-too-much version: glitter dots, candy cane borders, zero restraint. It photographs beautifully and it’s genuinely fun to make with kids. Staying power? The brown-and-white base is classic; the glitter is what you’ll repaint in three years.
13. Light Green Boxes Stacked In A Pyramid With Stickers
Twenty-four small kraft boxes cost about $12 at a dollar store, a can of sage spray paint runs $8, printable number stickers $5. That’s $25 for a calendar that looks like the $120 boutique version, because the trick isn’t the boxes — it’s the single color and the tidy circular labels. Keep sticker size identical across all 24 and nobody looks closer.
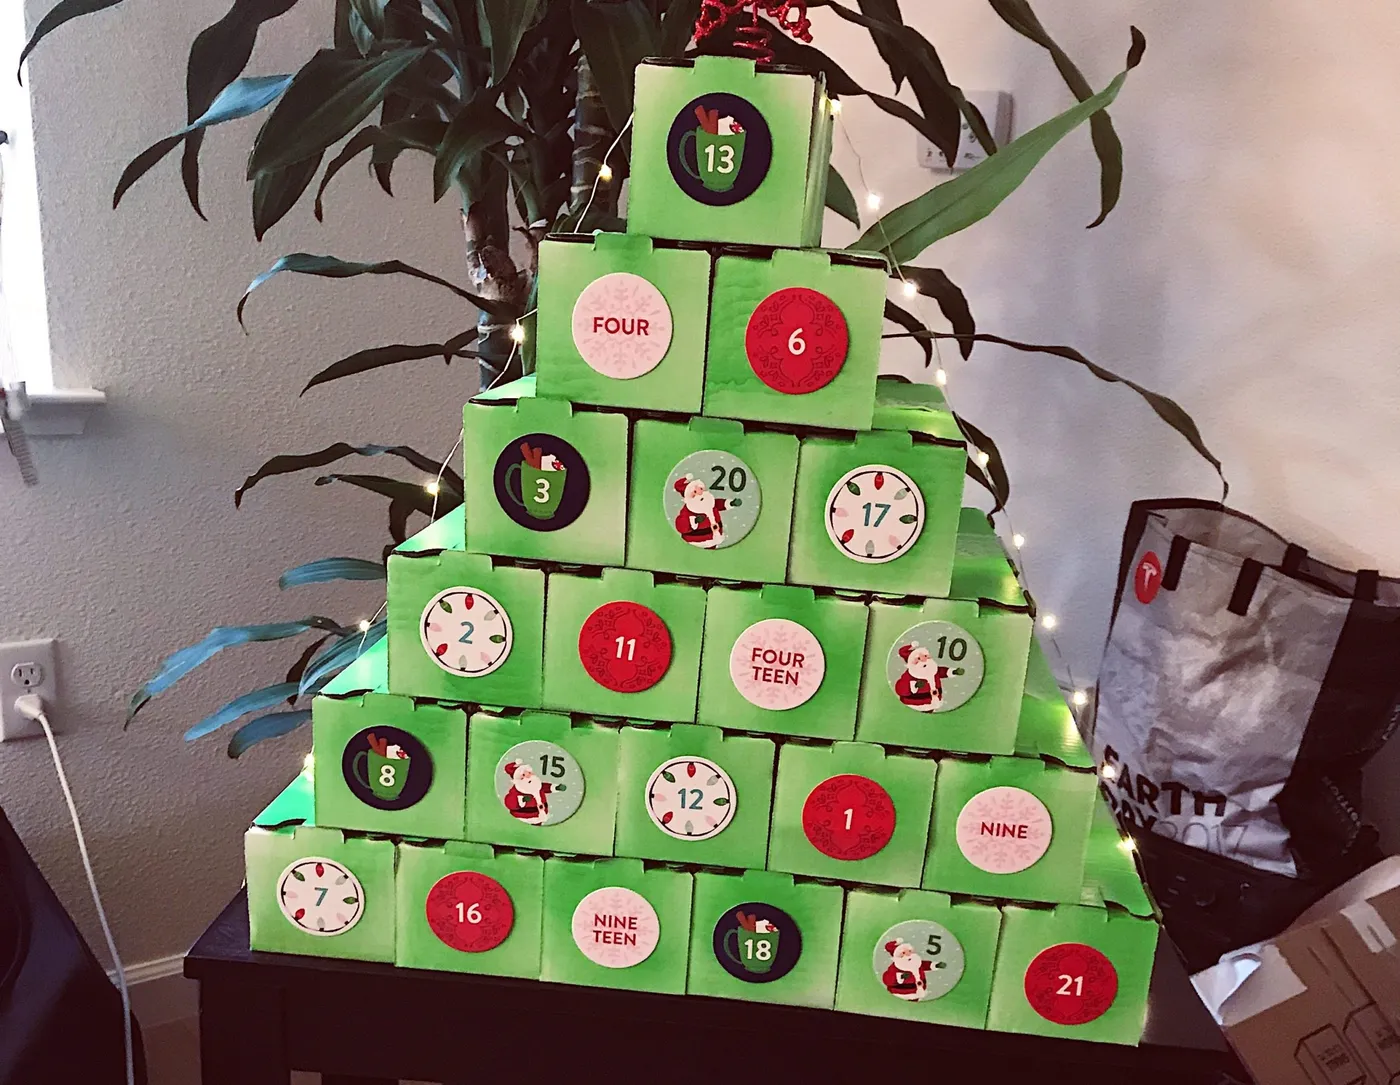
Build the pyramid against a wall and tape each row to the one below with double-sided tape, or it slumps sideways by December 6th. Use 3- to 4-inch boxes so the stack stays under 30 inches tall, and weave the string lights from the bottom up so the battery pack hides behind the plant.
14. 24 Illustrated Knitted Doors On A White Box
Twenty-four doors, twenty-four patterns, one white box — that’s the formula. The illustrated knit textures read as warmth without a single yard of wool, and the shared white frame stops all that color from turning into noise. It’s the same principle as a patchwork quilt: wild inside, disciplined at the edges.
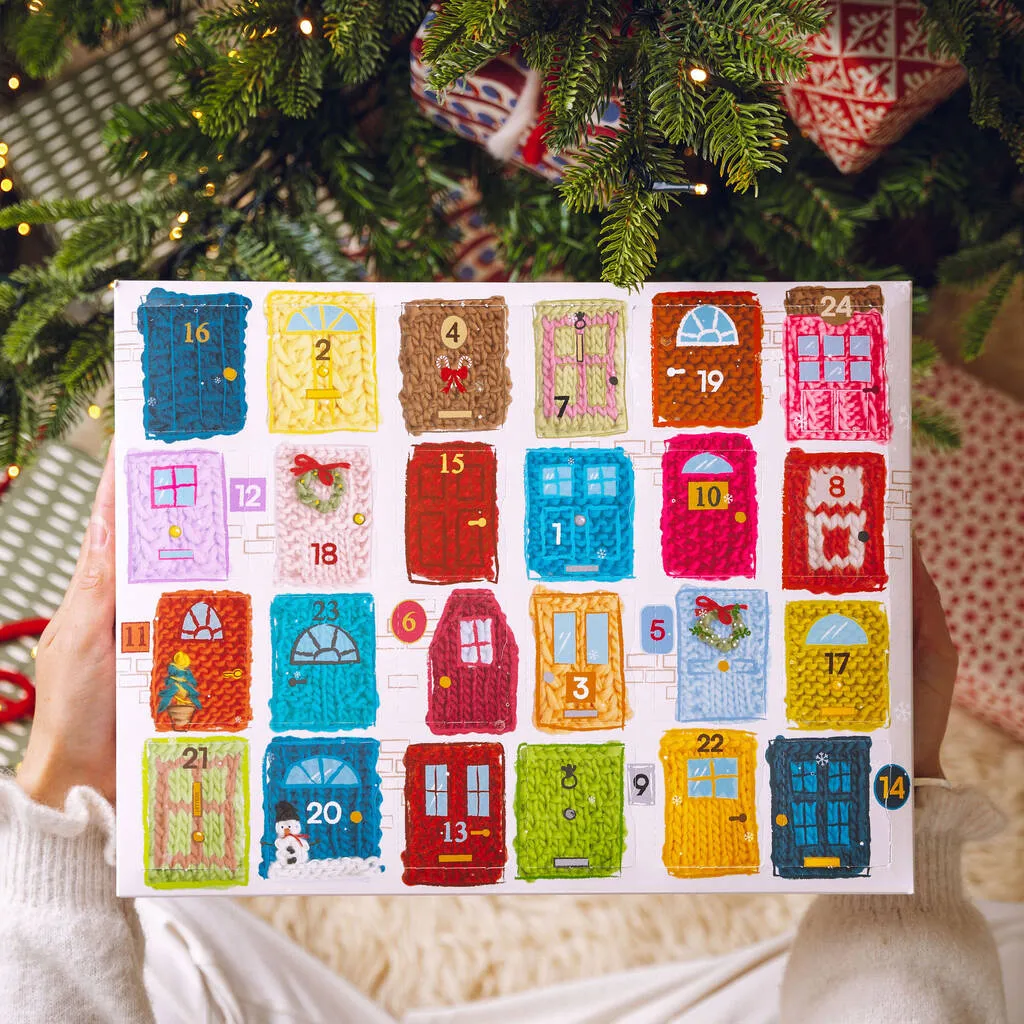
Cardboard doors crease the first time someone opens them impatiently, and creased card never lies flat again. Open along the hinge line with one finger, not a thumbnail. Store it flat rather than standing, and keep it out of a damp garage — one humid summer and the whole box goes soft and warped.
15. Gold-Numbered Wooden Ornaments On A Marble Tray
The tray works on roughly 70 percent neutral (white marble, beige rug, pale wood), 20 percent pastel, 10 percent gold. Change the pastels to jewel tones and the same ornaments read richer and more grown-up; swap the marble for a dark wood board and the gold numbers suddenly look antique. Nothing else has to change.
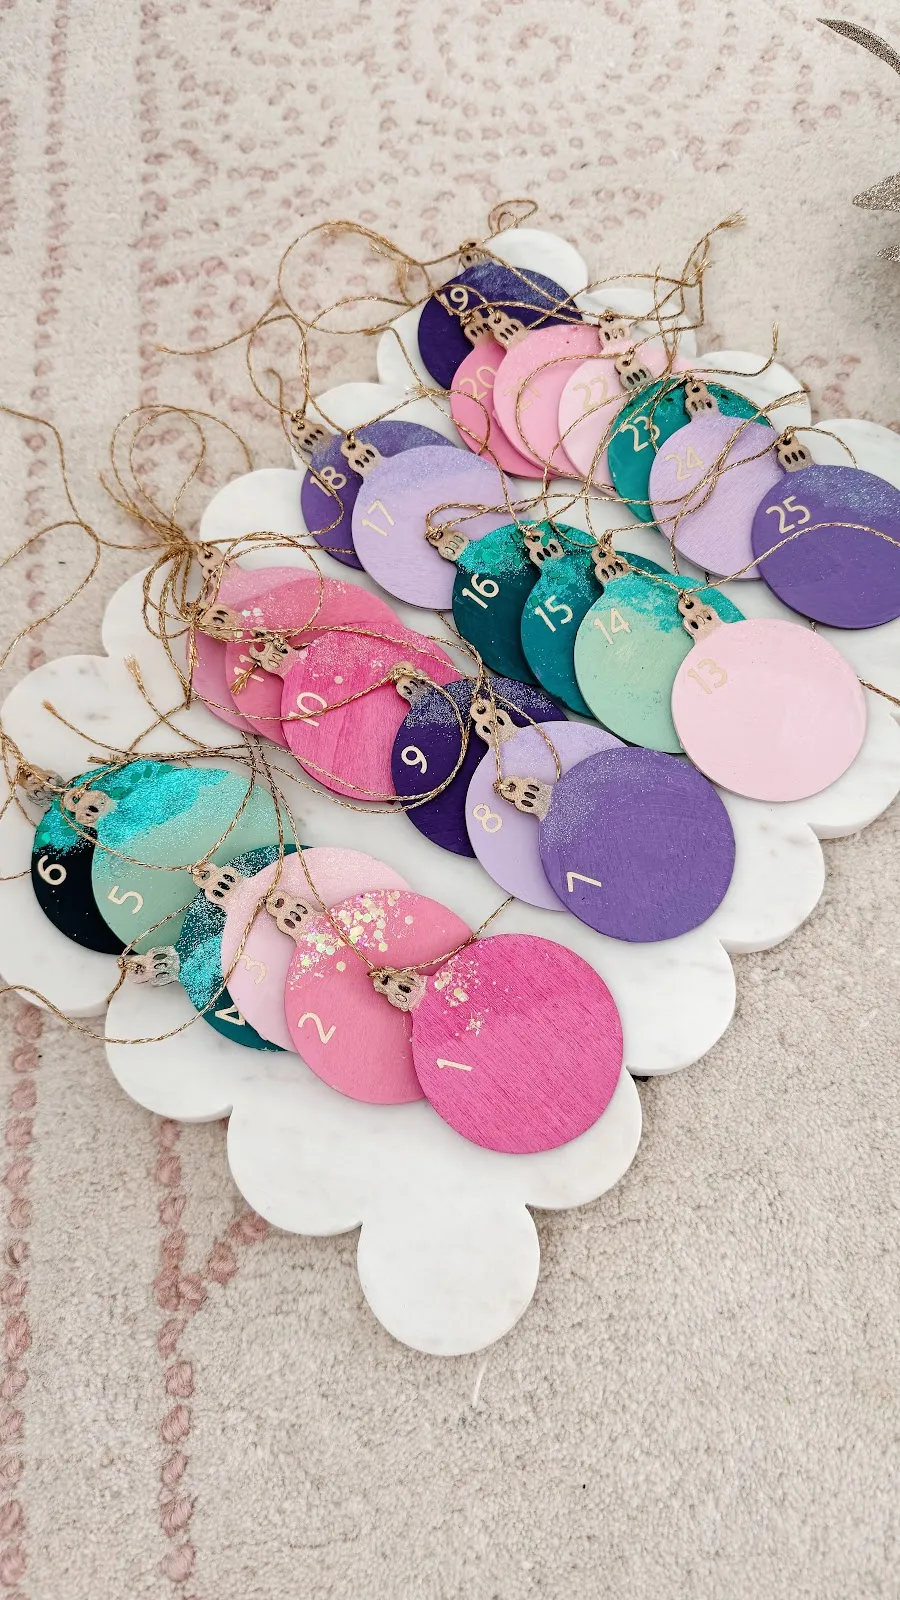
Before you commit, run through this:
- Count your ornaments — 25 if you’re going through Christmas Day
- Check your tray’s lip height against ornament thickness
- Decide where it lives: coffee table, console, or shelf
- Confirm twine loops are long enough to hang, short enough to stack
16. Gingham And Ornate Paper Doors With Brass Key Latches
- Cut card frames a half inch larger than each box face, then cut the center out to create a paper door frame.
- Glue gingham and ornate prints onto the frames, alternating patterns so no two neighbors match.
- Number each door with rub-on transfers, pressing firmly so the edges don’t lift.
- Attach a tiny brass key latch with a pin vise and a 1/16-inch bit.
- Fill, close, and leave the last three doors empty for the good stuff.
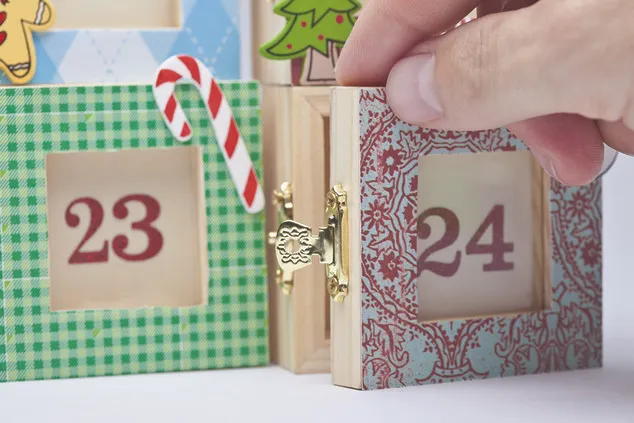
About 20 minutes per door, $18 in paper and hardware.
Miniature brass latches are adorable and they are also the first thing to break. Drill slowly, reinforce the back of the card with a scrap of the same paper, and keep spares. With small kids around, swap the latches for magnetic dots — same charm, no broken hardware, no tiny screws on the floor.
17. Chocolates Arranged Into A Christmas Tree Flat Lay
It’s the little gold star at the top. Without it you have a very pretty pile of chocolate in a triangle; with it, the shape snaps into a tree and becomes a centerpiece you’d actually put on a table. One $3 star doing all that work is the best deal in this entire article.

Edible advent calendars had a moment in 2025 and haven’t cooled — partly because food styling now rules Pinterest, partly because nobody wants a 25th object in the house. Arranging chocolates into a tree gives you the photo, the ritual and the snack. It lasts about four days in a household with teenagers.
18. Layered Reindeer And Snowflake Wooden Topper
Layering creates shadow, and shadow creates depth on a flat wall. The white snowflakes punch holes in the silhouette so the reindeer don’t read as one brown block, and the jagged mountain edge gives the base a horizon line. Three cut layers, an eighth of an inch apart, and it looks hand-carved.
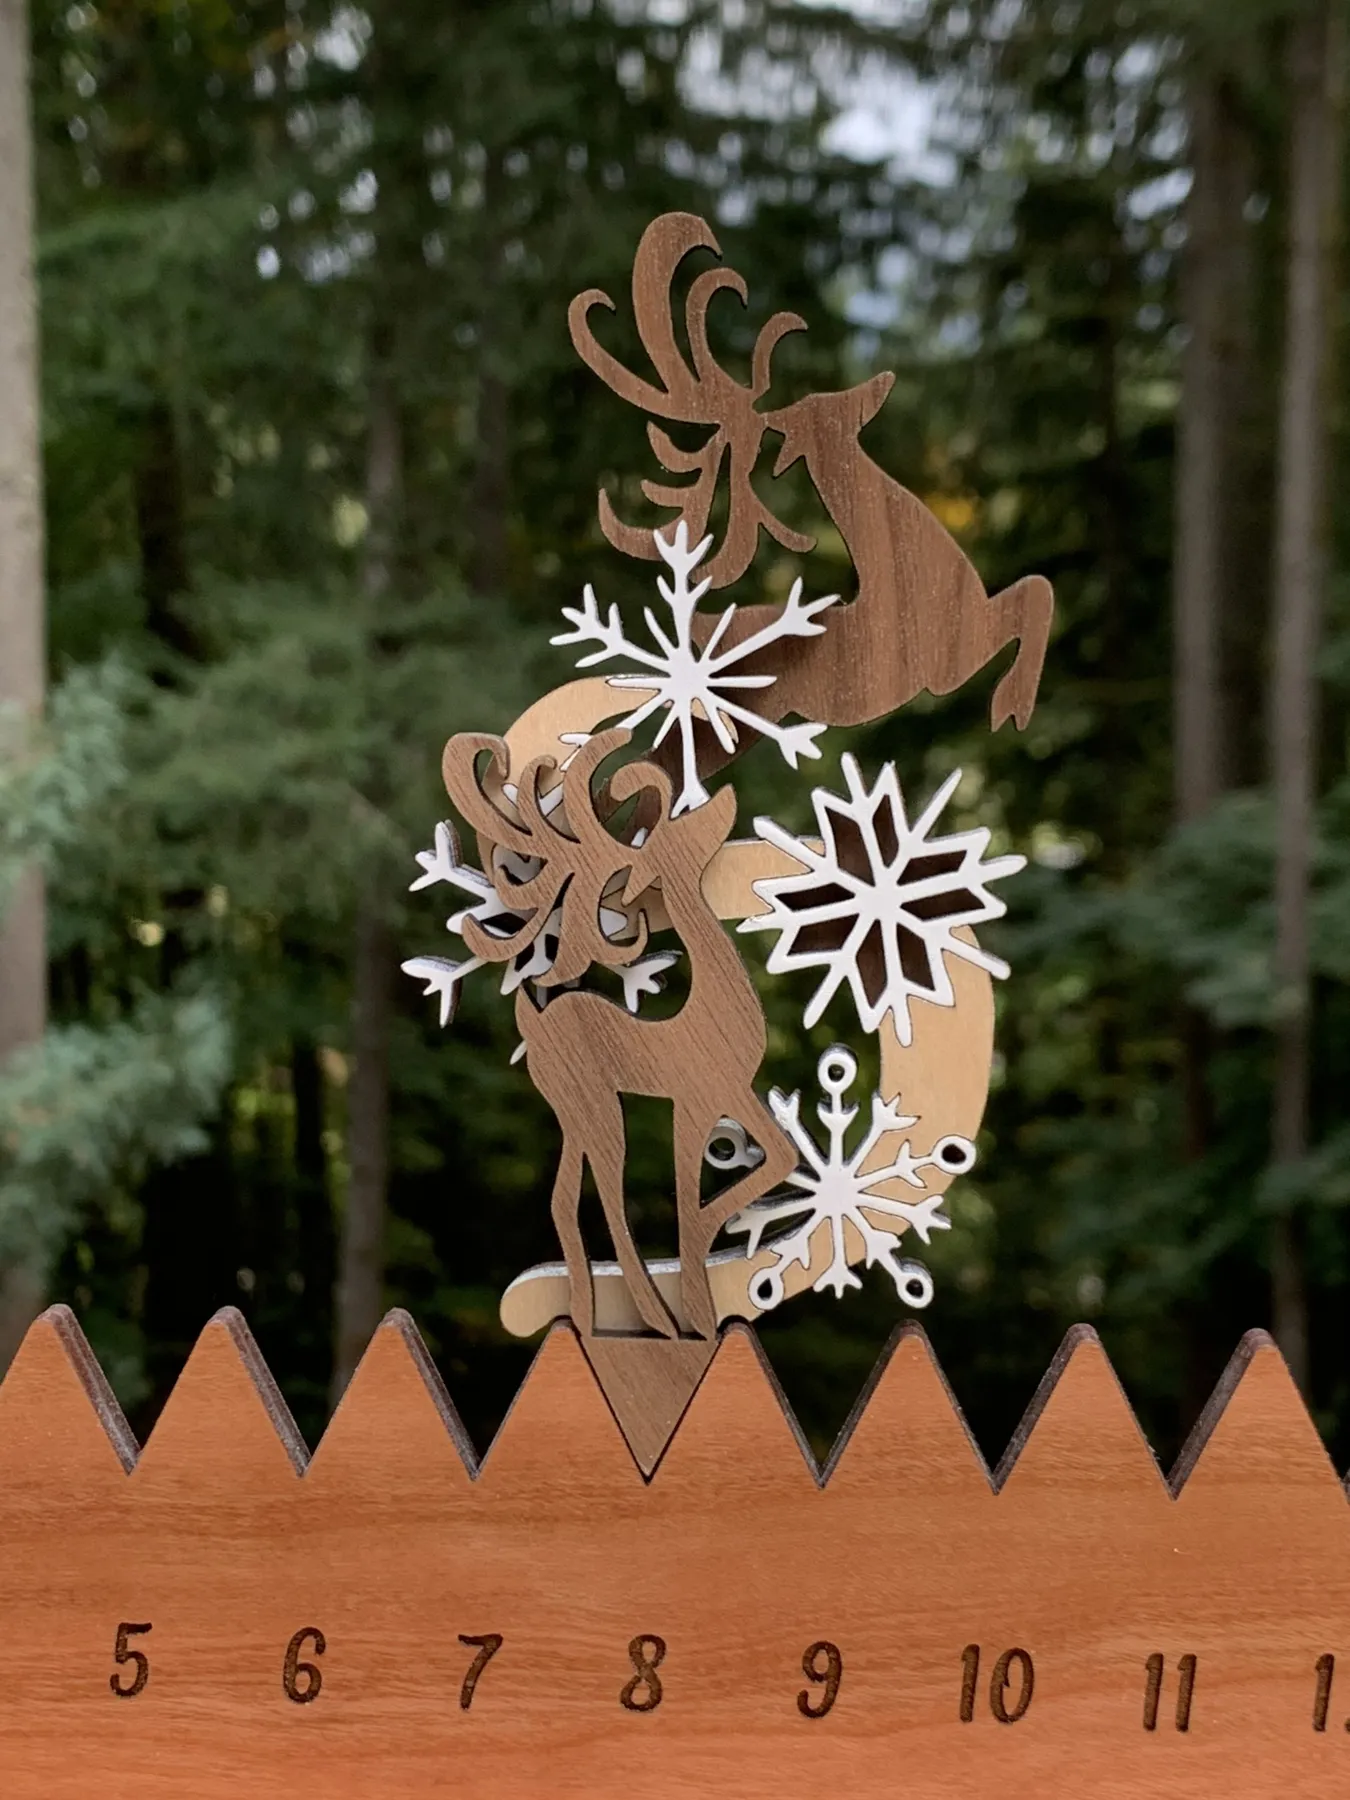
Keep every layer in the same wood family — light birch over medium walnut over white — or the stack starts to look like a craft bin. Three things worth checking:
- Sand every cut edge, because fuzz catches light
- Glue with wood glue, since hot glue fails in a warm room
- Test that engraved numbers read from five feet away
19. A Child Opening Door Number Nine On A Big Illustrated Calendar
A calendar big enough for a child to open needs 48 to 60 inches of wall, with doors landing between 30 and 48 inches off the floor. Any higher and you’ve built a decoration, not an activity. Check what’s behind it, too — hanging a five-pound illustrated board on drywall with one nail is how December starts with a crash.
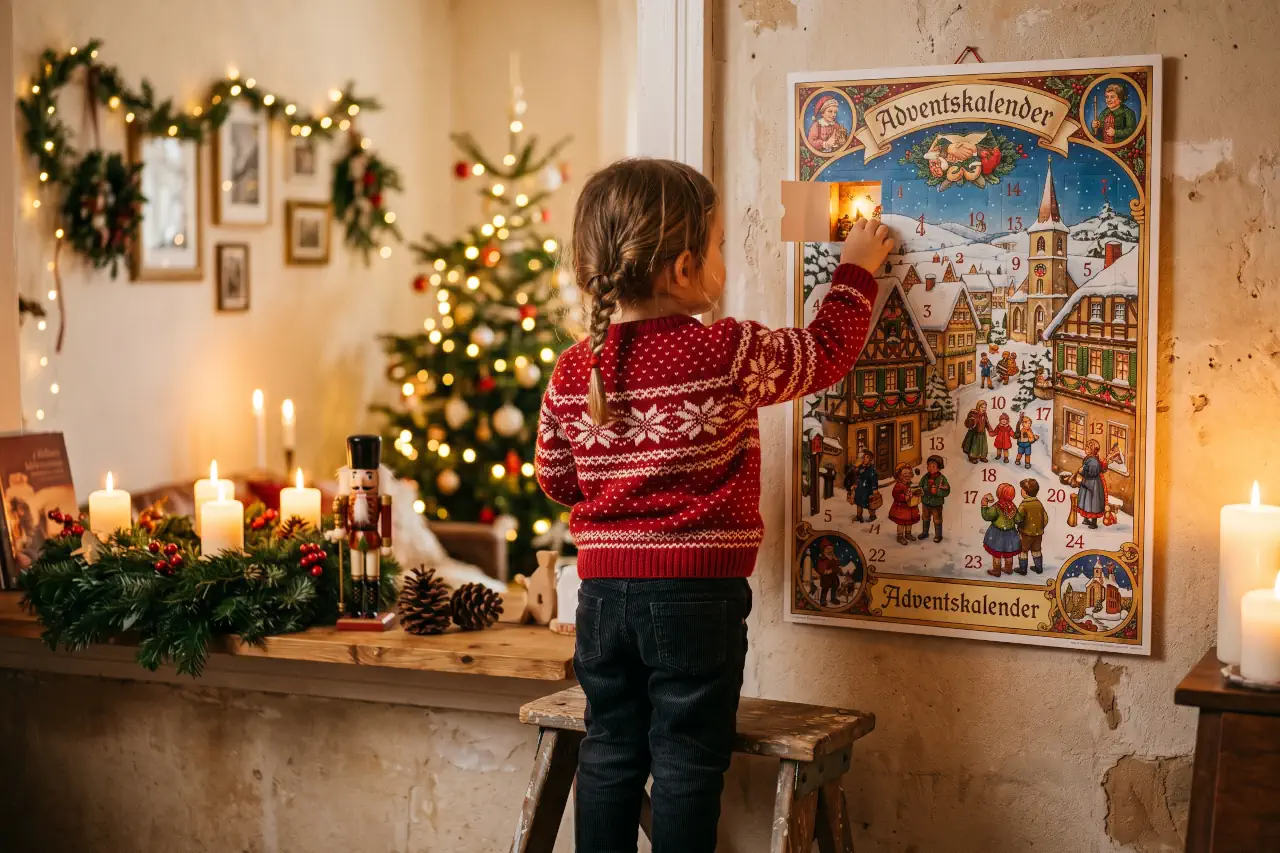
That stool is charming and it is also a tipping hazard. If your child needs to climb, anchor the calendar low enough that the top row is reachable standing, or keep a sturdy step stool with a wide base nearby. And skip real candles on the table below unless someone has eyes on them every minute.
20. Green Felt Tree With A White Mouse In A Pocket
- Cut two tree shapes from green wool felt and blanket-stitch around the edge, leaving the bottom open.
- Cut 24 pockets, 2 inches square, and pin them in rows before sewing — pinning first is the whole trick.
- Embroider numbers 1 to 24 in cream floss with a simple backstitch.
- Needle-felt a small white mouse and tuck it into pocket number 20.
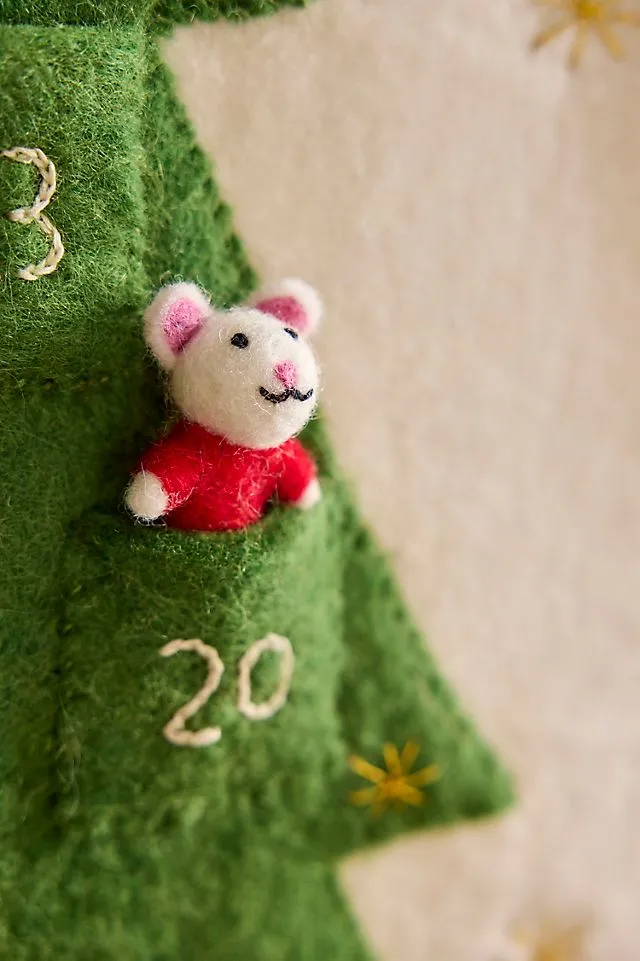
One long evening, about $20 in felt and floss.
Skip the kit. A half yard of wool-blend felt is $8, floss is $4, and stuffing comes out of an old pillow. Thrifted wool sweaters felt beautifully in a hot wash and give you a heavier, more expensive-looking fabric for $3 apiece — the same look the $70 handmade sellers charge for. See Idea #10 for the ornament version of this idea.
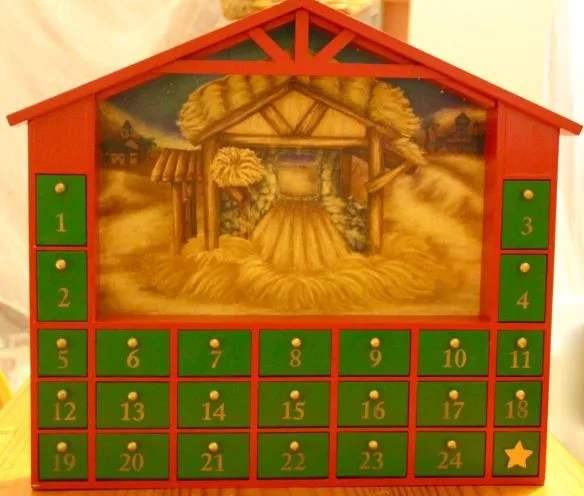
21. Nativity Cut-Out Glowing Above 24 White Knobs
- Light wood house calendar with 24 drawers: $70–$150
- Warm micro lights and batteries: $8–$18
- Pinecone and red berry garland: $15–$35
- Birch log candle holder and pillars: $12–$30
- White acrylic paint for the knobs: $5–$9
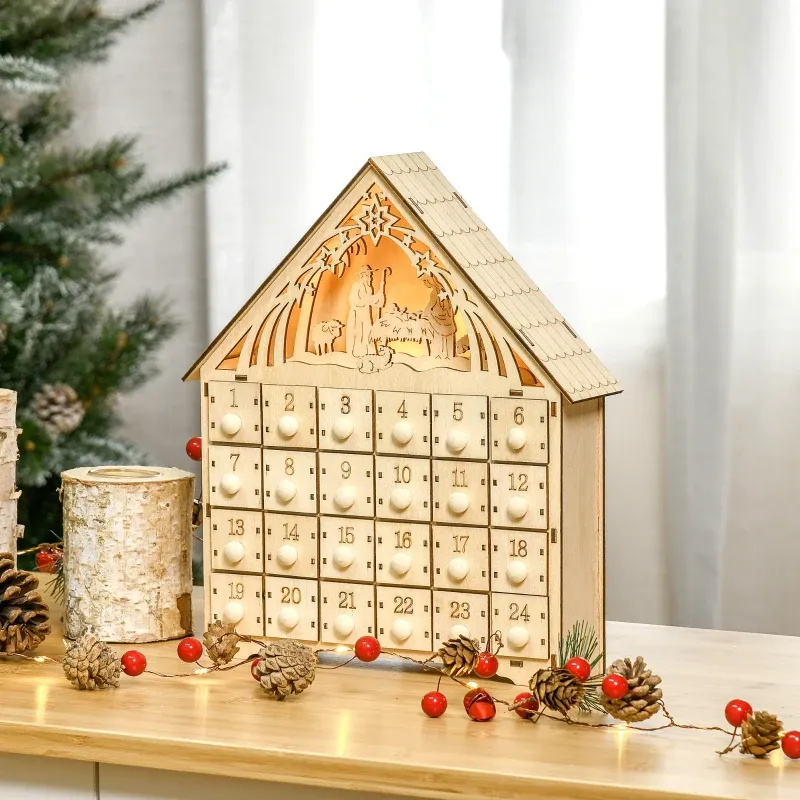
The glowing nativity cut-out in the gable is why this reads as an heirloom instead of a storage unit. Twenty-four drawers are useful; a lit scene above them is storytelling. If you’re building your own, spend your effort there — clean silhouette, warm backlight, one star — and keep the drawers plain.
22. Felt Tree And Red Pocket Panel On One Wooden Hook
Hang both pieces from a single wooden hook so the tree and the pocket panel read as one object instead of two crafts. Leave 4 to 6 inches between them, and line the panel’s top edge up with the tree’s lowest branch so your eye travels down without a jump. On a textured wall, use a screw-in hook rather than an adhesive one — felt is heavier than it looks.
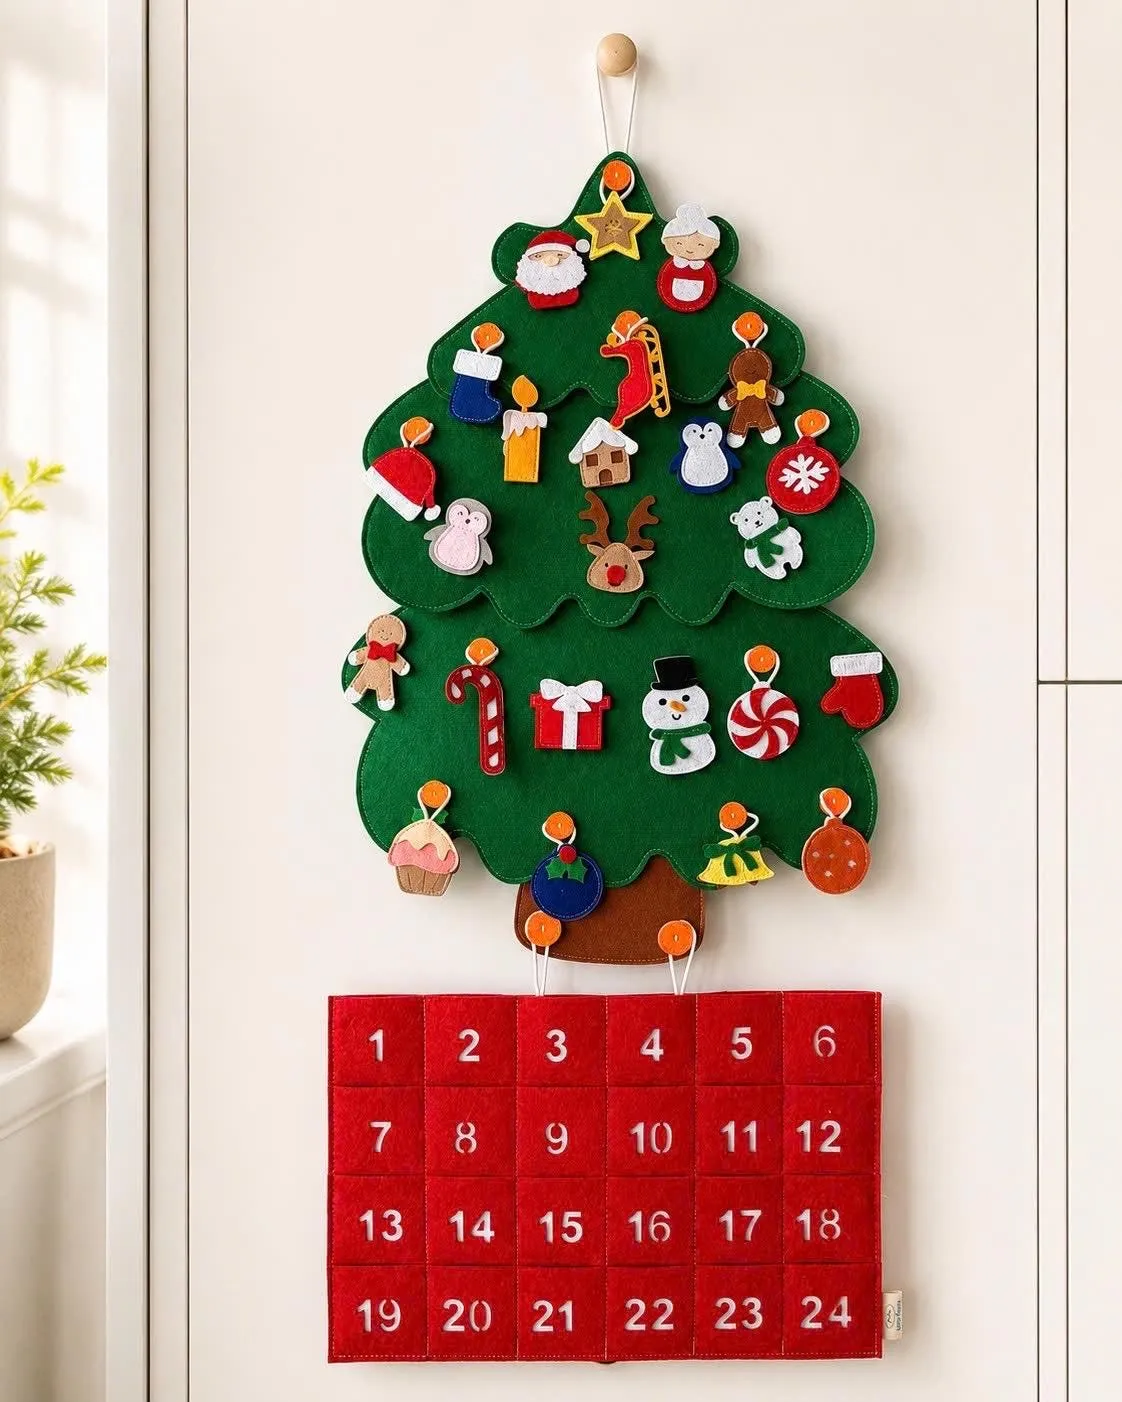
Roughly 55 percent green, 30 percent red, 10 percent white, 5 percent light wood. Trade the red pockets for cream and the whole thing goes calm and Scandi; trade the green tree for mustard felt and you get a retro, seventies-Christmas feel. One swap, an entirely different room.
23. Felt Gingerbread House With A Red Roof Pocket
The roofline does the work of a hanging rail — pockets climb the slope, so the calendar reads as architecture rather than a grid. Embroidered string lights across the walls add a second rhythm, and the mint candle introduces a color that appears nowhere else, which keeps all that red and white from turning into a candy shop.
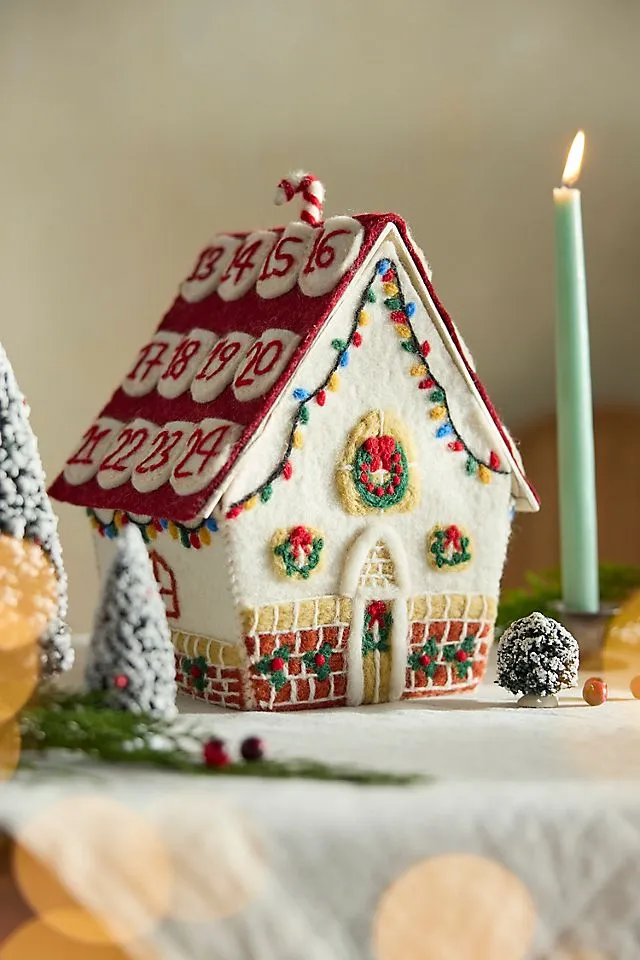
Felt pills where small hands grab, and an open flame beside wool is a genuinely bad long-term pairing. Keep the candle at least 8 inches from any felt edge, or switch to a battery taper that looks nearly identical. Three habits keep it looking new:
- De-pill with a fabric comb each January
- Hand-wash pockets cold if a candy melts
- Store it rolled, never folded
24. A Single Light Blue Paper House In The Pine Branches
Paper houses tucked into fresh greenery look magical for about nine days, then the needles drop and the paper drinks the moisture. Set the house on a small card plinth, keep it away from heat vents, and mist the branches — not the paper. Loose pine also means loose sap, so line the shelf underneath with a strip of parchment.
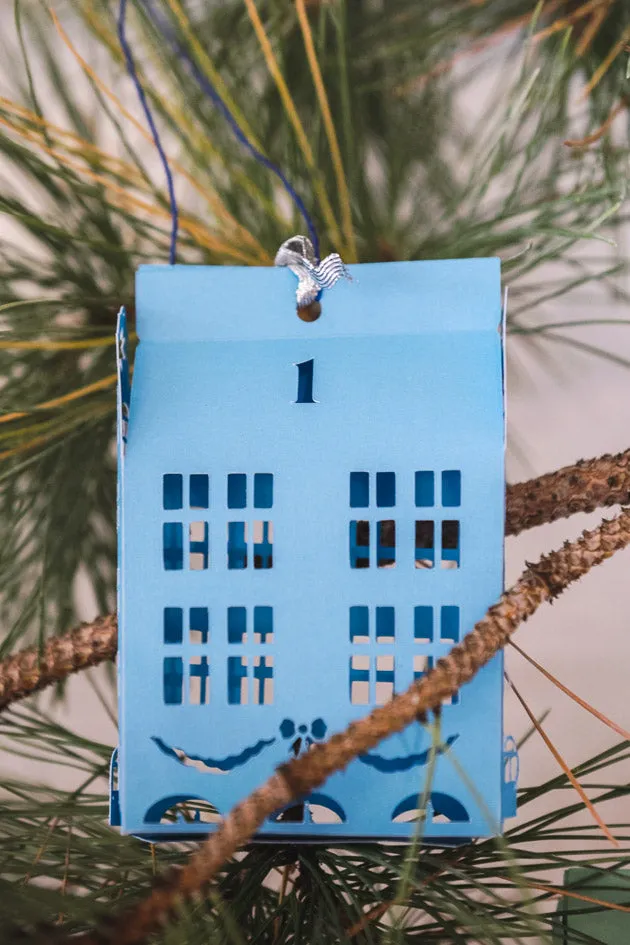
- Print the house template on 200gsm card and cut the outline with a craft knife.
- Punch the window shapes so the edges stay clean.
- Score the fold lines, glue the tabs, and clip for ten minutes.
- Add a silver ribbon loop and a blue string hanger through the roof.
Fifteen minutes each, about 40 cents in materials.
25. Snowman Pockets On Pine Tree Fabric
Two fat quarters of pine-print fabric run $6, iron-on transfer paper is $9, a pack of fusible fleece $5. That’s $20 for a panel that looks like the $60 versions on Etsy. If you don’t sew, fuse the pockets with hem tape — nobody examines the back of a calendar hanging on a door. Compare with Idea #27, the quilted building version.
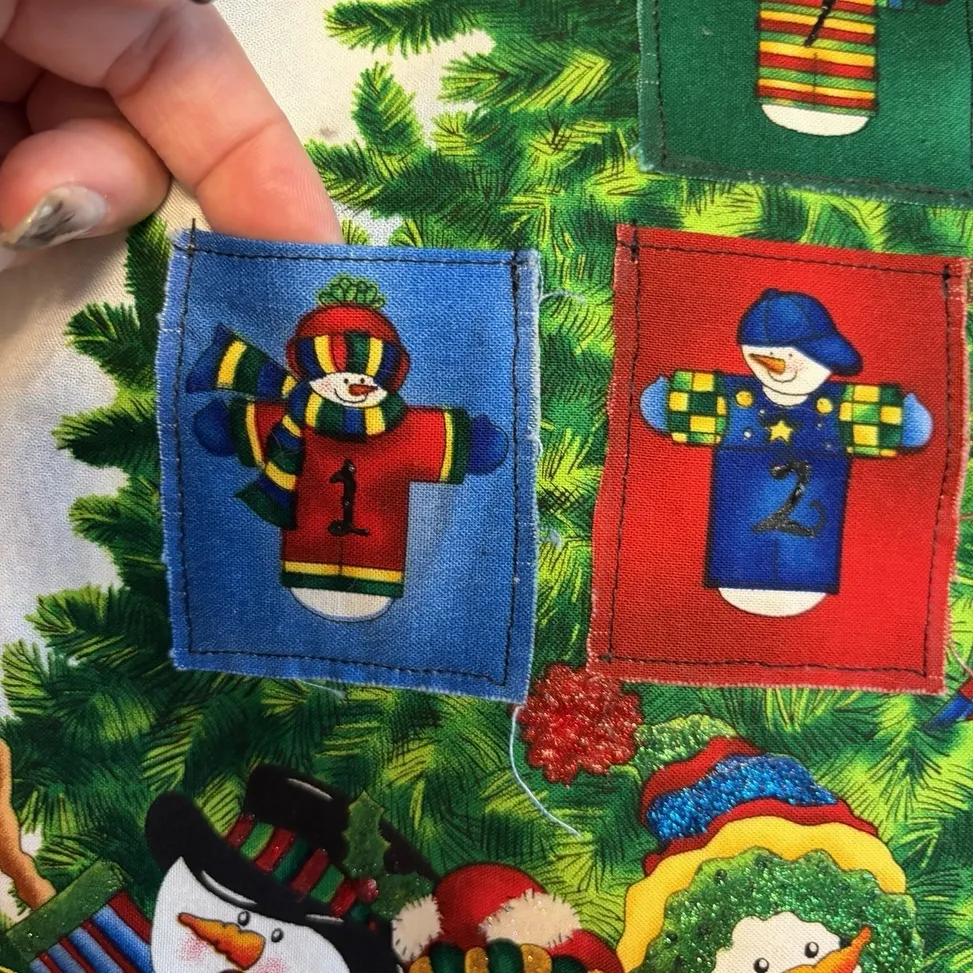
This one is built for a door or narrow wall: 24 to 30 inches wide and 36 to 40 inches tall, hung so pocket 24 sits about 20 inches off the floor. Wider than 30 inches and it starts reading as a banner; narrower than 24 and the pockets get too small to hold anything worth opening.
26. Kraft Bags In A Grid Under A Suspended Branch
A grid lives or dies on the first row, so check these before the first nail goes in:
- Measure wall width and divide by six, not five
- Confirm bag size — 4×6 inches holds a lip balm or two chocolates
- Mark the top line with a laser level and tape it
- Weigh one filled bag, then multiply by 24
Leave 2 1/2 inches between bags — closer and the grid turns into a solid brown block from across the room. Thread the twine through each bag in one continuous line rather than 24 individual strings, which keeps the rows dead level and takes about half the time.
27. Quilted Red Brick Building With Pompom Trim
- Quilted fabric calendar panel: $35–$85
- White pompom trim, three yards: $6–$14
- Fabric markers or iron-on numbers: $8–$15
- Wooden dowel and hanging cord: $4–$10
- Small treats for 24 pockets: $20–$50
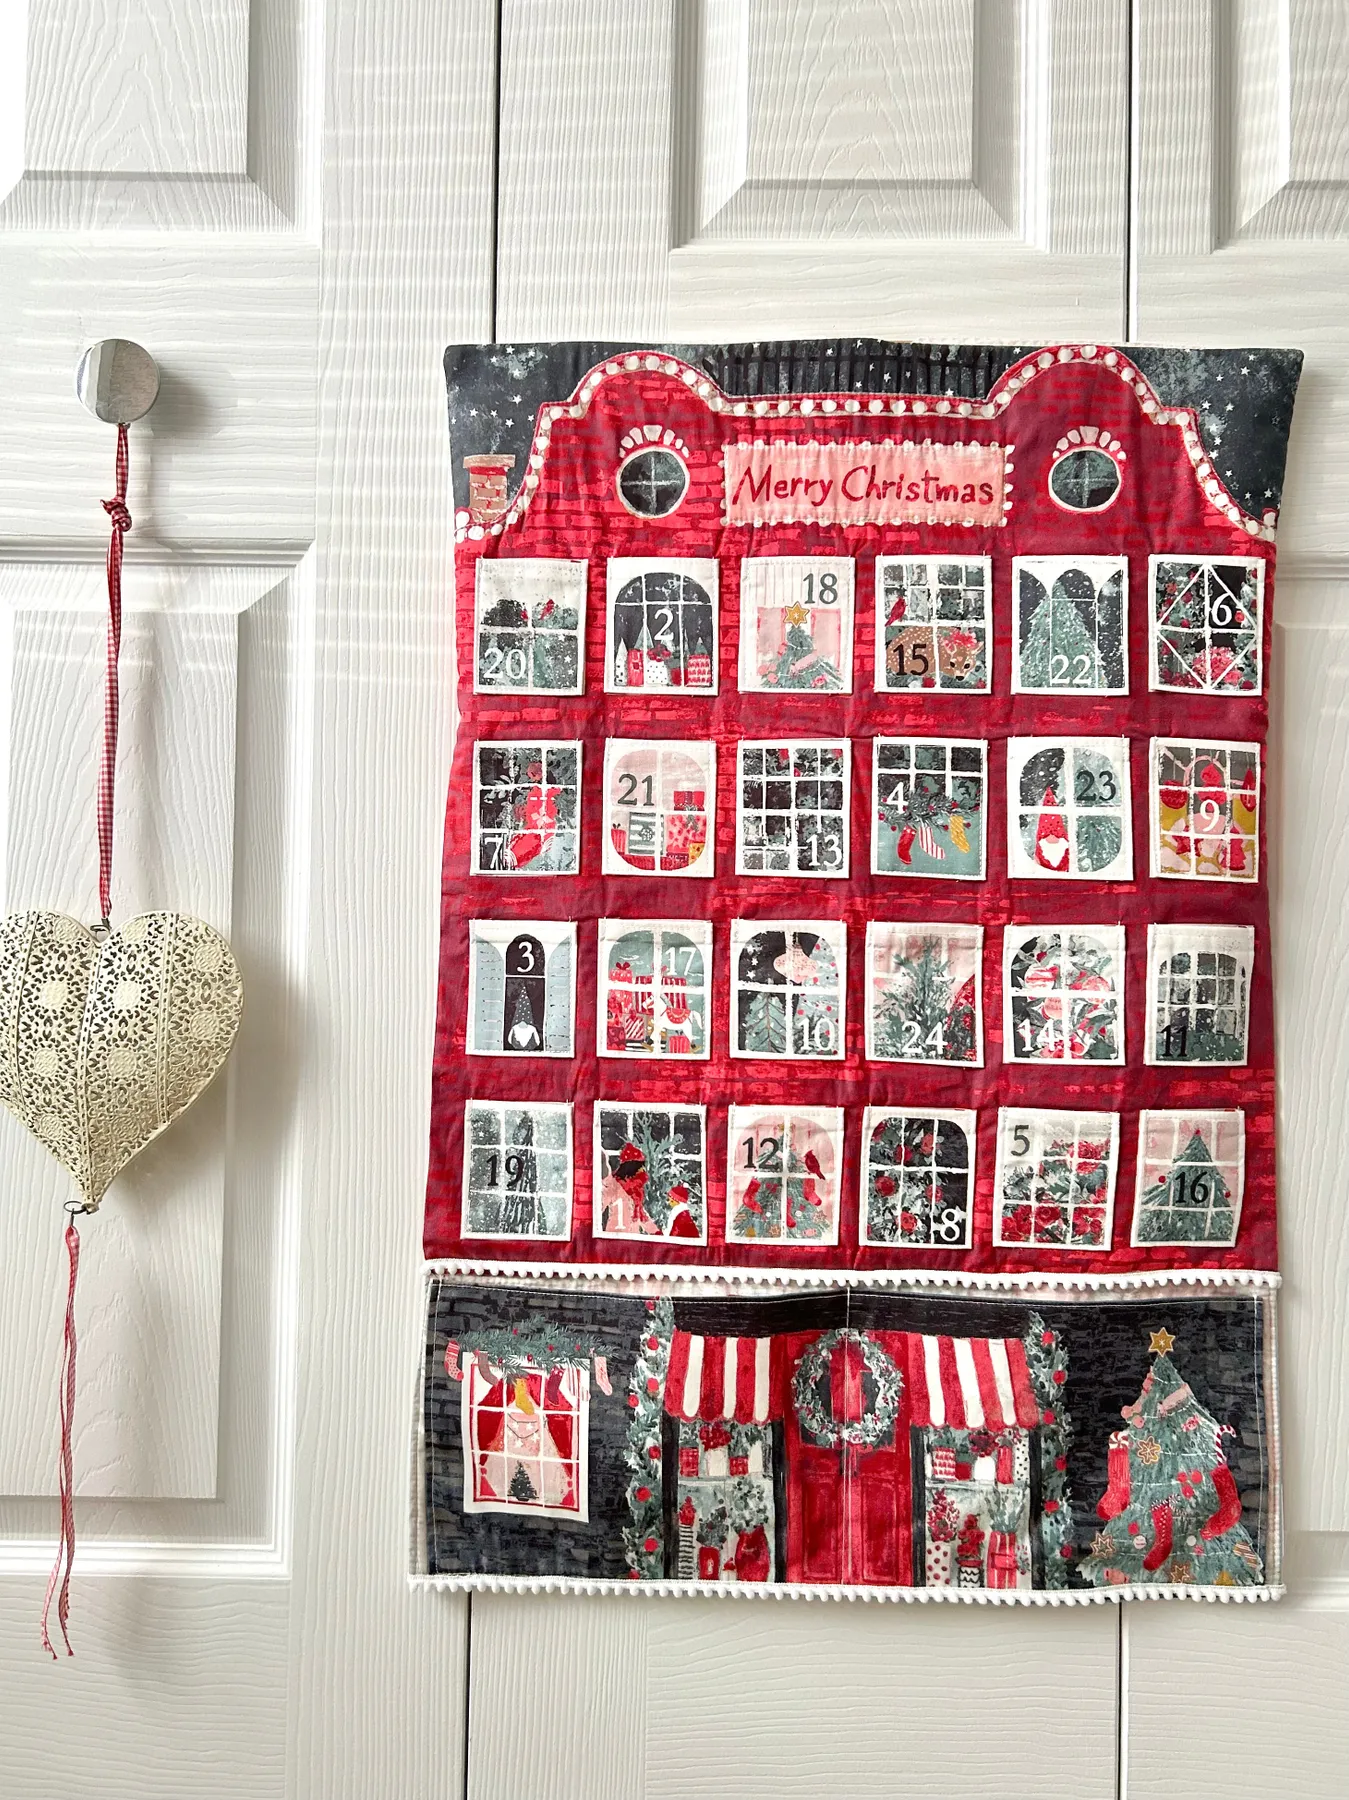
Treating each pocket as a lit window is the smartest move here: 24 identical squares become 24 tiny scenes, so your eye keeps moving. The white pompom trim softens the brick pattern and frames the whole thing against a white paneled door, while the storefront base gives it somewhere to stand.
28. Blue-Ribboned Paper Houses With Scattered Candy
The core ratio is 60 percent off-white paper, 25 percent blue in two tones, 10 percent green from the stacked books, 5 percent gold. Swap the blues for blush and burgundy and the same boxes read traditional; keep the paper white and change only the ribbon, and you can rebuild this palette for years without buying new boxes.
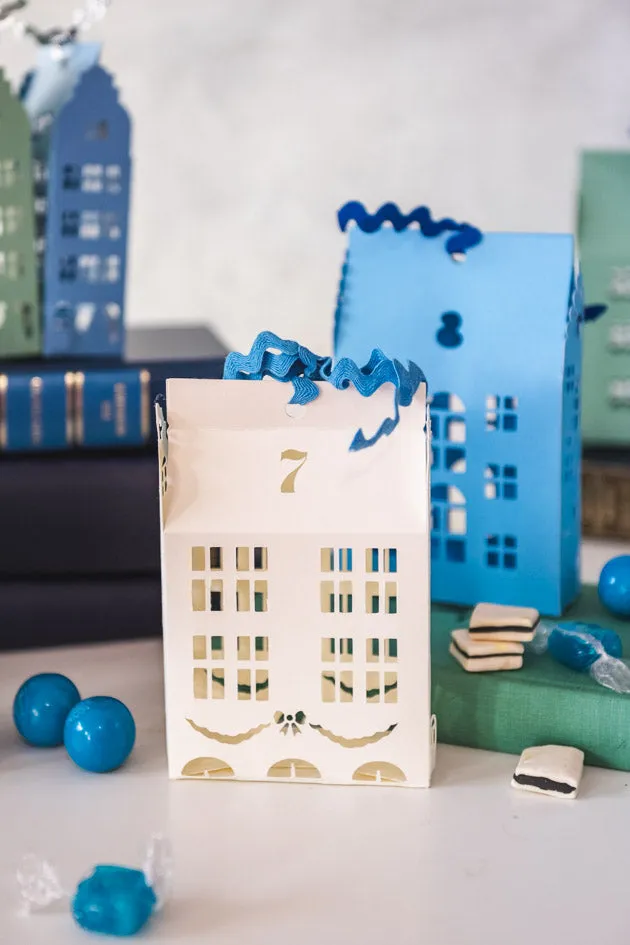
Winter blue has quietly taken over holiday styling — partly as pushback against red-and-green overload, partly because it photographs so well against warm wood. It’s also the most forgiving palette if your rooms already run cool. Expect blue to hold through 2027; this is a mood, not a micro-trend.
29. Tree-Shaped Frame Filled With Fused Glass Tiles
The glossy tiles are the whole personality. Twenty-four matte wooden squares would disappear into the frame; twenty-four little glassy scenes catch the light and turn the tree into a jewel box. If you’re making your own, that’s the one place to spend — real glass or resin, not flat stickers. Compare with Idea #15, where the tray does that job instead.
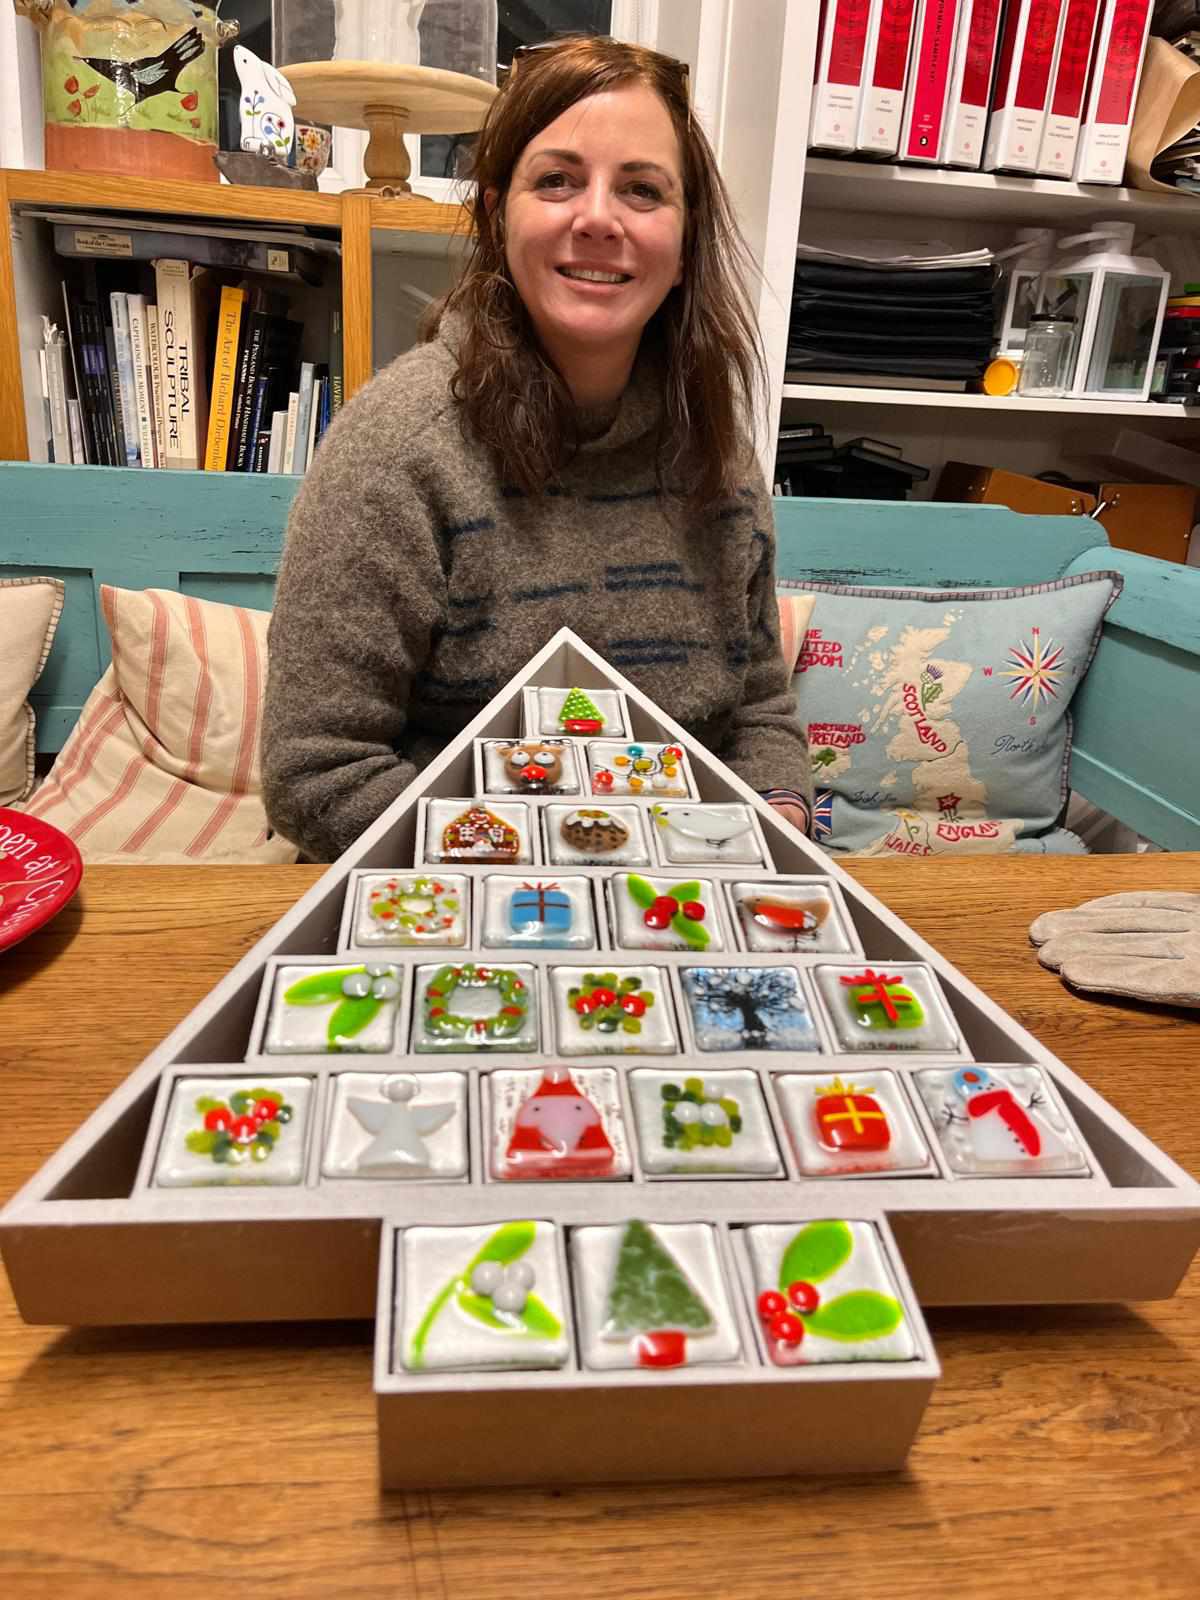
Real fused glass runs $6 to $12 a tile, which is $150 before you’ve built anything. Print 24 vintage Christmas images on glossy photo paper, glue them to 2-inch wood squares, and seal with a coat of glossy Mod Podge. About $28 total, and from three feet away nobody can tell.
30. Glitter Village On A Distressed Blue-Green Cabinet
Cabinet-top displays need height to work: the surface should sit between 55 and 70 inches so the village lands near eye level when you’re standing. On a standard 36-inch sideboard, add a stack of books or a shallow riser — otherwise all anyone sees is the roofline. Leave about 8 inches of clearance from the ceiling for the taller houses.
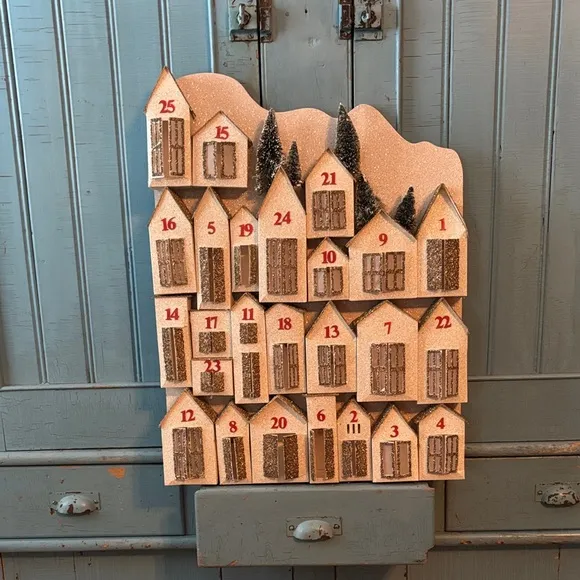
Quick checks before the village goes up:
- Confirm the cabinet is level and takes 10–15 pounds
- Check the village leaves 6 inches clear at each end
- Test your lights against the cabinet color in daylight
- Decide if the top row is decorative or functional — you can’t reach both
Twenty-Four Small Doors, One Very Good December
Here’s the honest truth: the calendar your family remembers won’t be the most expensive one on Pinterest — it’ll be the one with the crooked number and the pocket you filled with the good chocolate. Pick one idea, give yourself a weekend, and let it be imperfect.
📌 Save this to Pinterest now so it’s waiting for you in November, when you’ll be very glad past-you did the planning.