Vintage Christmas crafts are having a serious moment on Pinterest right now — and the 2026 version looks nothing like the dusty box in the attic. It looks like a navy wall covered in mismatched glass ornaments, a hand-painted gourd drying on the windowsill, and a little tree sitting in a red-striped bucket.
We spent weeks combing Etsy, eBay, Target, and Dollar Tree, then narrowed hundreds of options down to 31 ideas that actually deliver — from a $6 pack of ornament blanks to an $850 brass rotating display tree.
Expect retro eclectic, cozy vintage traditional, and pastel craft-room whimsy, with budget and luxury versions compared side by side.
Why now? Searches for hand-painted ornaments and bottle brush trees have climbed every fall since 2023, and this year’s crop leans hard into slow, made-by-a-person work.
This post contains affiliate links. Save it now — this one’s worth keeping.
1. Light-Up Wreath Built From Vintage Bulb Covers
Take away the emerald and red covers and this wreath still reads as Christmas. Take away the clear ones and it goes flat. Those translucent caps are the whole trick: the warm-white LEDs sit behind them and push colored shadows onto the white beadboard below, so the wreath looks lit from inside rather than decorated from outside. The red velvet bow with holly gets all the attention in photos, but it’s the clear plastic doing the heavy lifting.
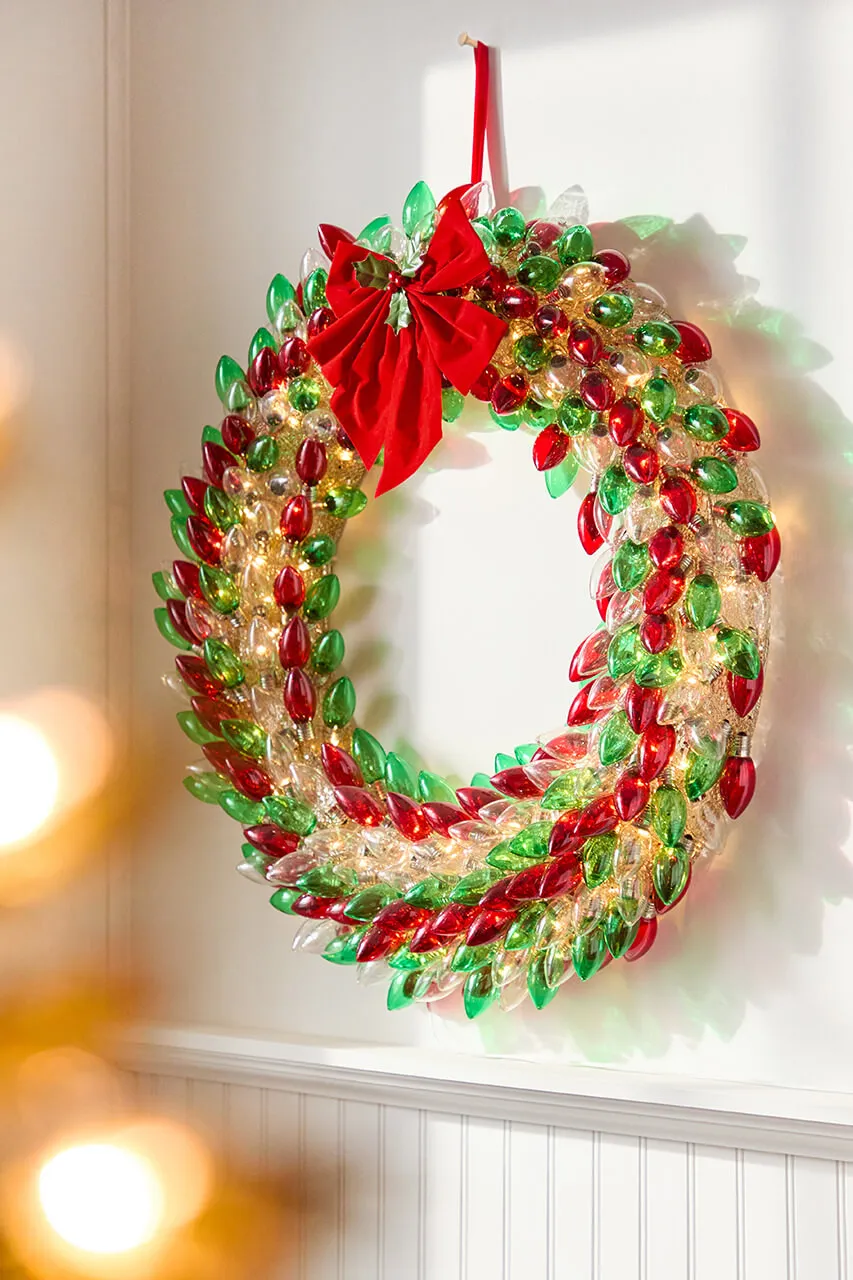
Work on a 14-to-16 inch wire form and cluster the covers toward the outer two-thirds; packing them evenly all the way to the center turns the ring into a solid disc from across the room. Space covers roughly 1.5 inches apart at the rim and tighten to 3/4 inch near the inner edge. Weave a 15-foot warm-white LED strand (2700K, never cool white) behind the covers so no bulbs show, then wire a 10-inch bow at the 11 o’clock position. Slightly off-center reads collected; dead center reads craft fair. Budget $35 to $60 and one evening.
2. The White Hutch That Became a Vintage Christmas Museum
The hutch works because it repeats instead of matching. Bottle brush trees land on three different shelves at three different heights, ceramic Santas sit near eye level, and miniature village houses crouch along the bottom — same three ingredient types, different proportions on every shelf. That’s what keeps your eye traveling. The red plaid thermos and suitcases act as anchors, too: with that much small clutter you need one big, calm color to land on, and warm string lights threaded behind everything blur the hard edges.
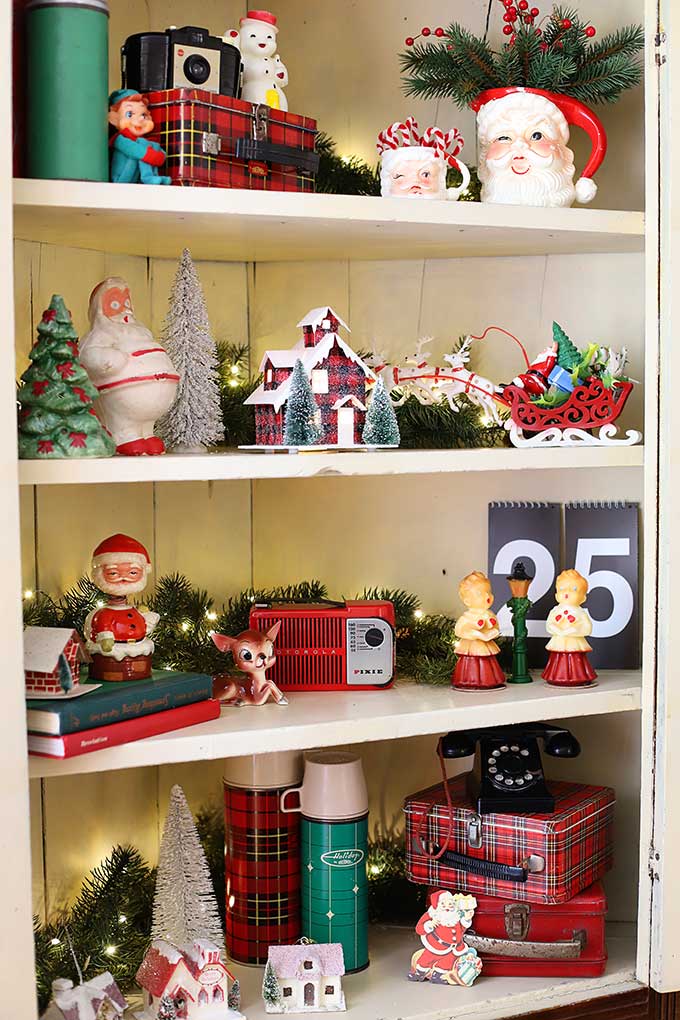
- Thrifted white hutch: $75–$250
- Vintage ceramic Santas and figurines, bought in lots: $40–$120
- Bottle brush trees, 8 to 12: $24–$60
- Miniature village houses: $30–$80
- Plaid suitcases, thermos, and a retro radio: $35–$110
- Warm string lights and pine garland: $20–$40
- Total: $224–$660
- Budget alternative: paint a Facebook Marketplace bookcase white, swap the vintage radio for a $10 thrift find, and pull the figurines from your own ornament box — lands near $180.
This display wants a hutch or bookcase between 36 and 48 inches wide, on a wall with at least 5 feet of clear space. Leave air on both sides or the whole thing reads like a store fixture. Shelf depth matters more than ceiling height: aim for 10 to 12 inch shelves so figurines can sit two rows deep without touching. In a small apartment, shrink the idea to a single 30-inch bookcase and keep the top two shelves for the good stuff.
3. Pastel Hand-Painted Gourd Ornaments With Folk Patterns
Six ornaments run about $20 in materials, and the whole batch takes an evening plus one drying day.
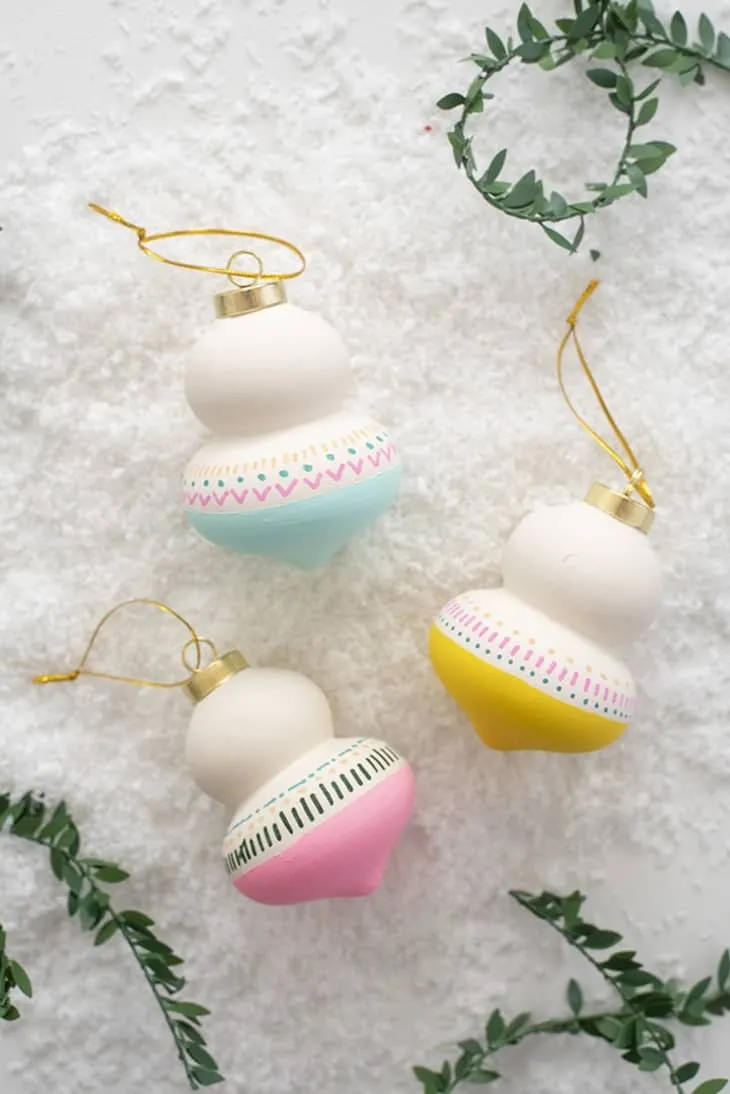
- Sand papier-mâché or basswood gourd blanks with 220-grit, then wipe them with a barely damp cloth.
- Base-coat the top third in matte white and let it cure for two hours.
- Block the lower two-thirds in one pastel per ornament — resist mixing colors on a single gourd.
- Add dots and dashes with a fine-liner brush in a contrasting pastel plus white, working in tidy rows of three.
- Seal with two thin coats of matte acrylic varnish, then glue on a gold cap and hanger.
The formula here is 50 percent matte white, 40 percent pastel blocking, and 10 percent gold hardware. That ratio is why three different pastels still look like one set. Swap pastel blue for sage or butter yellow and the math holds. Want it to feel less Easter and more December? Push white to 60 percent and drop the pastel to 30, but keep that 10 percent gold — the caps are what stop it from reading as a nursery project.
4. Miniature Knit Stockings, Hats, and Wreaths on a Craft Table
Miniature knits are dust magnets, and wool blends fade fast in direct sun. Brush them with a soft pastry brush every two weeks, hand-wash in cold water inside a mesh bag once a season, and lay flat to dry — never hang a wet mini stocking or it stretches into a comma. Budget about $10 a year for cedar blocks and a mesh bag; cedar keeps moths from turning your craft table into a buffet. Acrylic yarn survives longer than wool here, and honestly nobody can tell at this scale.
A 30-by-48-inch table is the sweet spot: big enough for 12 to 18 miniatures plus your supplies, small enough that it still reads as a scene instead of a craft aisle. Group in odd numbers — three stockings, five hats, one wreath — and leave a third of the surface bare. If your table is only 24 inches deep, work along one long diagonal instead of covering the whole top. A hallway console works too, if you keep it to seven pieces.
5. Fourteen Vintage Glass Ornaments on a Deep Navy Ground
The ornament wall is 2026’s answer to the gallery wall, and it’s the reason thrift stores keep selling out of mismatched glass balls. Collectors have hunted Shiny Brite reflector ornaments for years, but what changed is the display: instead of hiding the collection in a box, people mount it on a dark ground and treat it like art. It has staying power because a collection grows — every estate sale adds to it, and the wall gets better as it fills. If your taste runs warmer, see Idea #11 for the same collecting habit stacked on a brass tree.
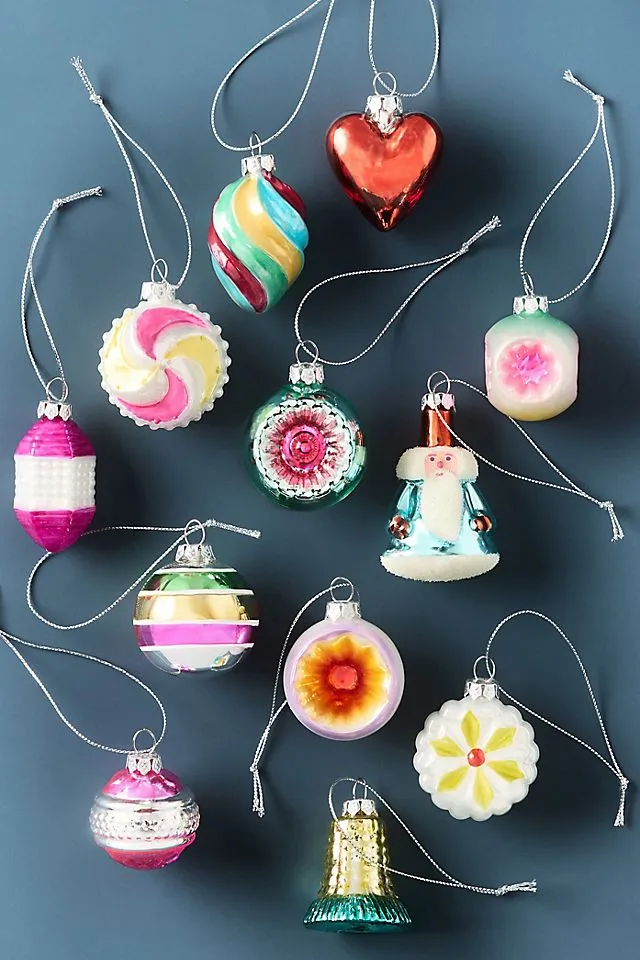
Three rules make $4 ornaments look curated instead of accidental:
- Mount them on a dark ground — navy velvet, matte black board, or deep burgundy felt. Glossy glass needs a matte, saturated backdrop or it disappears into the wall.
- Keep 2 to 2.5 inches of space between each piece and hang from a 1-inch nail grid with clear monofilament so nothing competes with the objects.
- Light from one side at roughly 45 degrees with a small picture light or clamp lamp. Flat overhead light kills the reflections that make vintage glass worth collecting.
6. Eclectic Retro Living Room With a Zebra Rug
The danger here isn’t color — it’s pattern count. Three patterns plus a busy tree plus ornate portraits is the ceiling; add a fourth and the room turns into visual static. Keep the teal sofa solid, let the armchairs and zebra rug carry the prints, and give the walls a rest. Also worth knowing: zebra rugs show every dog hair and crumb, so if you have a shedding pet, plan on vacuuming three times a week or hang the rug on the wall as art instead.
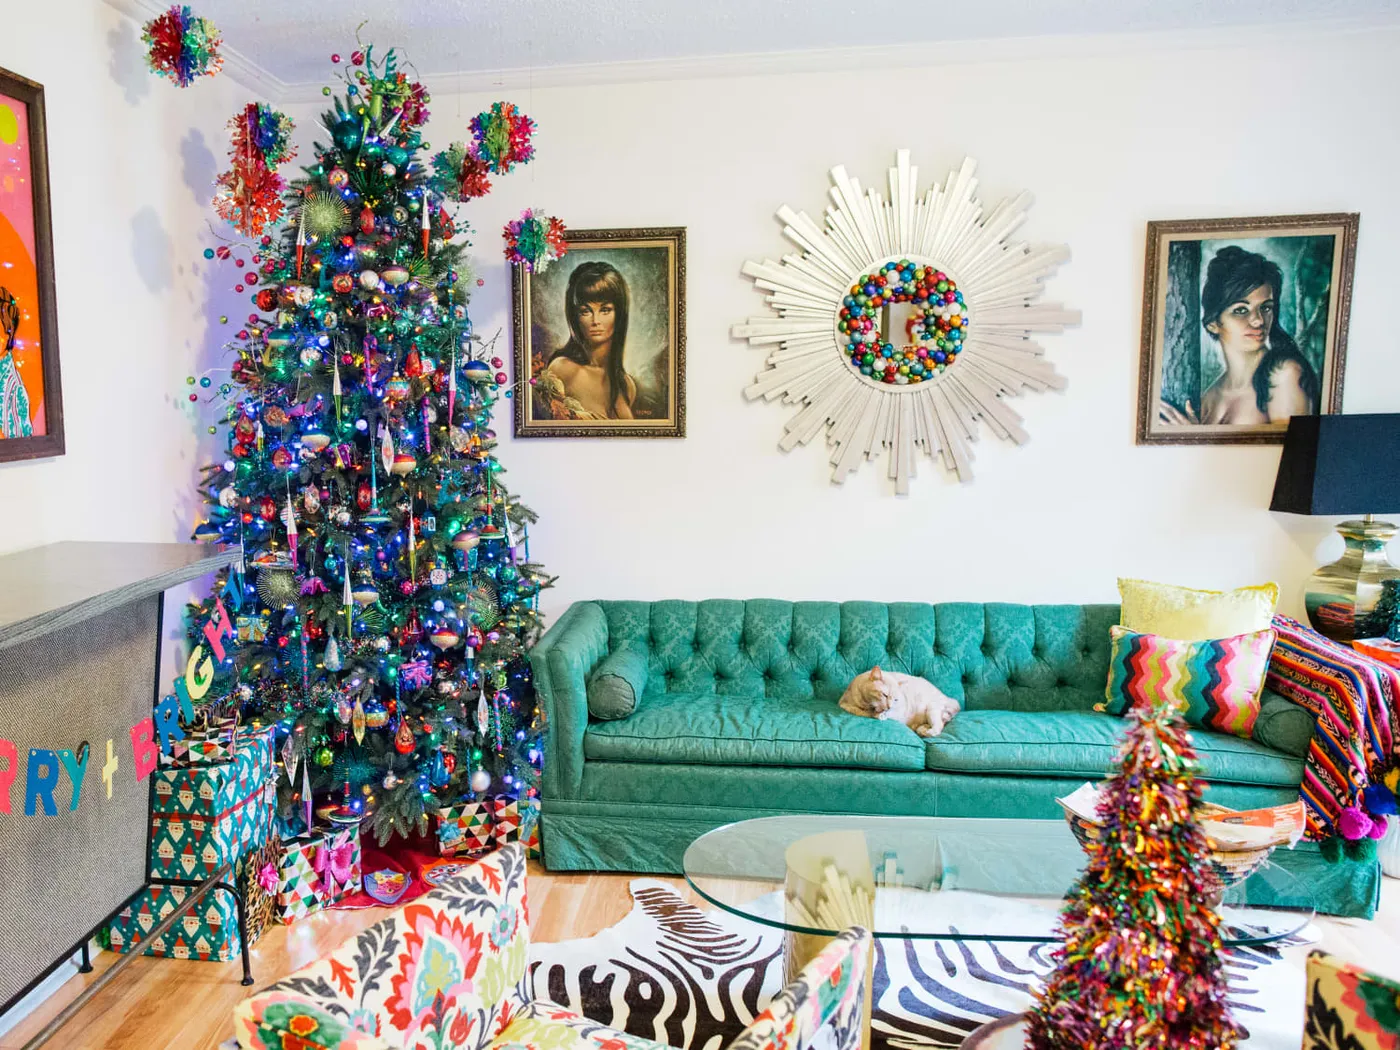
- Deep teal tufted sofa: $900–$2,400
- Patterned accent chair: $250–$700
- Zebra print rug, 5×8: $120–$400
- 7.5-foot tree plus 150 mixed ornaments: $250–$600
- Sunburst mirror dressed as a bauble wreath: $60–$180
- Ornate framed portraits, thrifted: $40–$150
- Total: $1,620–$4,430
- Budget alternative: keep your existing sofa and add a teal velvet slipcover, buy a flatweave zebra rug for under $100, and trade the sunburst mirror for a $15 thrifted gold oval.
7. Green Glass Diorama Ornament on a Flocked Branch
Flocked trees shed — expect to lose 10 to 15 percent of that snow the first season, more if you drag it across carpet. Vacuum the floor with a brush attachment instead of wiping with a wet cloth, which turns flocking into paste. The glass diorama ornament needs its own care: lift it by the cap, never the glass walls, and keep it off branches directly above a heat vent. Store flocked trees upright in a bag, never flattened in a box.
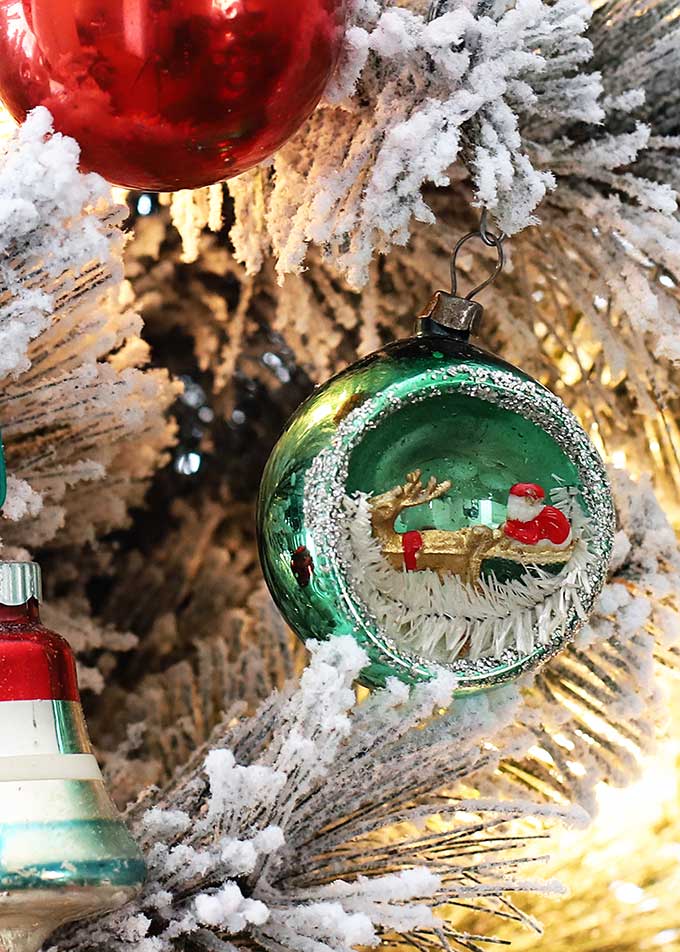
Emerald carries 45 percent of this look, the flocking white holds 30, red adds 15, and gold and silver metallics split the last 10. That’s a lot of white for a Christmas tree, which is exactly why the glass reads so bright — you’re lighting a snowy ground rather than a green one. Trade the emerald for cobalt and you get a cooler, more modern tree without changing anything else. Trade red for copper and it goes soft and vintage in a different direction.
8. Hand-Painted Floral Ornaments in a Kraft Paper Box
Plan on about $30 for six ornaments and three hours across two sessions.
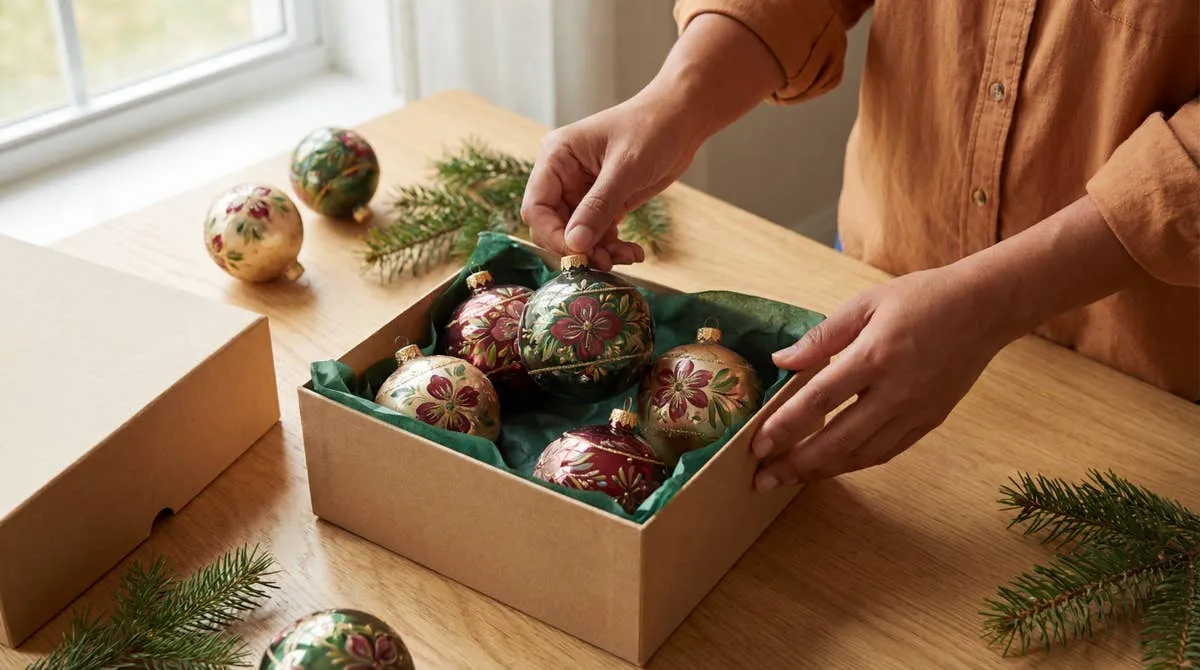
- Wipe clear glass blanks with rubbing alcohol so the paint actually grips.
- Paint a one-stroke leaf cluster in deep green, then add burgundy petals with a size 2 round brush.
- Let everything dry a full day, then add gold accents with a liner brush — dots at the flower centers only.
- Seal with two light coats of gloss enamel and cure for 24 hours.
- Nestle each ornament in dark green tissue inside a kraft box, then tuck in a pine sprig before gifting.
Clear glass blanks at Dollar Tree run $1.25 each, and craft-store enamel in deep green, burgundy, and gold will cover a dozen ornaments for about $12. Skip the kraft boxes if you’re not gifting and use a thrifted bread tin lined with tissue instead. Against hand-painted ornaments from an artisan on Etsy at $22 to $35 apiece, you’re saving roughly 90 percent — and yours will have crooked leaves, which is the point.
Ornaments between 2.5 and 3 inches are the sweet spot for a 7 to 7.5 foot tree. On a 6-footer, stay at 2 to 2.5 inches so the branches don’t look weighed down, and reserve these painted florals for the front and sides at eye level while cheaper filler handles the back.
9. Fully Loaded Tree Beside a Rattan Chair and Ceramic Elephant
A tree this loaded gets heavy. Once you pass 150 glass ornaments on a 7.5-footer, you need a stand rated for it and a base wide enough that a bumped shoulder doesn’t tip the whole thing. Keep the rattan chair at least 18 inches from the tree so needles don’t rain into the seat, and check your strand count — more than three light strands end-to-end on one outlet is asking for a warm cord.
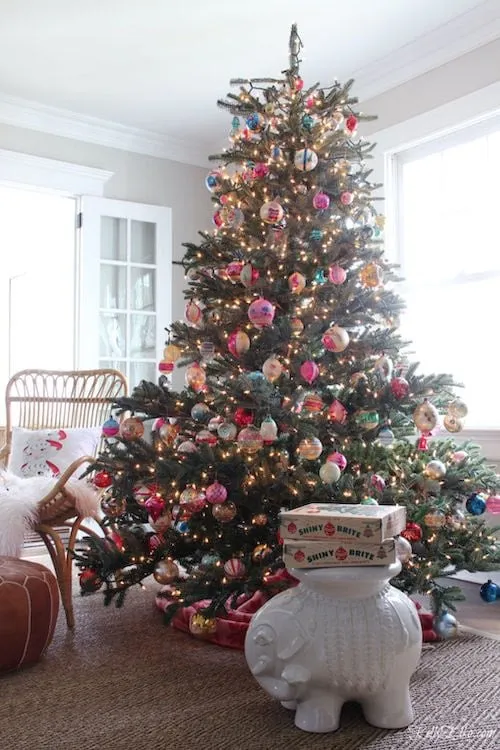
This is maximalism with a memory. What separates it from a big-box blowout is that nothing matches: the ornaments come from four decades of boxed sets, and the white ceramic elephant stool isn’t even Christmas decor — it just stayed. That accidental quality is exactly what people are chasing in 2026. Think of it as Idea #6 with the volume at eight instead of eleven.
10. Felt Light Bulb Ornaments With Embroidered Snowflakes
Each felt bulb takes about 20 minutes and roughly $1.50 in materials.

- Cut two matching bulb shapes from wool-blend felt, plus one small grey rectangle for the base.
- Embroider a snowflake in white six-strand floss on one shape, then add three tiny beads around it.
- Blanket-stitch the two shapes together, leaving a one-inch gap for stuffing.
- Stuff with a small handful of polyester fill — firm, not plump.
- Sew the grey base over the bottom, add a twine loop, and trim the felt fuzz with sharp scissors.
Scale the ornaments to the branch spacing, not the tree height. On a tree with 12-inch gaps between branch tiers, 3.5-inch felt bulbs look generous and handmade; on a dense 6-footer with 8-inch tiers, drop to 2.5 inches or the felt reads as chunky. Hang them in loose zigzags of three at slightly different depths so they catch light from more than one angle, and run a white felt ball garland at 3-inch intervals behind them.
11. Brass Rotating Ornament Tree Under a Garlanded Chandelier
- Brass rotating ornament tree: $120–$350
- Vintage glass ornaments, 60 to 100: $150–$450
- Chandelier garland plus velvet ribbon: $45–$90
- Assorted bottle brush trees: $30–$80
- Light wood hutch: $75–$250
- Patterned wallpaper, two rolls: $80–$200
- Total: $500–$1,420
- Budget alternative: skip the wallpaper and use a $30 stencil kit, swap the brass tree for a rotating carousel from a thrift store, and build your ornament count from estate-sale lots.
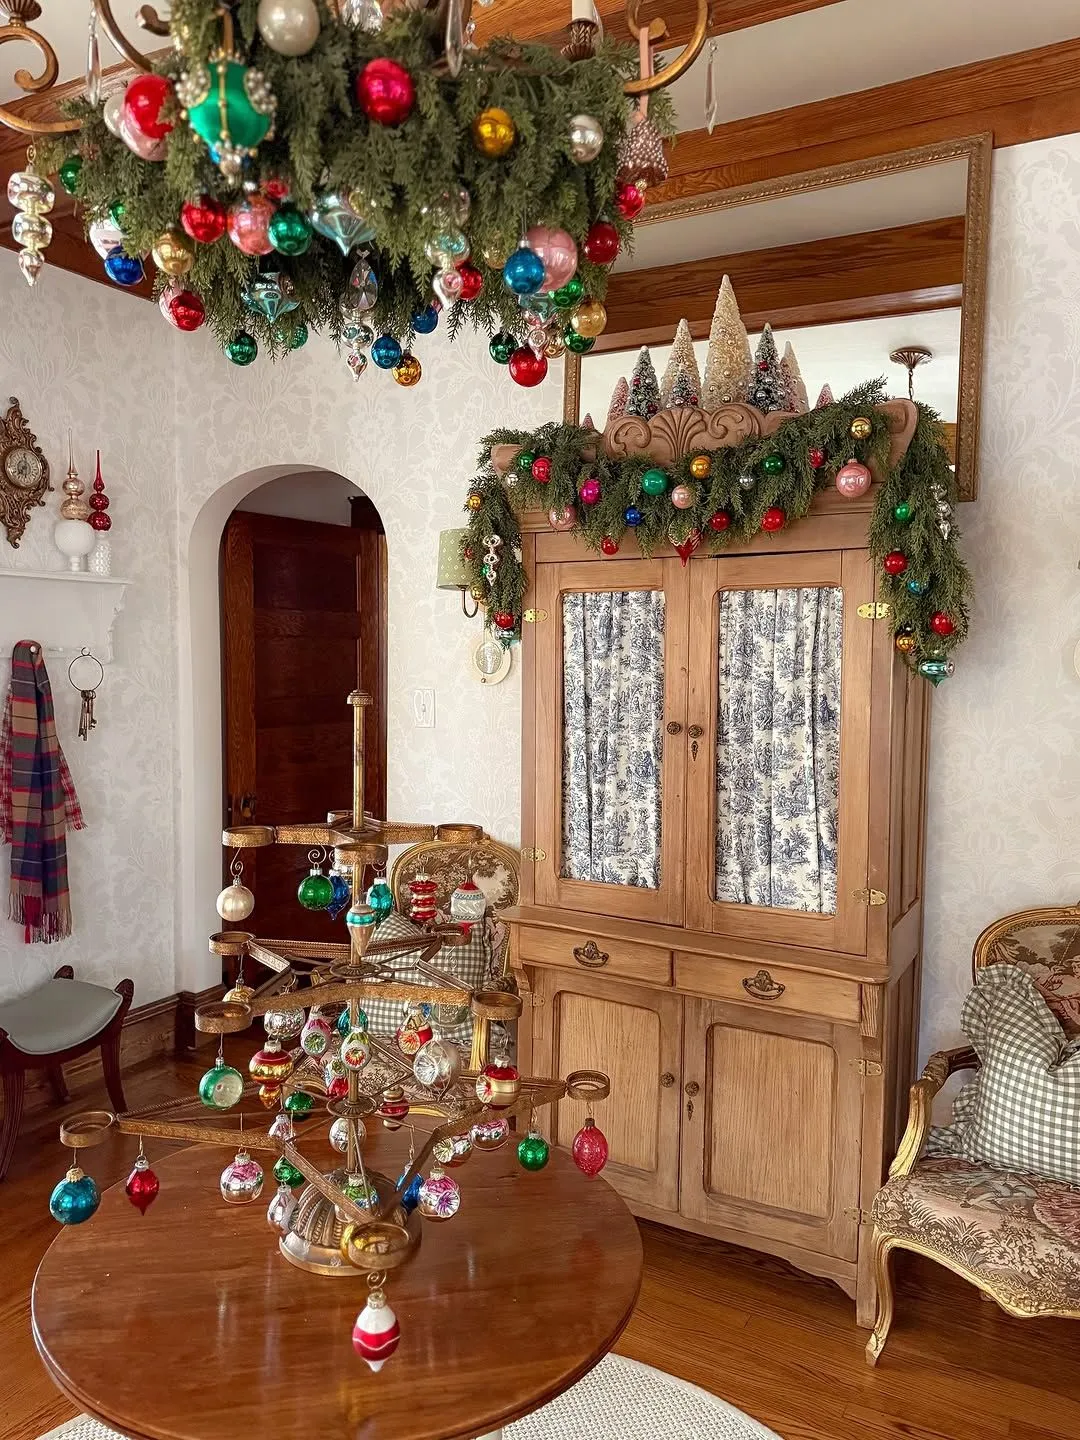
This setup needs a room at least 10 by 12 feet, because the chandelier display and the hutch want their own zones. Hang the garland-draped fixture so the lowest greenery sits 30 to 33 inches above the table — low enough to feel lush, high enough that nobody’s hair catches it. The hutch belongs against a wall that gets indirect light; a busy wallpaper pattern plus direct sun makes the whole corner feel hotter than it is.
12. Little Tree in a Red Striped Bucket, With a Rocking Horse
A real tree from a local farm runs $25 to $60 for a 4 to 5 foot cut-your-own, and garage sales turn up artificial versions for $15 to $30 in early December — under $10 if you wait until New Year’s. The red and white striped bucket is a $15 to $25 Target find, or paint stripes on a galvanized pail for about $12. Wooden rocking horses show up at flea markets for $20 to $60, and brown paper with red ribbon costs nothing to wrap. The whole nostalgic scene lands under $120.
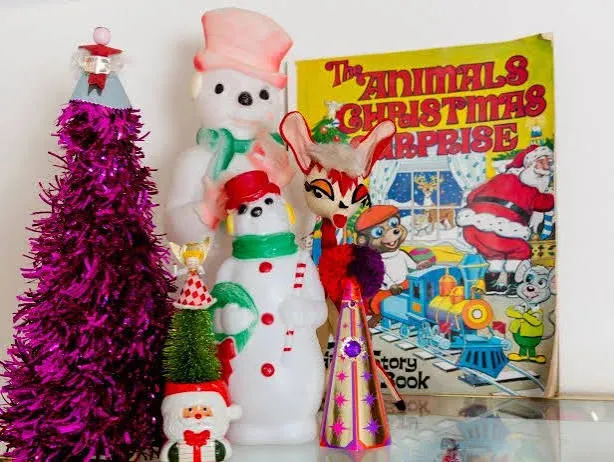
Live trees drink about a quart of water a day in a warm room, and a 4-foot tree in a metal bucket has almost no reservoir — check the water twice daily or it dries out and drops needles by week two. Keep it at least three feet from heat vents and fireplaces. If you’re using a bucket rather than a stand, set the tree in a hidden plastic liner inside so the metal never rusts from the inside out.
13. Personalized Felt Santa Stocking With Embroidered Trees
A single stocking takes two evenings and about $14 in felt, floss, and trim.
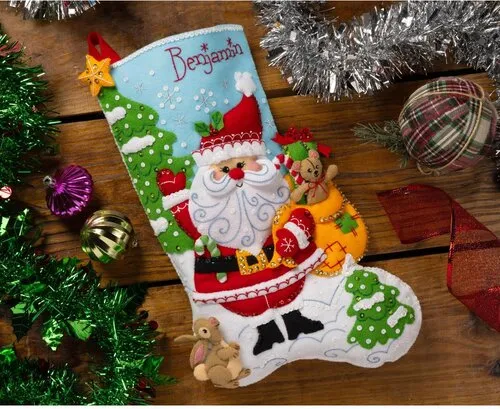
- Trace a stocking template onto wool-blend felt and cut two mirrored pieces plus a 4-inch cuff.
- Appliqué the Santa body in red, then layer the beard, hat, and small green trees with a whip stitch.
- Embroider the name in chain stitch across the cuff — mark it first with a water-soluble pen.
- Sew the two sides with a half-inch seam, clip the curves, and turn.
- Add the cuff and a hanging loop, then press lightly with steam, not a hot iron.
Chain stitch is the only embroidery stitch you need for names on felt — it’s fast, it handles the curved letters that satin stitch fights with, and it looks deliberately hand-drawn. Center the name with the cuff folded up, not down, and keep it under 4 inches wide so it doesn’t wrap the curve. Use three strands of floss, not six; six strands on felt looks like rope from across the room.
- Measure your mantel hooks — an appliquéd felt stocking needs about 18 inches of drop to hang straight.
- Check that your template fits a real gift; a 16-inch stocking cannot hold a hardcover book.
- Test one small appliqué on a scrap first so you know how your felt behaves with steam.
- Decide on your lettering now: block letters read cleaner on a busy design than script.
14. Two Felt Winter Dolls on a White Sequined Pillow
It’s a scale trick. Two small dolls on a big pile of sequins get swallowed unless you give them a stage, so the pillow becomes a plinth — soft, glittering, and slightly absurd. The white sequins also bounce light upward onto the felt faces, which is why the dolls look lit from below even in a dim room. Scatter the tiny light beads along the front edge only; spreading them everywhere flattens the whole arrangement into a soup of sparkle.
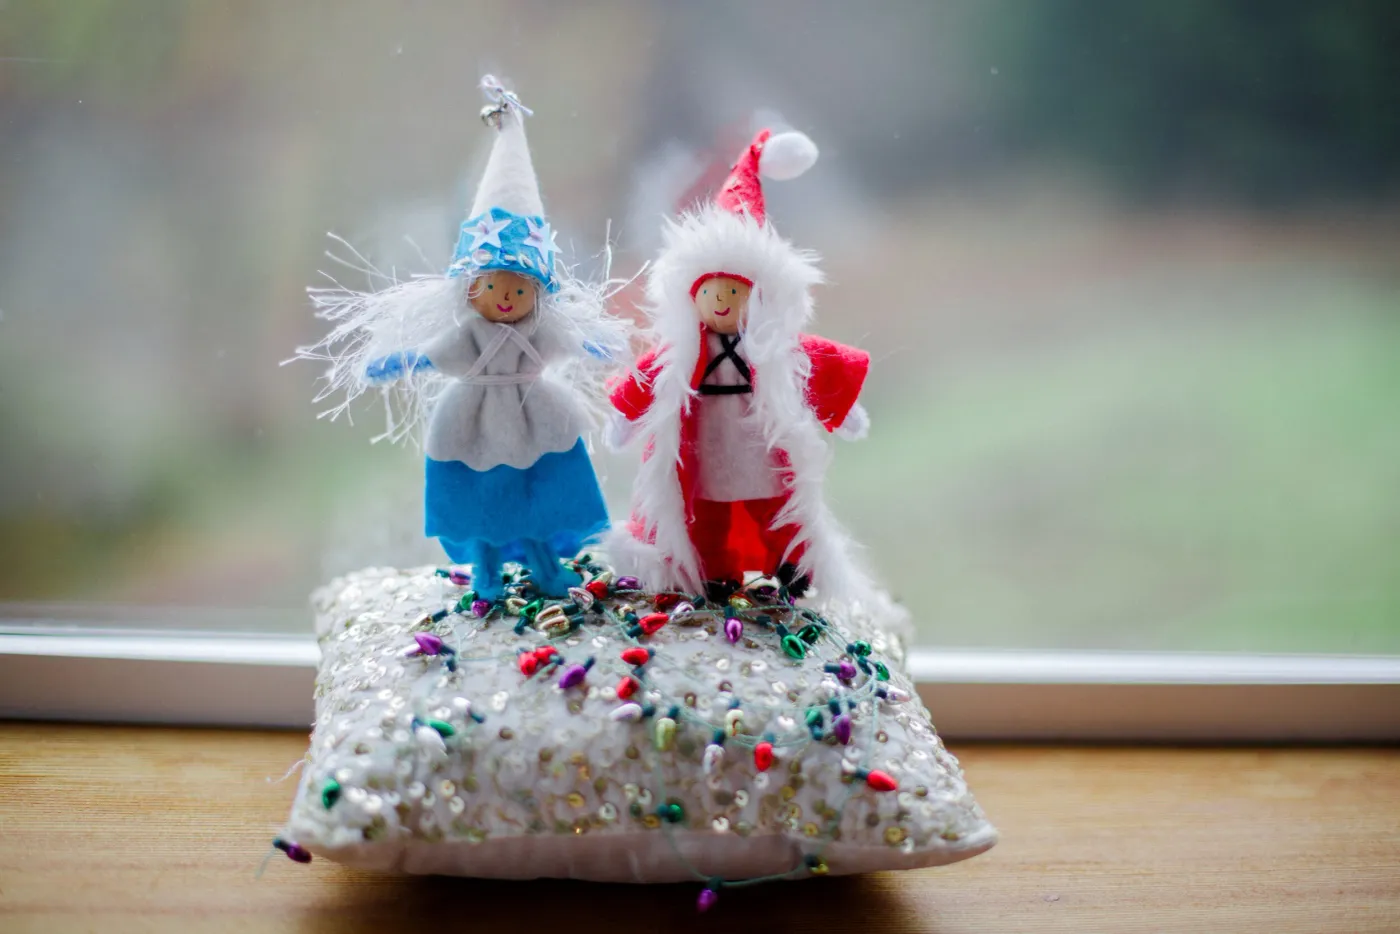
Cream and white hold 60 percent here, red takes 25, blue takes 10, and the multi-colored light beads sneak in the last 5. That small percentage is deliberate: the beads are the only place many colors appear, so they read as sparkle instead of noise. Swap red for forest green and the pair feels more traditional; swap blue for mustard and it goes folk-art. Either way, keep the bead colors mixed — a single-color bead strand looks commercial.
15. A Lemon Ornament Hanging on Plaid Ribbon
The lemon is the whole idea. A hand-painted citrus ornament on a plaid-and-gold tree is technically a mismatch, and that’s exactly why it stops your eye — it tells you a person hung this, not a theme. Without it you have a lovely, predictable tree. With it you have a story about the trip, the market, the grandmother who collected fruit ornaments. One oddball per tree, front and center, is plenty.
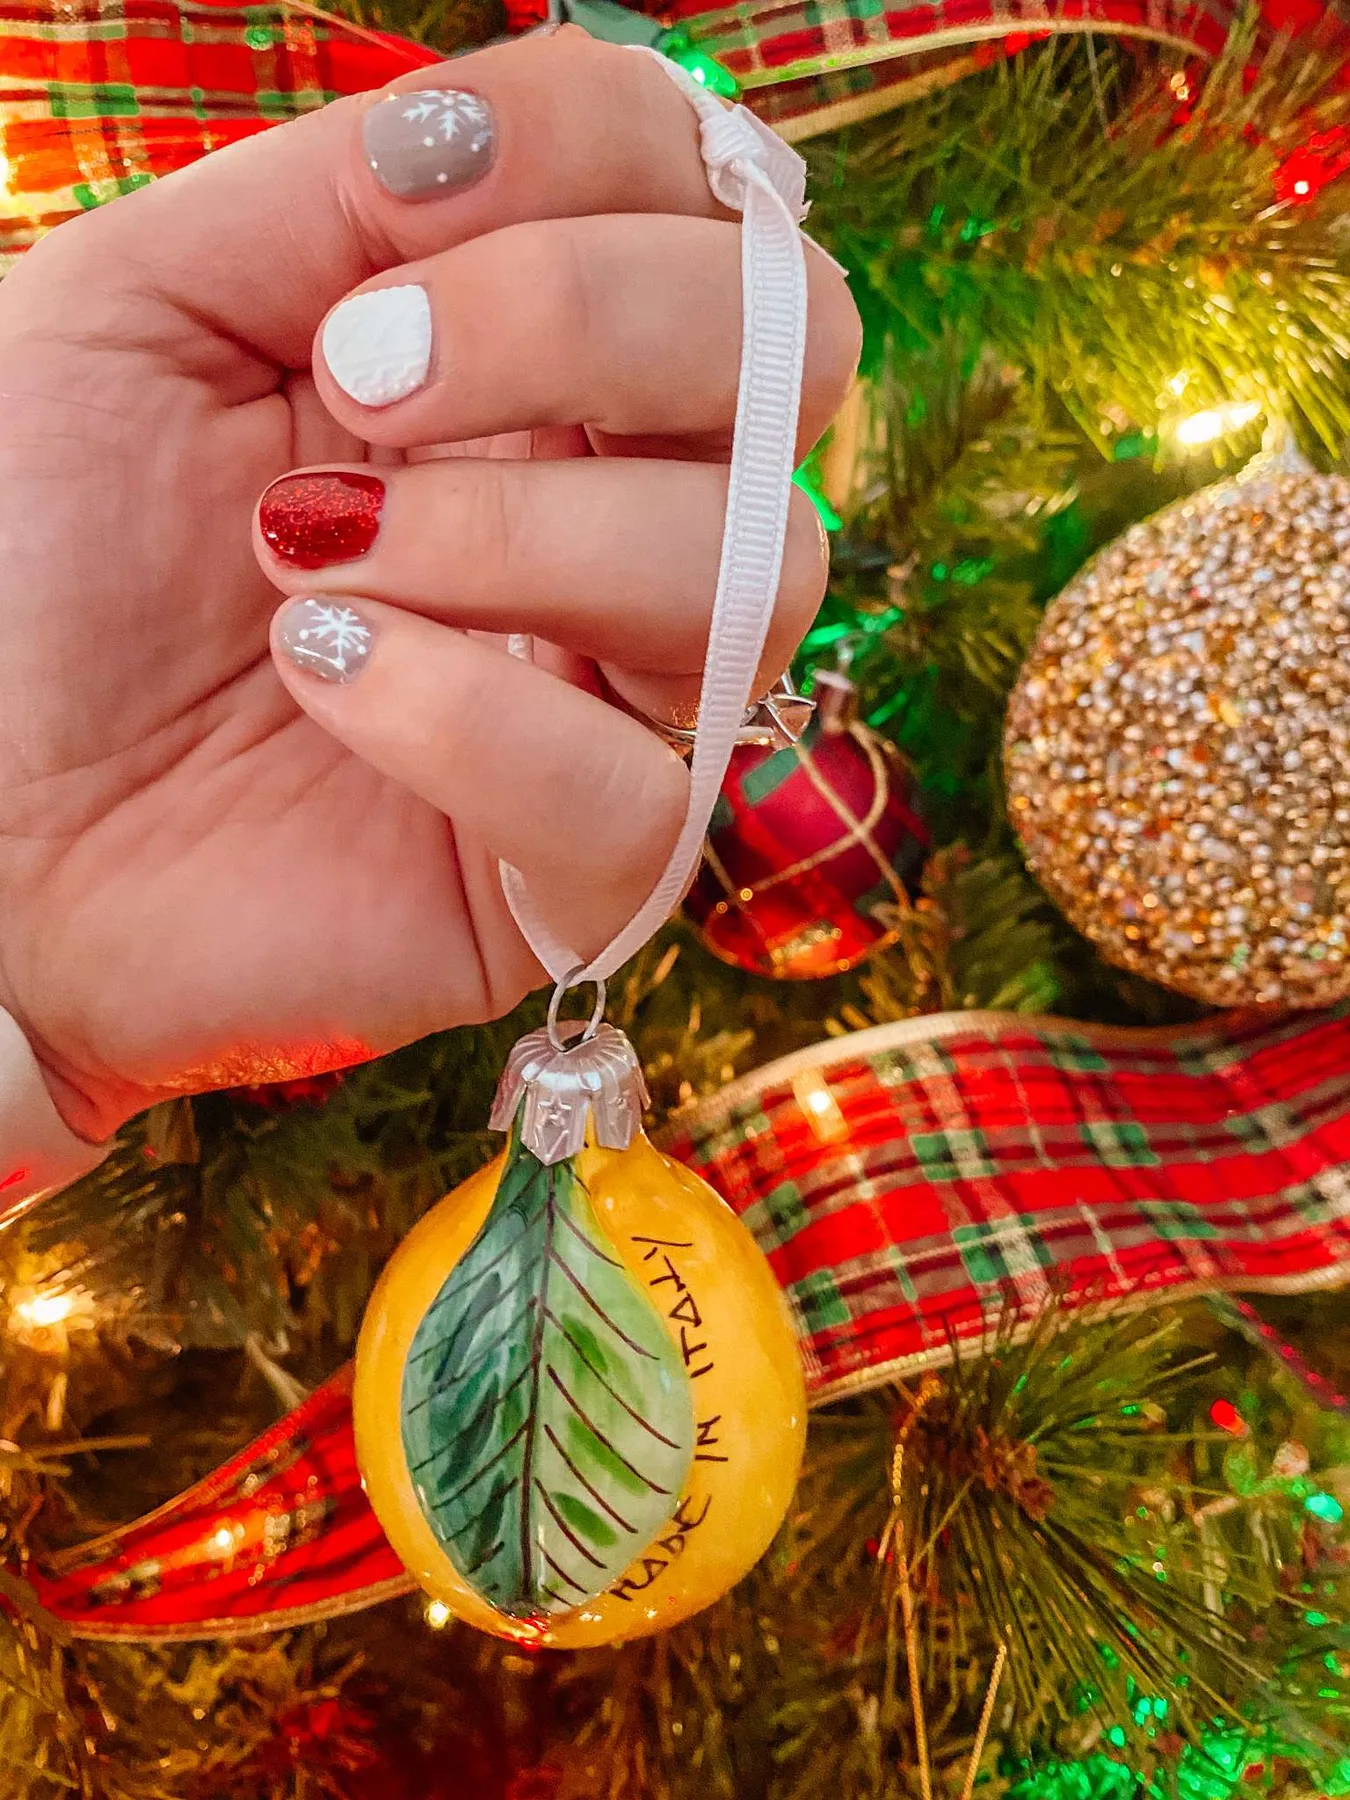
Novelty ornaments disappear on a tree that’s already busy. If you’ve woven plaid ribbon through every branch, a small lemon at the back will never be seen — hang it in the front upper third with 6 clear inches around it. And if you have toddlers or a cat, keep the hand-painted glass above their reach; ribbon and glitter can be replaced, the ornament from that trip can’t.
Pick your novelty ornament’s landing spot before you decorate anything else. Front, upper third, with a 6-inch clearing — that’s where the eye lands first at standing height. Then build outward: ribbon deeper in the branches, filler ornaments near the trunk, nothing sparkly within arm’s reach of the novelty piece. Compare with Idea #27, which pulls the same move with a seashell instead of a lemon.
16. Mid-Century Credenza With Ceramic Light-Up Christmas Trees
Warm wood takes 40 percent, bright green 30, assorted brights 20, and gold the last 10. The wood percentage is doing more work than it looks like — it’s the neutral that keeps eleven ceramic trees and a gallery wall from turning into a flea market. Swap the brights for pastels and the whole credenza goes soft and sweet; swap them for navy and mustard and it turns mid-century graphic.
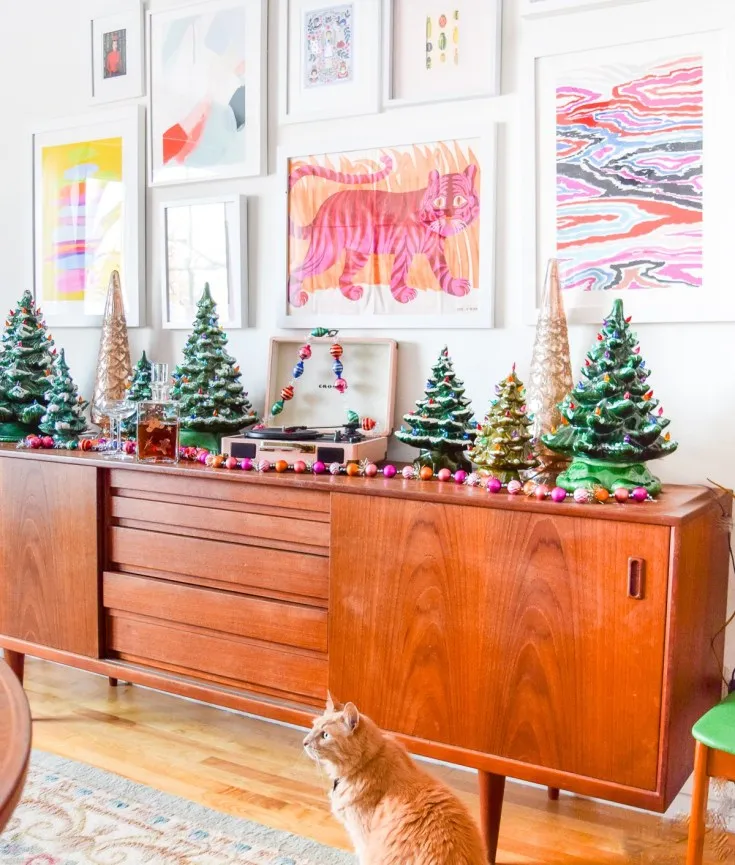
A 60 to 72 inch credenza is the right anchor for this much art. Run the gallery wall to about two-thirds of the credenza’s width; full-width galleries above furniture look like wallpaper. On an 8-foot ceiling, keep the lowest frame 6 to 8 inches above the tallest ceramic tree so nothing crowds. Smaller rooms can borrow just the credenza and three light-up trees, then move the gallery wall to a hallway.
17. Why Handmade Vintage Christmas Crafts Still Beat Store-Bought
Handmade is having a moment partly because everything else looks the same. Searches for hand-painted ornaments, felt appliqué, and bottle brush crafts have climbed every fall since 2023, and 2026’s crop leans hard into slow, imperfect, made-by-a-person work. Estate-sale glass sets are still cheap, which helps — the raw material for this trend is sitting in bins at your local thrift store for a dollar apiece.
Pick one craft and make twelve of it instead of making twelve different things. A batch of identical ornaments reads as a collection, photographs well, and covers everyone on your gift list. It also means one set of supplies, one learning curve, and one afternoon. Depth beats variety in a small display every single time.
18. Tiny White Tree Dressed in Candy Canes and Red Bows
The candy canes. A white tabletop tree with white ornaments is elegant and completely forgettable; oversized red-and-white striped canes give it a spine. They also solve a design problem — white on white needs contrast to show shape, and a stripe does that better than any bow. Take the canes off and you’re left with a wedding centerpiece that happens to be shaped like a tree.
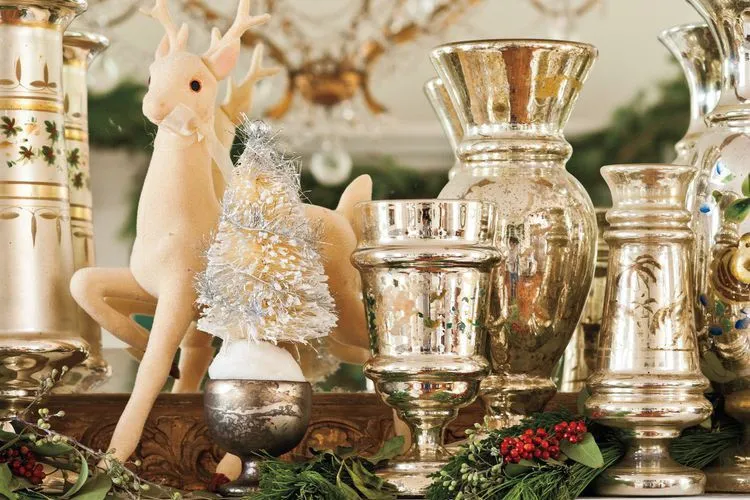
This one is a genuine $20 project:
- Mini white tabletop tree, Dollar Tree: $5
- Two boxes of full-size candy canes, Walmart: $3
- Red bows with gold trim, Target dollar spot: $4
- White shatterproof ornaments, 12-pack: $6
- Leftover ribbon for hanging: free
That’s about $18, which buys you a tree for the entry table, the guest room, and the bathroom counter for the price of one boutique ornament.
19. Retro Stocking With Atomic Embroidery on Dark Wood Paneling
Contrast does the work: bright turquoise and lime embroidery against dark wood paneling is almost a color-wheel lesson, and the white felt keeps it from screaming. The embroidered ornaments are all different sizes, which is why the pattern reads as accidental rather than printed. The gifts underneath repeat the palette — turquoise, red, lime — so the stocking and the pile below feel like one composition instead of two separate displays.

Felt pills. If you’re embroidering heavily on wool-blend felt, the fabric will fuzz along the stitched edges within a season or two — trim with sharp scissors and a lint roller, and never machine wash it. Glitter ribbon also sheds onto dark wood paneling, and there’s no hiding it. Set the gifts on a felt pad or a tray, and if the stocking hangs near a doorway, expect the corner to get bumped and re-hung weekly.
20. Flocked Tree Loaded With Retro Reflector Ornaments
Flocked branches hold dust better than they hold ornaments, so plan on a soft brush or a vacuum brush attachment every few weeks during the season. Glitter ribbon drops a fine trail that shows up on light floors and rugs. Reflector ornaments with indented centers collect dust right in the indent — which is exactly where the light catches — so a dry microfiber cloth is the only safe tool. Store this tree upright; folded flocked branches crease permanently.
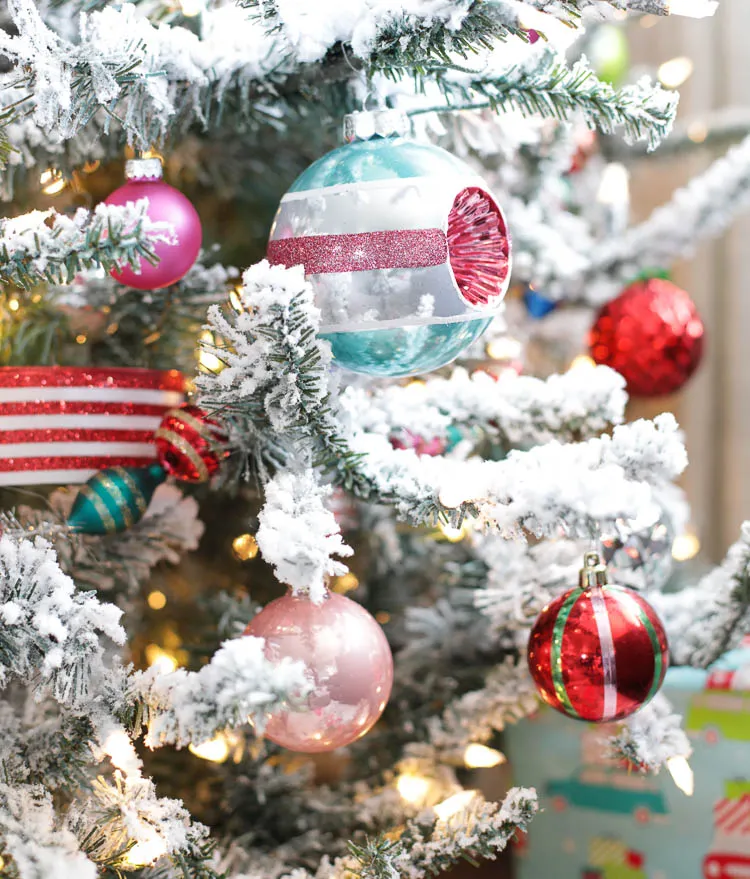
- Measure the tree footprint, not just the height — a heavily decorated flocked tree needs 6 inches of clearance on all sides.
- Confirm two outlets near the tree; six strands of lights on one cord is a fire risk, not a shortcut.
- Decide your bulb temperature before you buy — 2700K warm white flatters vintage glass, 4000K cool white turns it grey.
- Weigh one ornament and multiply by your count; a 7.5-footer with 200 glass balls needs a stand rated over 100 pounds.
21. Cream Sofa, Snowy Window, and a Pine-and-Berry Coffee Table
This arrangement needs a living room at least 12 by 14 feet so the sofa can face the window with a walkway behind it. Keep the coffee table 40 to 48 inches from the sofa front — closer and the snowy rug disappears, farther and the pine arrangement feels stranded. The snowy view is half the design, so if your window is small, borrow the look by styling the table and skipping the faux snow entirely.
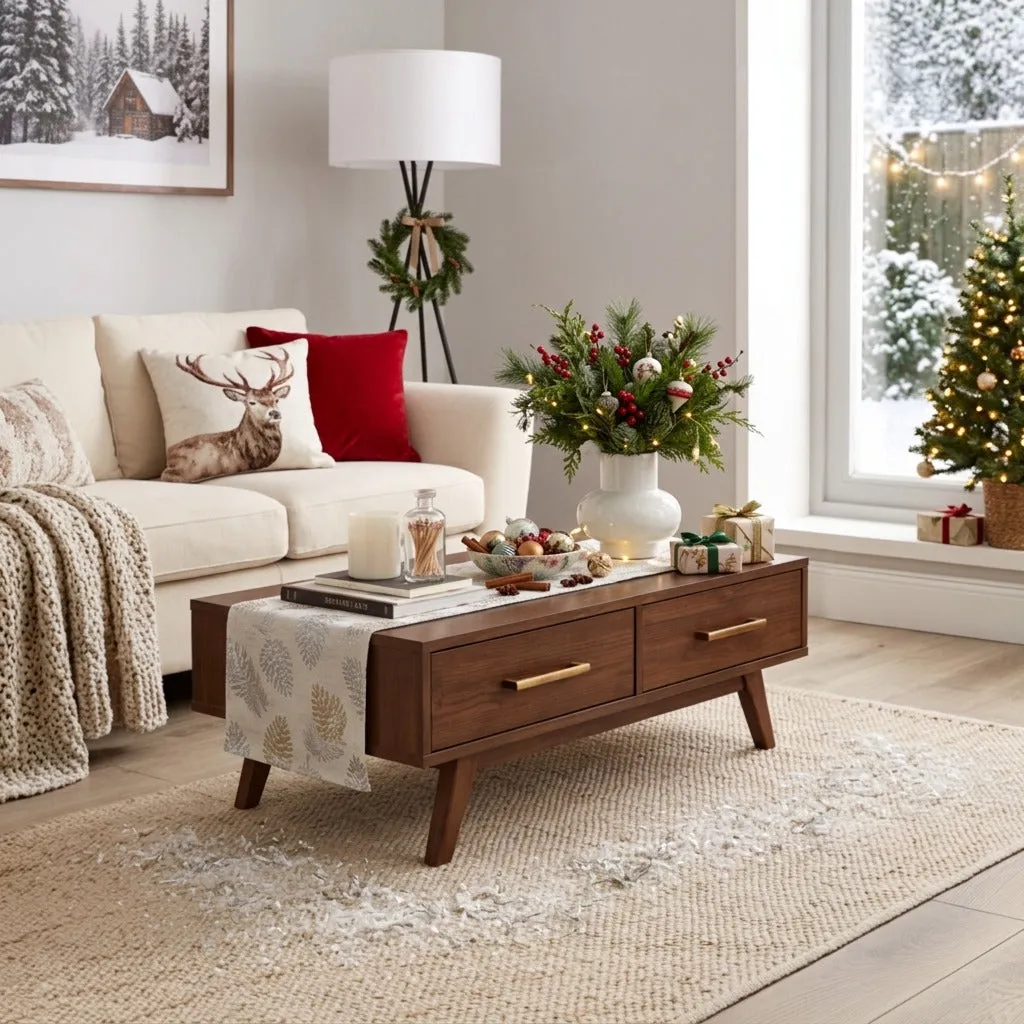
Three neutrals, one dark anchor, one accent. Cream sofa, natural fiber rug, faux snow, then dark wood and evergreen to hold it down, then red berries for the eye. The faux snow on the rug is the detail people miss — it blends the floor into the winter view outside, so the room reads as one continuous scene. Compare with Idea #16 — same mid-century bones, warmer palette.
You don’t need custom anything for this look:
- Cream slipcover for an existing sofa, IKEA: $60–$120
- Natural jute rug, 8×10, Walmart: $110–$180
- Mid-century style coffee table, Facebook Marketplace: $50–$150
- Faux snow blanket, Target: $12–$20
- Pine and berry stems, dollar store plus one good spray: $25–$40
- Deer print pillow cover: $10–$18
22. Distressed Tear-Drop Ornament Styled With Pine and an Old Book
One ornament takes about 40 minutes and under $6 in supplies.
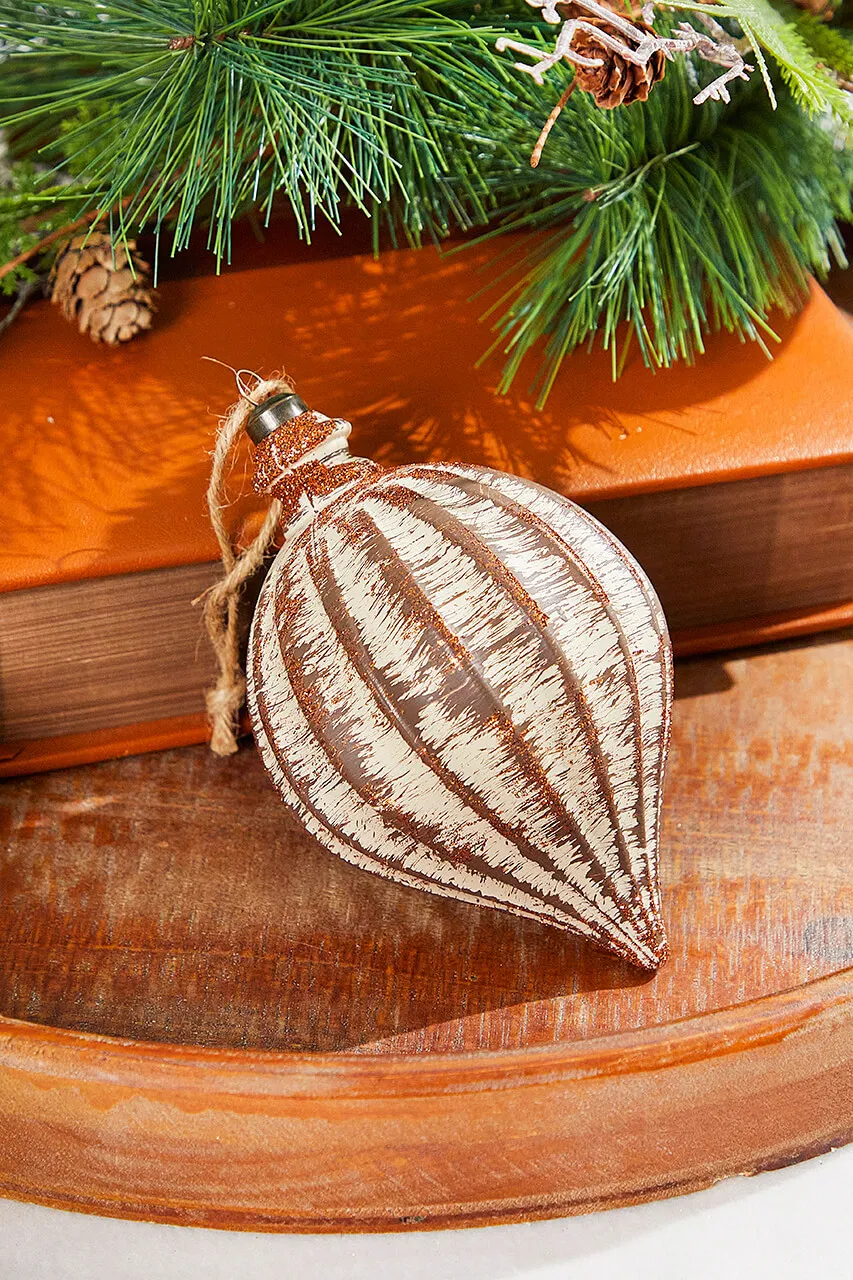
- Base-coat a paper-mâché teardrop in flat white and let it dry completely.
- Brush a thin layer of decoupage medium where you want the bronze stripe to sit.
- Sprinkle bronze glitter over the wet area, then tap the excess onto paper so you can funnel it back into the jar.
- Repeat for a second stripe after 20 minutes, working in thirds so it stays imperfect.
- Seal with matte spray from 12 inches away, then add a twine hanger.
The old orange-brown book. A single ornament on a plain tray is a product shot; the same ornament propped against a worn book is a scene. The book adds height, a warm color the ornament doesn’t have on its own, and the suggestion that someone sits here. Any hardcover in a warm tone works — turn it so the page edges, not the spine, face the room.
23. A Candy Platter That Doubles as Christmas Centerpiece
- White serving platter, 14 to 16 inches: $15–$30
- Candy and cookie ingredients (chocolate, peppermint, nuts, caramel): $30–$60
- Red and green striped cups and liners: $5–$12
- Fresh evergreen sprigs: $8–$15
- Parchment, bags, and ribbon for gifting the overflow: $8–$14
- Total: $66–$131
- Budget alternative: bake three things and buy the rest from a grocery bakery counter — the platter looks identical and you save the whole afternoon.

Arrange in odd numbers and never in a ring. Five fudges, seven cookies, three barks — and use height: a small inverted cup under the parchment creates a riser so the back row isn’t hidden behind the front. Keep the color count to three, like red, green, and chocolate-gold, or the platter reads as a buffet instead of a centerpiece. Add the evergreen sprigs last and let one drape off the edge.
24. Vintage Glass Ornaments Piled in a Galvanized Bin
Estate-sale and eBay ornament lots routinely sell for $10 to $25 per dozen, which is how most of these collections start. Thrift stores price individual glass balls at 50 cents to $2. A galvanized tub runs $12 to $20 at a farm store, and shredded paper filler costs under $5 a bag. Fill a bin for about $40 total, versus $150 or more for a curated set of new vintage-style ornaments from a boutique.
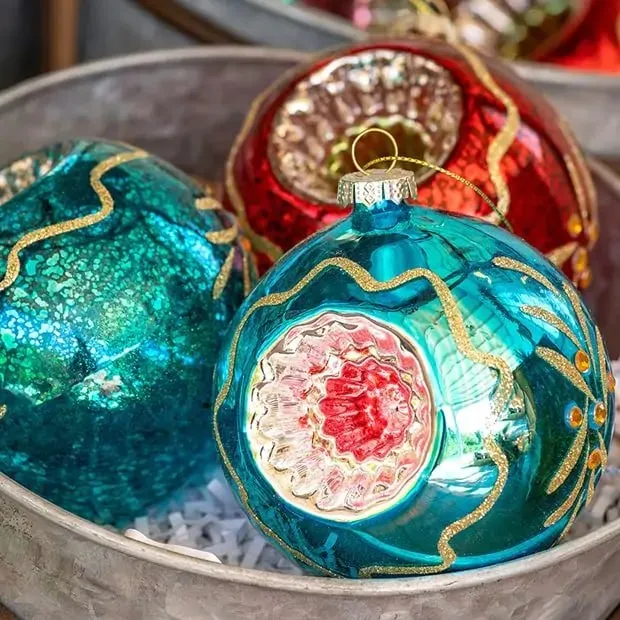
Two contrasts create the whole effect. First, dull metal against glossy glass — a shiny silver bin would fight the ornaments, so it needs that matte, slightly scratched finish. Second, crackled and embossed surfaces against smooth ones, which is why the pile never looks repetitive even though every piece is round. The white shredded filler at the bottom matters too: it lifts the ornaments and keeps them from clinking together.
25. Blue and Green Ornaments in a Teal Footed Bowl
Teal and blues take 55 percent, emerald green 25, that reddish-pink runner 15, and the dark wood table the last 5. The pink is technically off-palette, which is exactly why the arrangement feels collected instead of purchased. Swap the runner for deep plum and the whole centerpiece warms up; swap it for charcoal and it turns sleek and modern. Keep the bowl teal either way — it’s the bridge between cool ornaments and a warm table.
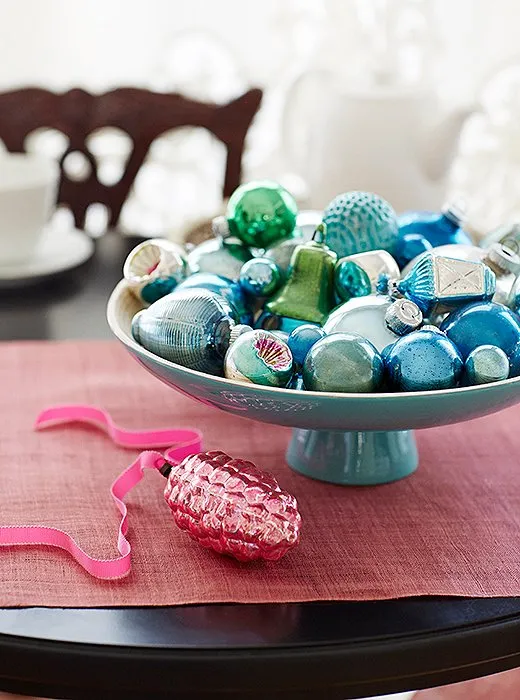
The single pink pinecone ornament resting outside the bowl. Everything else lives inside the teal vessel; this one piece sits on the runner with its own velvet ribbon, and it’s what makes the arrangement look styled rather than poured. It’s also your permission slip to break the palette — one warm accent against a hundred cool ornaments gives the eye somewhere to rest before it goes back to digging through the bowl.
A 10 to 12 inch footed bowl is right for a dining table 36 inches wide or more; anything bigger blocks sightlines across the table. Run the fabric runner about 14 inches wide and let it hang 6 inches over each end. If your table seats six or more, use two smaller bowls instead of one large one. Compare with Idea #24 for the bin version of the exact same storage problem.
26. Silver Tinsel Flocked Tree Beside a White Brick Fireplace
Silver tinsel sheds like nothing else in your holiday box — vacuum it up rather than picking at it, and never pull strands out of the branches, because you’ll take needles with them. Brass candlesticks need a polish twice a season if you actually burn candles on them. Flocked trees beside a working fireplace collect soot, which turns white snow grey by January, so keep the tree at least four feet from the hearth.
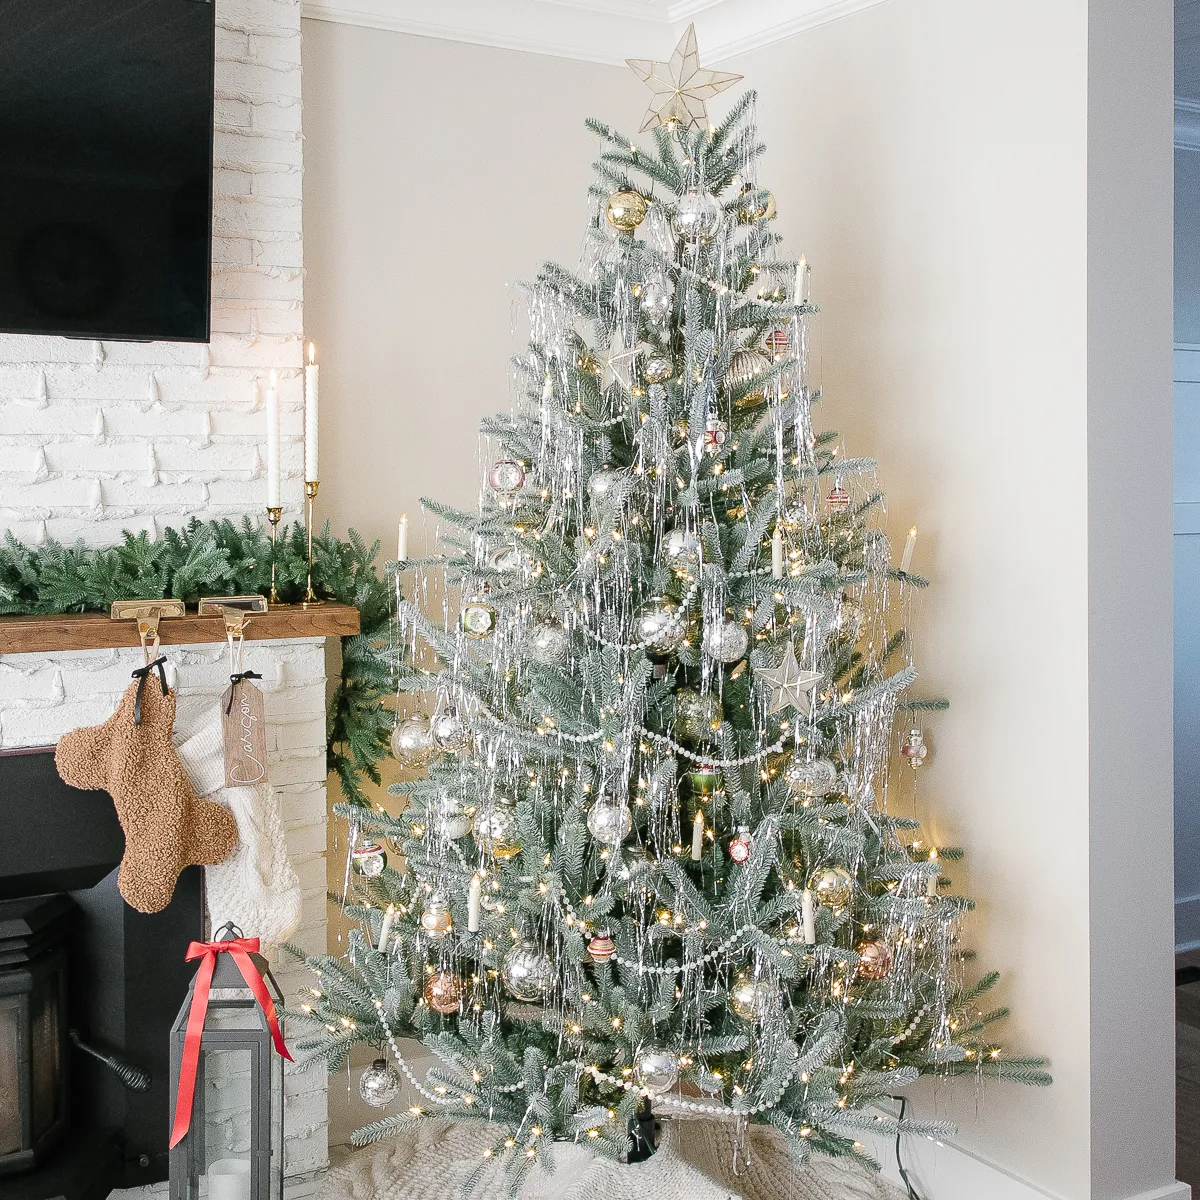
- 7.5-foot flocked tree: $150–$400
- Silver tinsel garland, 6 strands: $15–$30
- Mixed metallic ball ornaments, 75 count: $40–$90
- White beaded garland: $15–$25
- Brass candlesticks, thrifted: $20–$60
- Stockings: $25–$60
- Total: $265–$665
- Budget alternative: buy tinsel and metallic balls on January clearance and reuse last year’s tree — you’ll cut this number in half.
- Measure the distance from tree to fireplace; four feet is the minimum, six is better.
- Check whether your mantel can hold garland plus candlesticks without screws — old plaster often can’t.
- Count outlets and buy a heavy-duty power strip rated for the light count.
- Confirm the stand can handle tinsel plus glass; tinsel alone adds two to three pounds.
27. Seashell Santa Ornament Among Poinsettias and Gold Glitter
The seashell Santa. It’s a souvenir shell with a vintage Santa illustration, which means it carries a place and a decade the rest of the tree doesn’t. Without it, you have a beautifully decorated traditional tree — red poinsettias, gold glitter, warm lights. With it, you have a tree that tells you someone’s been collecting since before you were born.

Cluster your statement ornaments in threes rather than spacing them evenly. Group the poinsettias and glitter pieces at three points on the tree — one high left, one mid right, one low center — and let the rest of the tree stay quieter. Even spacing flattens a tree; deliberate clustering creates the impression that the decorations fell that way. Keep statement clusters at least 18 inches apart so each one registers on its own.
28. Glass Santa Ornament With Glitter-Trimmed Red Suit
Glass Santa ornaments with gold caps run $18 to $28 at boutique home stores, $5 to $8 at Target and Walmart, and $2 to $4 at estate sales and church bazaars. The glitter trim is the giveaway detail — check that the white glitter sits on the suit trim rather than sprayed across the whole figure. Fill a bowl with six of them for under $30 and nobody will ask where they came from.

It’s contrast, plain and simple. A shiny red suit with white glitter trim against dark green needles gives you maximum color separation at minimum detail, and that reads from across the room — which is what a tree ornament is actually for. The golden cap and hook finish the effect: a small metallic punctuation mark that makes a $5 ornament look intentional next to anything else on the branch.
29. Snow-Dusted White Bells Tied With Twine and Ribbon
A cluster of ten takes about 45 minutes and roughly $12.
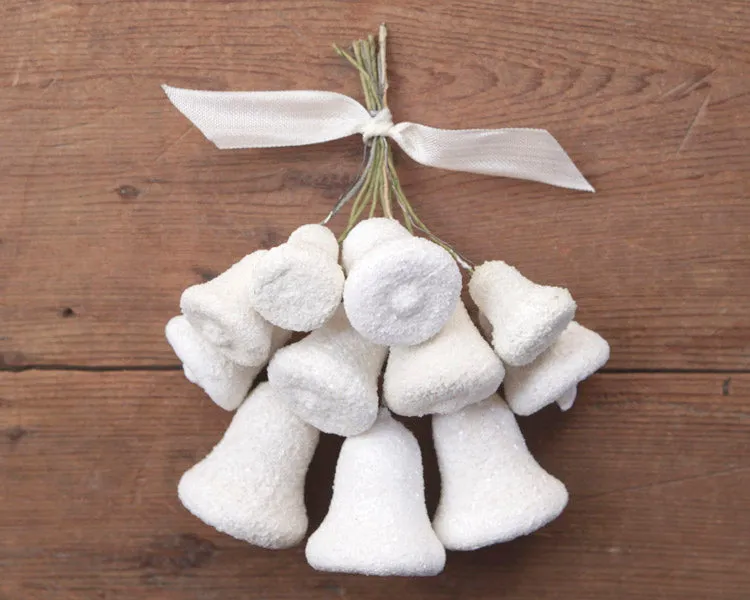
- Coat small paper-mâché or ceramic bells in flat white and let them dry fully.
- Brush on a thin layer of craft glue and roll each bell in fine white glitter or faux snow.
- Tap off the excess and let them cure for an hour.
- Thread each bell onto 24-gauge wire and twist the ends together into a loose cluster.
- Tie the bundle with natural twine, then add an off-white ribbon bow over the wire.
White and off-white hold 80 percent here, natural brown takes 15, and the remaining 5 is shimmer from the sparkling coating. That’s a nearly monochrome formula, and it’s why the cluster works on a rustic wooden tray without looking washed out — texture replaces color. Introduce one deep green sprig and the white reads brighter. Introduce red and it turns into a candy cane arrangement entirely.
30. Pastel Ceramic Light-Up Trees on a Bright Red Table
- Vintage ceramic light-up trees: $45–$120 each
- Reproduction ceramic trees: $25–$60 each
- Replacement C7 bulbs and cords: $8–$15
- Small gold conical trees: $12–$30
- Colorful beaded garland: $10–$22
- Power strip and cord covers: $15–$25
- Total: $115–$272 for a three-tree vignette
- Budget alternative: build the vignette over two years from thrift finds — vintage ceramic trees turn up for $8 to $20 in June, when nobody’s thinking about Christmas.
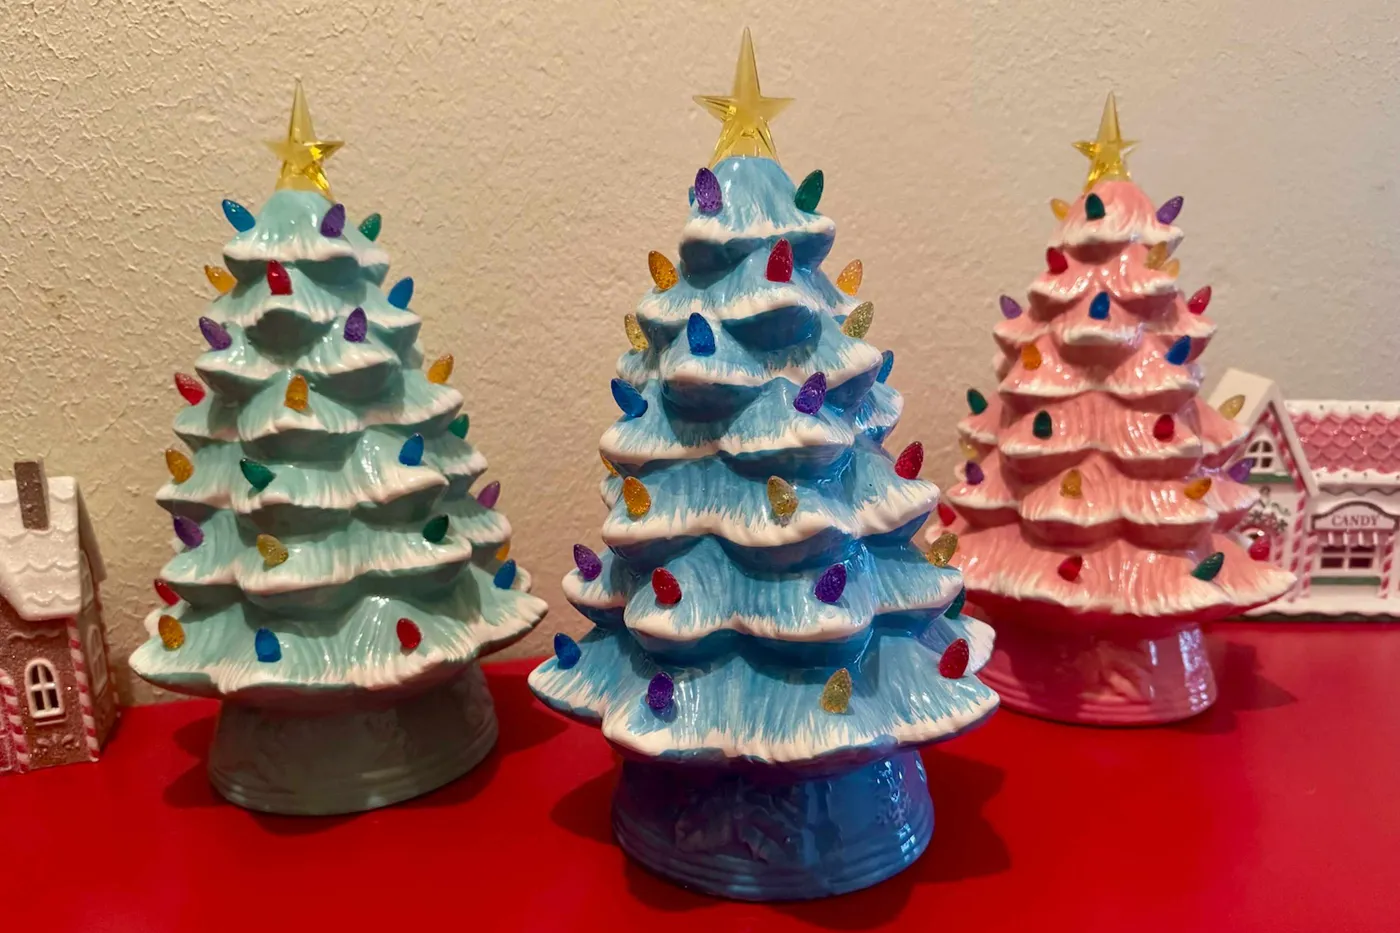
Every vintage ceramic tree has its own cord, and most are two-prong and decades old. Test each one before you chain them together, keep the load under what your power strip is rated for, and replace any cord that’s stiff, cracked, or warm to the touch. Those little C7 night-light bulbs burn out and originals are hard to match, so buy a reproduction set in the same color temperature before you need it.
Pastel Christmas is having a moment, and the ceramic light-up tree is its mascot — half nostalgia, half grandmillennial color play. It’s sticking around because it’s a tabletop decoration that plugs in, takes up eight inches of space, and makes a whole room feel lit. Compare with Idea #18 for the same table-size scale without the cords.
31. Blow-Mold Santa Glowing Inside a Dark Green Tree
- Check the bulb inside before you buy — vintage blow-molds use incandescent bulbs that run warm; swap in an LED equivalent.
- Measure the branch you plan to hang it from; these pieces weigh 1 to 3 pounds, so hang near the trunk, not the tip.
- Confirm the cord reaches an outlet without an extension running under the tree skirt.
- Look for a UL listing on the plug; unmarked blow-molds from estate sales should be inspected or rewired.

Treat the glowing Santa as a light source, not an ornament. Hang it in the front third of the tree at eye level and clear a 10-inch radius around it — matte ornaments, dark blue balls, plain branches. That quiet ring is what makes the internal glow read as light rather than as one more shiny object. Two of these on one tree is one too many.
Make Something Worth Passing Down This Christmas
Vintage Christmas crafts work best when they’re a little imperfect and a lot personal — a tree in a painted bucket, a hand-painted ornament with crooked leaves, a pile of glass balls that took three years of thrifting to collect.
Start with one project this weekend, add to it next year, and let the collection tell the story. 📌 Save this to Pinterest for later — you’ll want to revisit these ideas when December gets busy.