32+ Stunning School Hallway Christmas Decorations That Will Spark Joy This Holiday Season

You know that feeling when you walk into school on the first Monday of December and a kid stops dead in the doorway because the hallway looks like a completely different place? That is the entire goal here.
We spent serious time digging through Dollar Tree, Amazon, Michaels, Target, and Oriental Trading to bring you only what is worth your holiday budget this year — and the price range runs from about $6 in craft paper to $240 for a full archway build.
Inside you will find 32 curated hallway ideas covering gingerbread and candy-land themes, winter wonderlands, Polar Express tunnels, and classic evergreen-with-red-bow setups. Budget and splurge versions get compared side by side, and every idea is shoppable with direct product links.
2026 is all about the walk-through hallway — decor families photograph, not just glance at — which is exactly why these builds keep resurfacing on Pinterest every November.
📌 Save this to Pinterest for later — you’ll want to revisit these ideas.
1. Elf Door and Stocking-Loaded Tree in the Main Corridor
This corridor works because it reads as a scene instead of a display. The elf-outfit door on one side and the cartoon face on the other act like bookends, and the lit artificial tree between them gives your eye somewhere to land before it wanders down the hall. Repetition is doing the heavy lifting too — dozens of small stockings hung at a consistent height make a plain artificial tree look collected over years rather than bought in one Saturday. The candy cane pole and plush figures down at floor level keep the whole composition from floating.
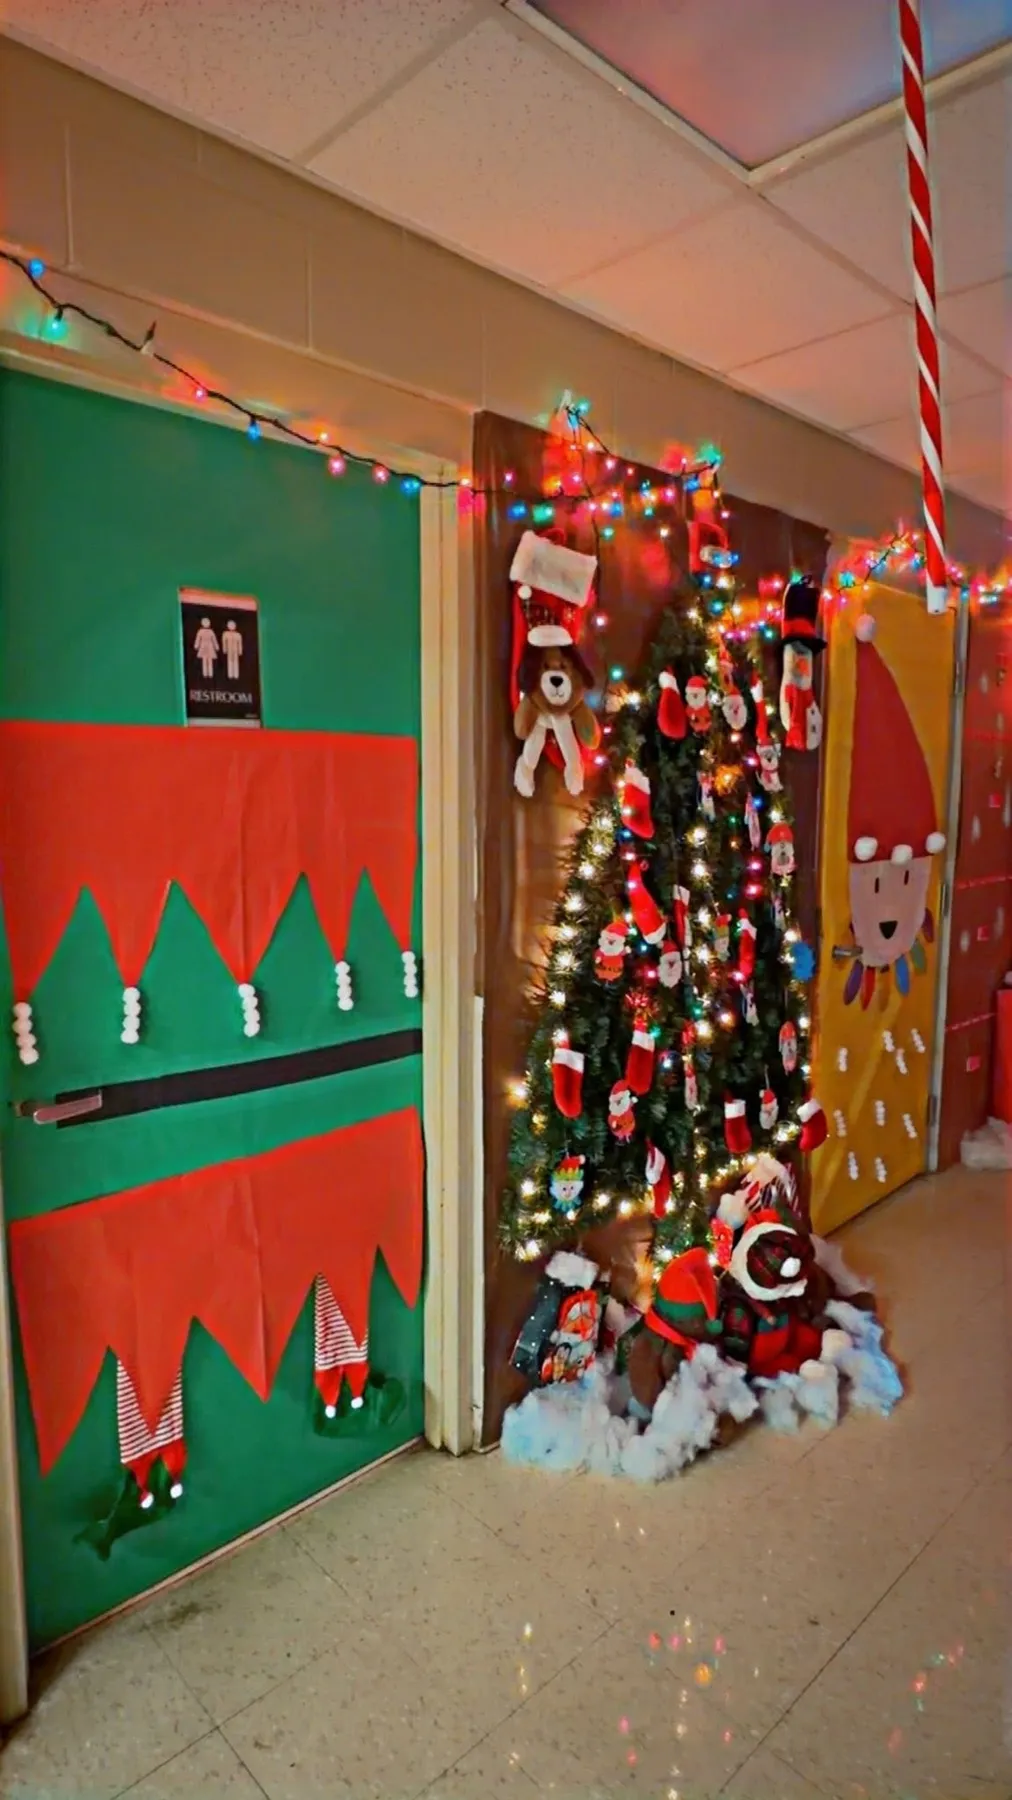
Strip everything else away and the lit tree standing squarely between the two decorated doors is what holds this together. Take it out and you have two cute doors with a dead pocket of wall in the middle; the hallway loses its center of gravity. One tall vertical element, dead center, flanked by two lower focal points — that is the entire trick. Copy the arrangement before you copy the crafts.
2. A Ceiling Canopy of Warm Lights and Dangling Ornaments
Run your light strands in parallel lines about 18 inches apart, then hang ornaments on clear nylon line at staggered drops — 8, 12, and 18 inches — so no two sit at the same height. That is what makes a ceiling feel like weather instead of a grid. Check your ceiling type first: drop-ceiling T-bars take clips and light strands happily, but drywall needs adhesive hooks rated for at least 2 pounds each, and 60 hooks is a lot of pulling come January.
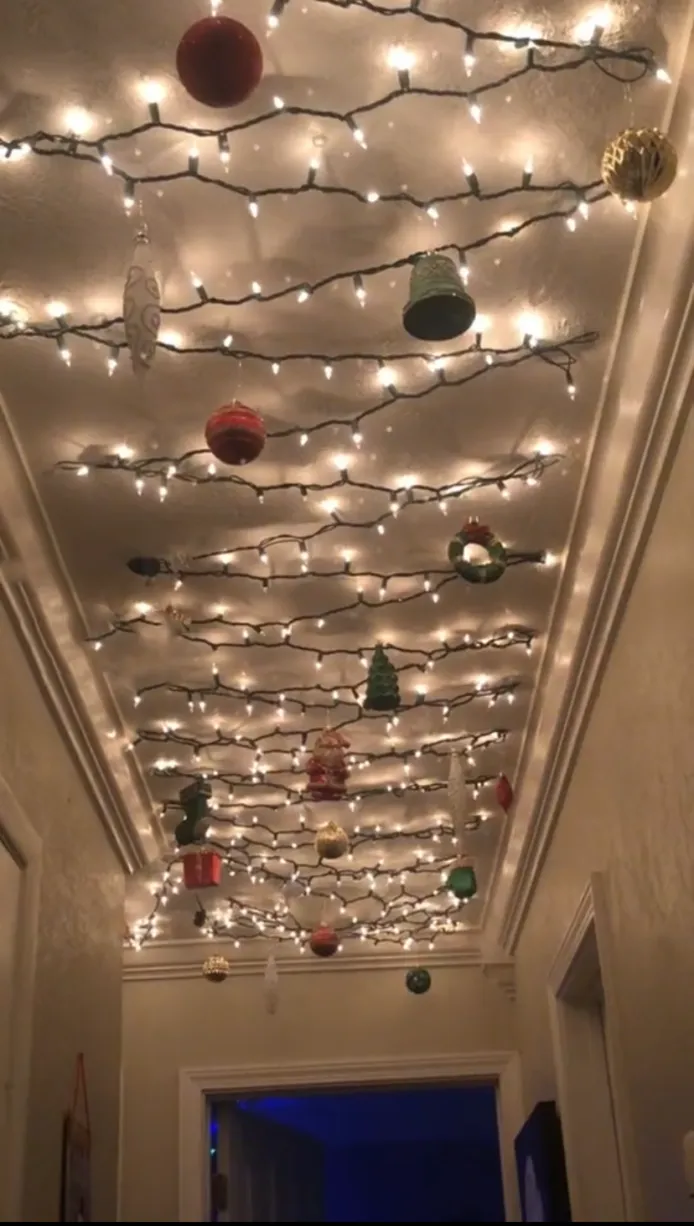
This look wants a hallway at least 5 feet wide and an 8-foot ceiling minimum. Anything lower and those long drops will greet your tallest eighth grader with a smack. In corridors under 6 feet wide, cap the longest drops at 8 inches and save the 18-inch ornaments for the middle of the run where people walk through, not along the walls. Compare with Idea #4, which uses open draping that doesn’t eat vertical space.
3. Santa’s Chimney and a Gingerbread Wall at the End of the Hall
- Faux brick chimney (cardboard frame plus brick-print paper): $35–$90
- Santa legs and boots prop: $25–$60
- Gingerbread wall (kraft paper plus white paint pen): $20–$45
- Plush characters, snow batting, garland: $45–$95
- String lights and door ribbon: $15–$40
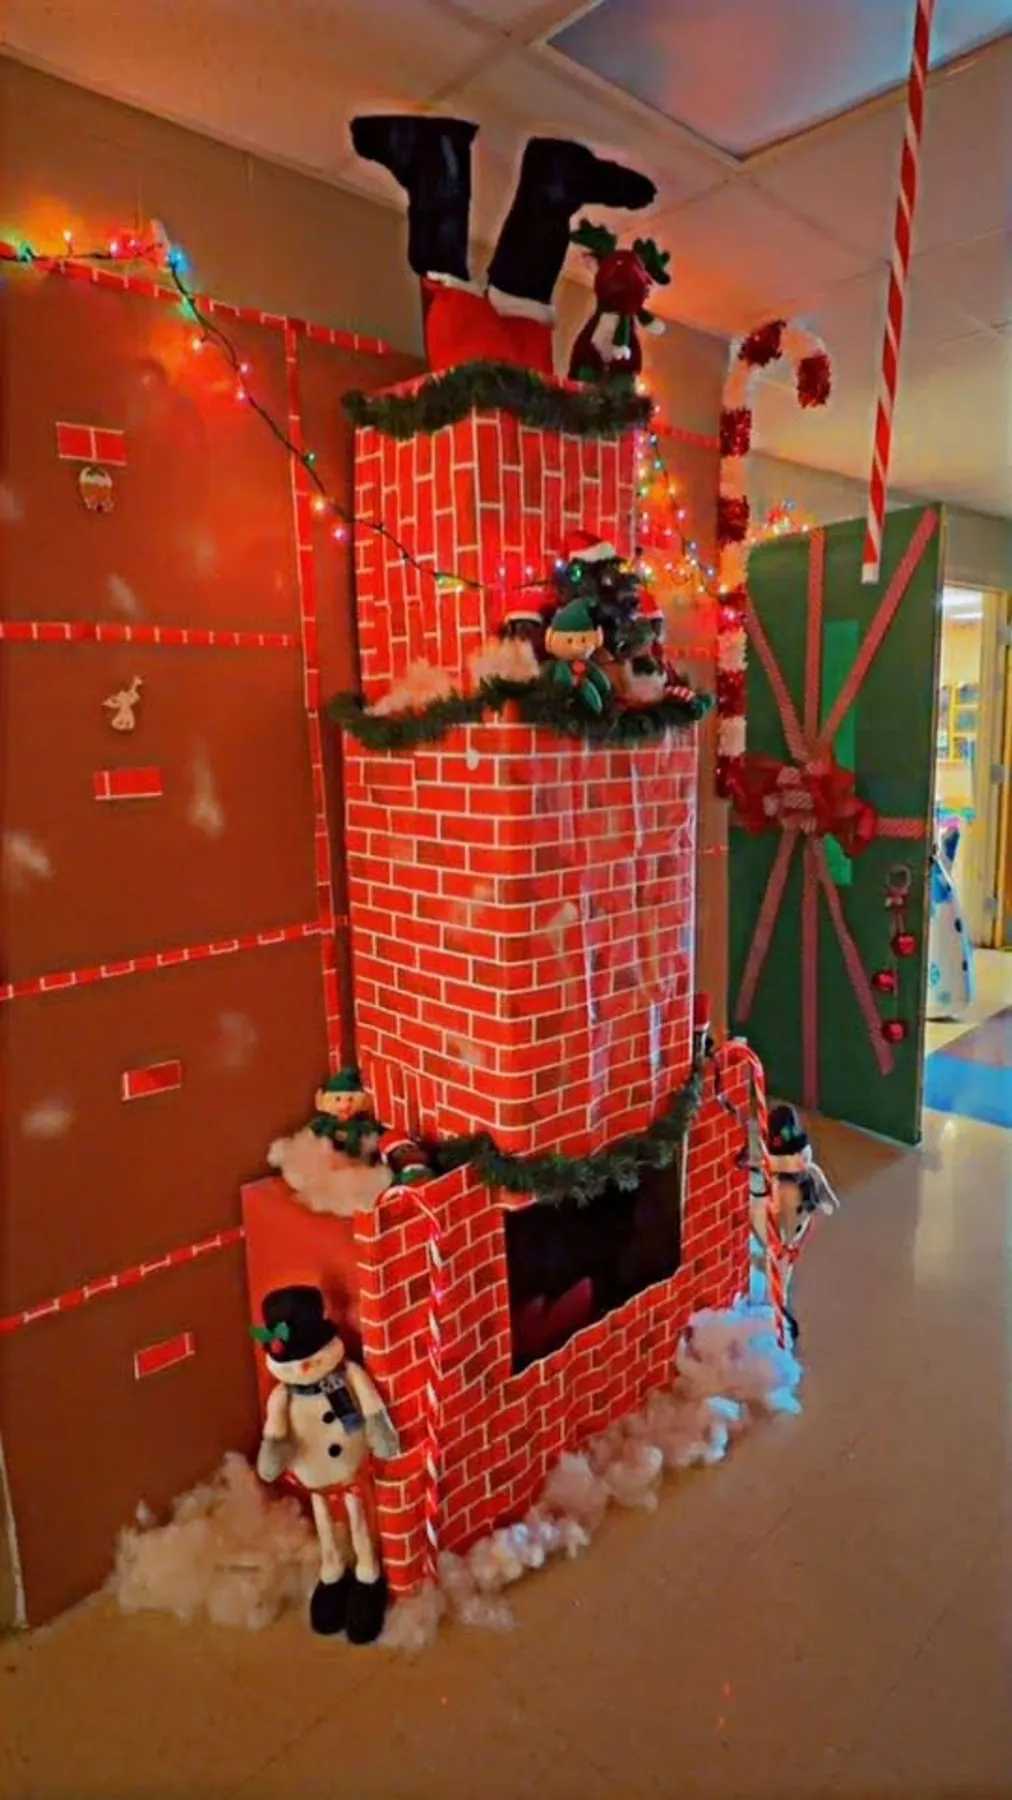
Budget alternative: skip the chimney structure and paint Santa’s legs directly onto a large cardboard sheet taped to the wall — about $25 all in.
Cardboard and kraft paper are the cheapest way to build a chimney and the fastest way to get a visit from the fire marshal. Keep every paper structure at least 3 feet clear of exit doors and never block a panic bar, not even for a week. And if your hallway is painted cinder block, plain masking tape will peel the paint right off in January — lay down a strip of painter’s tape first and stick your paper to that.
4. Paper Stars and Garland Draped Above Blue Lockers
Read this corridor as a formula: about 55% warm white light, 20% paper white for the stars and snowflakes, 15% evergreen garland, and 10% locker blue acting as the only cool note in the room. Swap the paper stars for paper bells and the formula still holds. Swap the warm white bulbs for cool white and it goes cold and institutional in about four seconds. Stay between 2700K and 3000K and let the lockers supply the color.
- Measure the hall and cut two lengths of garland 6 inches longer than the span.
- Set cup hooks or adhesive cable clips every 6 feet along the ceiling.
- Drape the lights first, then lay garland over them so green hides the wires.
- Cut paper stars in three sizes — 4, 8, and 12 inches — for variety.
- Hang stars on fishing line at staggered heights, lowest point 7 feet up.
Roughly $40 in materials and three hours for a 40-foot run.
5. Craft Paper Gingerbread Hallway With Candy Cane Pillars
Teachers have been turning hallways into full narrative sets for a few years now, and 2026 is peak walk-through decorating — the kind that ends up on a parent’s phone before the first bell rings. The gingerbread-and-candy theme keeps winning because it is cheap to fake: brown kraft paper reads as cookie, white paper reads as icing, and honestly, nothing has to look neat to look good. Schools lean into it because it photographs well for newsletters, open houses, and the district social feeds.
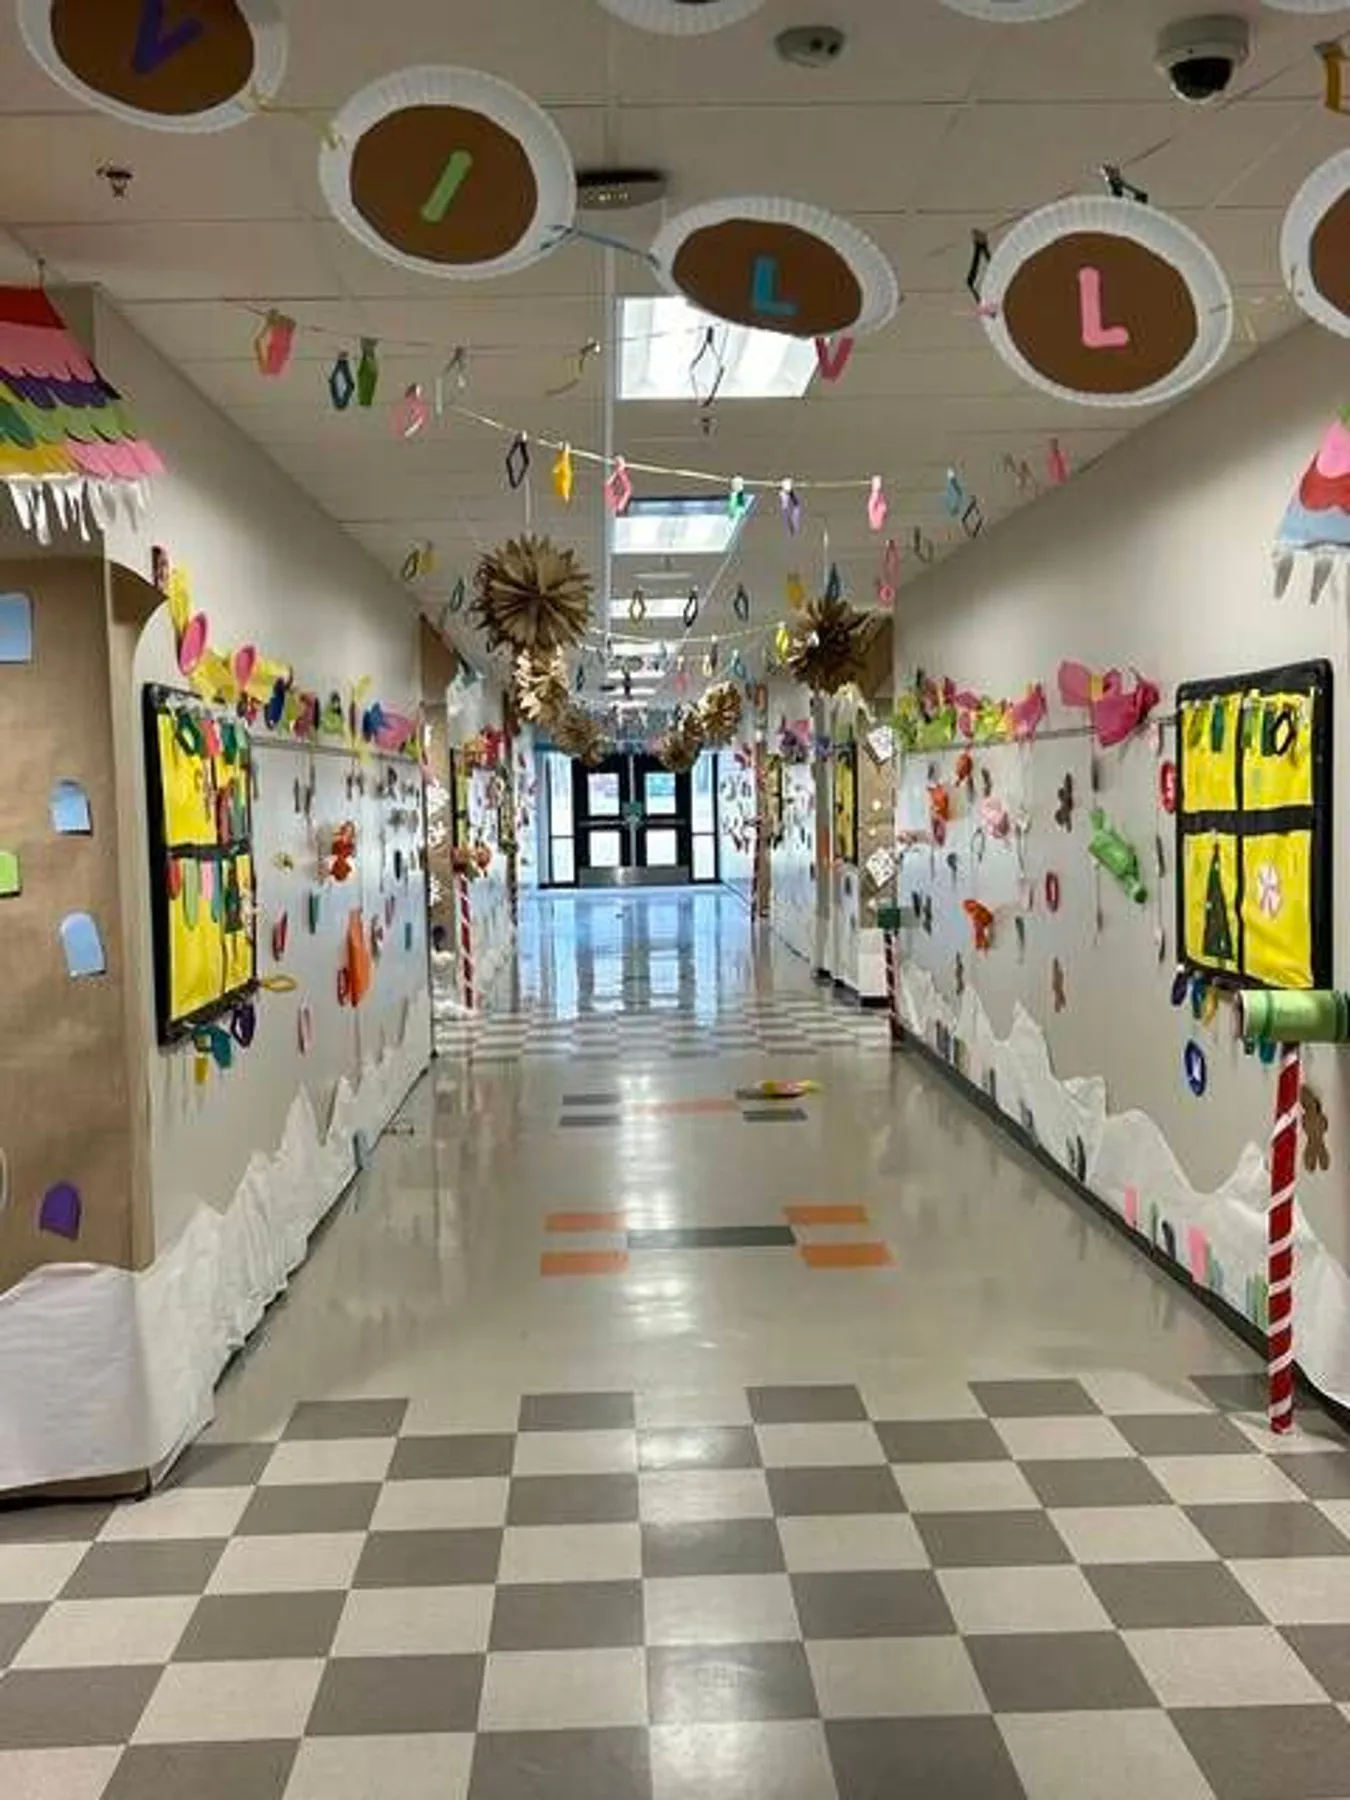
Paper plate letters look store-bought if you do one thing: glue two plates back to back with the rims facing outward, then coat both sides with matte clear sealer. That gives you a rigid, double-sided letter that won’t curl in hallway humidity. Hang them on fishing line at a consistent 4-inch interval so the word reads as one unit — uneven spacing is what makes handmade displays look messy instead of charming.
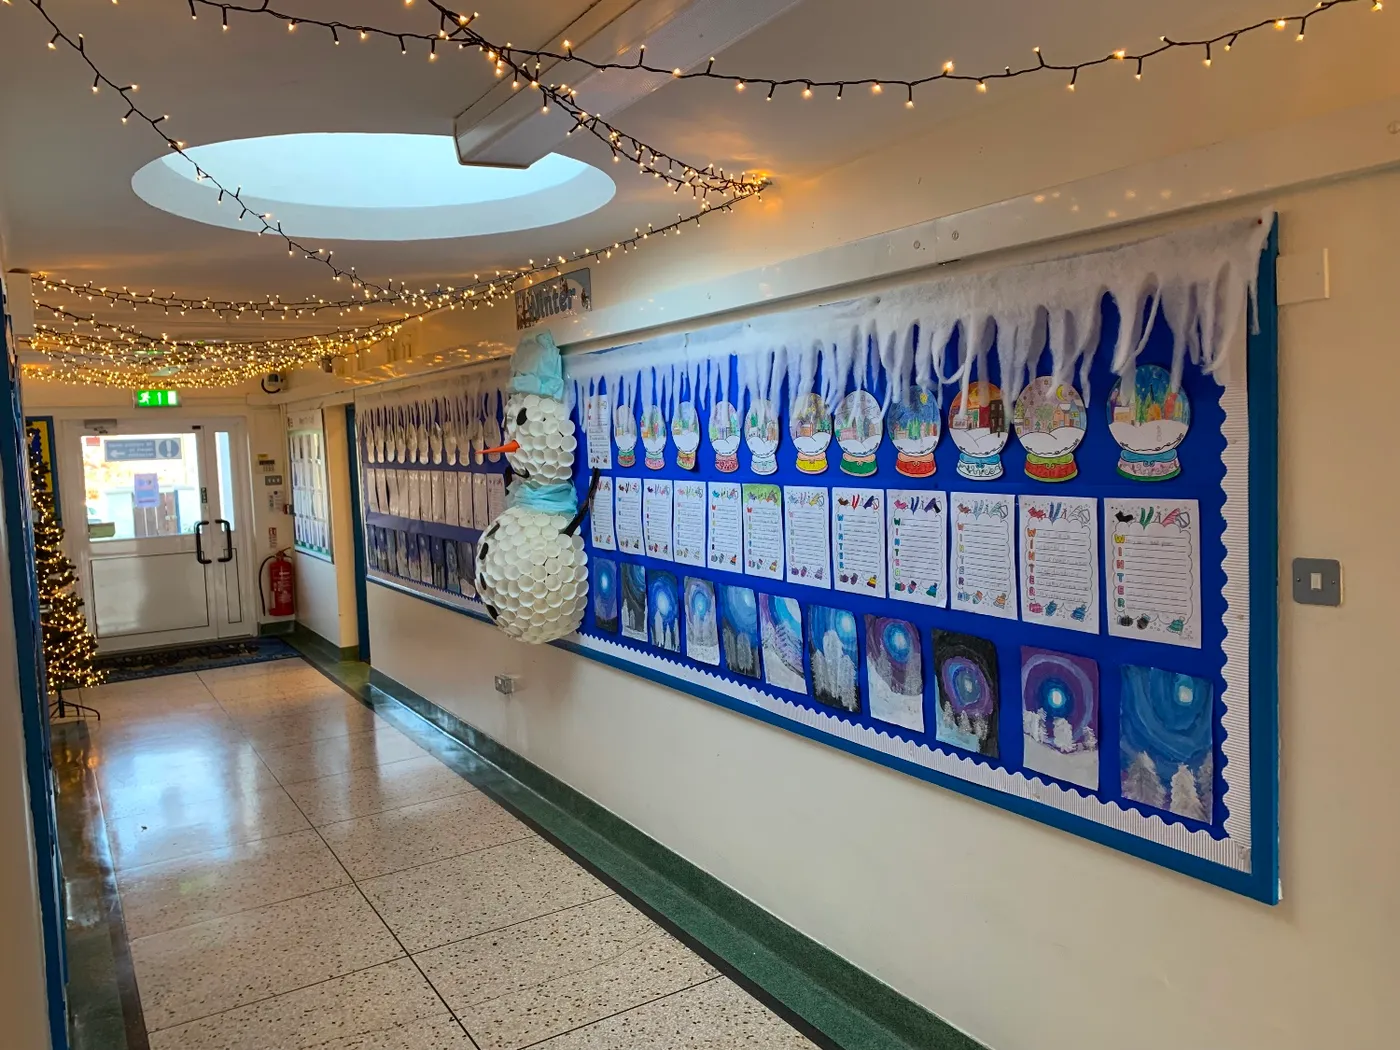
6. Inflatable Snowmen and Icicle Lights by the Bulletin Boards
Nobody needs a $300 commercial display. Indoor inflatable snowmen run $25–$45 at Walmart and Target once Thanksgiving passes, and Dollar Tree’s $1.25 snowflake packs will cover an entire ceiling for under $30. Facebook Marketplace in January is where the real steals live — teachers offload whole sets for $40 because they are switching classrooms. The one thing worth buying new is the icicle lights; confirm they are indoor-rated and have a steady-on mode.
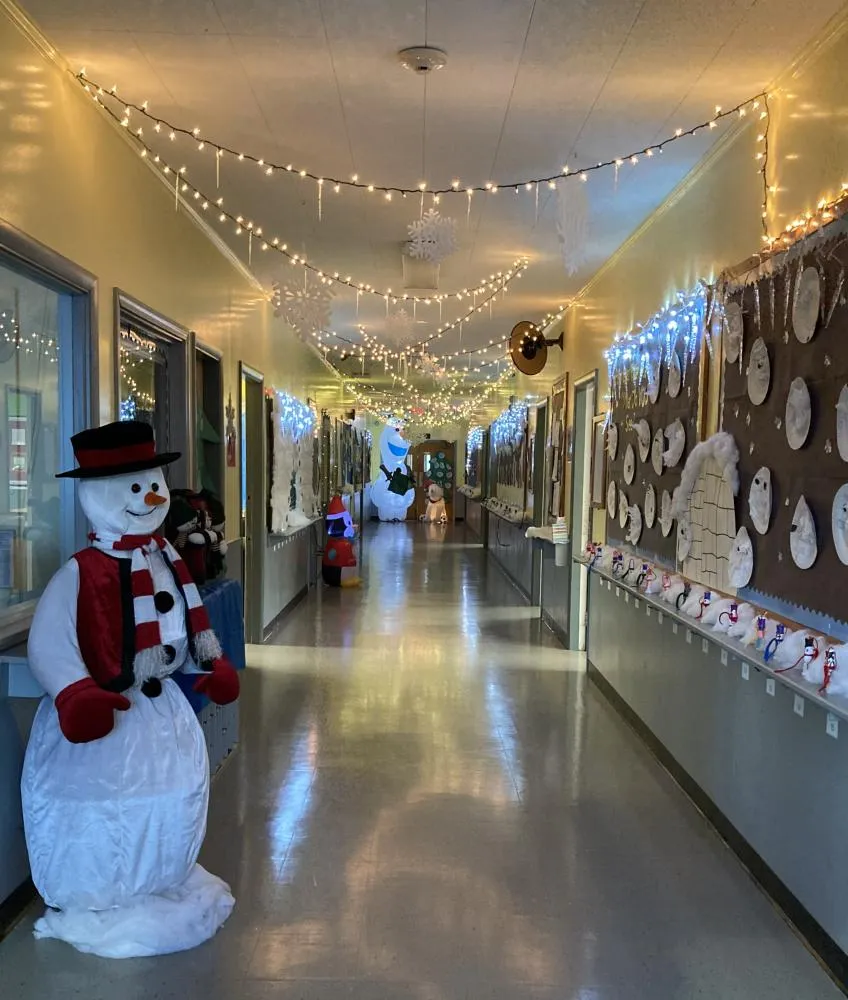
What makes this read as winter rather than Christmas is the light temperature mix — warm white strands along the ceiling against cool blue lights on the bulletin boards. That contrast does more work than any single decoration in the hallway. The second move is scale: giant inflatables sitting next to small paper snowflakes give your eye two very different sizes to process, which keeps a long corridor from turning into visual wallpaper. The bulletin boards then act as frames, so decorations have somewhere to belong.
7. Hand-Cut Snowflakes Floating in Warm String Light Glow
What carries this hallway is that no two snowflakes are alike. A ceiling of identical machine-cut flakes reads as a party store aisle; a ceiling of individually folded and cut paper reads as a community. Swap them for the store-bought version tomorrow and you would still have light and color, but you would lose the texture that makes people stop and look up. Get twenty people folding and cutting for an hour and the whole effect is done.
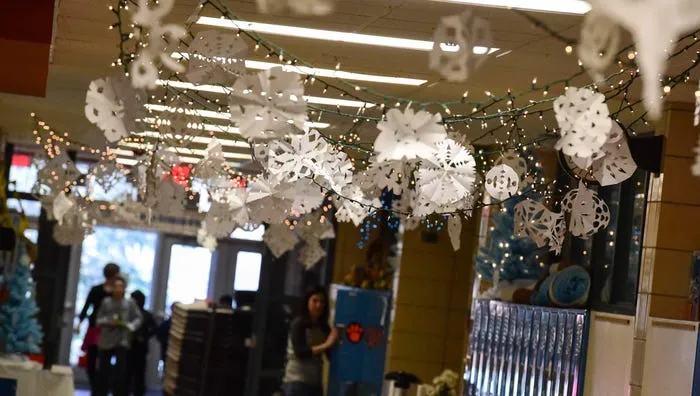
Paper snowflakes are the lowest-maintenance holiday decor there is, and also the most fragile. Edges curl within a week in a heated hallway — press them under a stack of books overnight and they flatten right back out. The string lights are the real upkeep: expect a strand or two to fail each season, so buy one spare and store everything flat in labeled bins with tissue between layers. Treated well, the same snowflakes come back for five Decembers.
8. A Candy Cane Archway and a Tinsel-Wrapped Fire Extinguisher
- Measure the door frame width and add 12 inches of overhang per side.
- Cut white and green paper into 3-inch strips, alternating colors.
- Lay the strips diagonally over a cardstock arch cut to shape, overlapping each one.
- Add a second cardstock layer on the back so the arch holds its curve.
- Mount with removable hooks on the wall beside the frame, not on the frame.
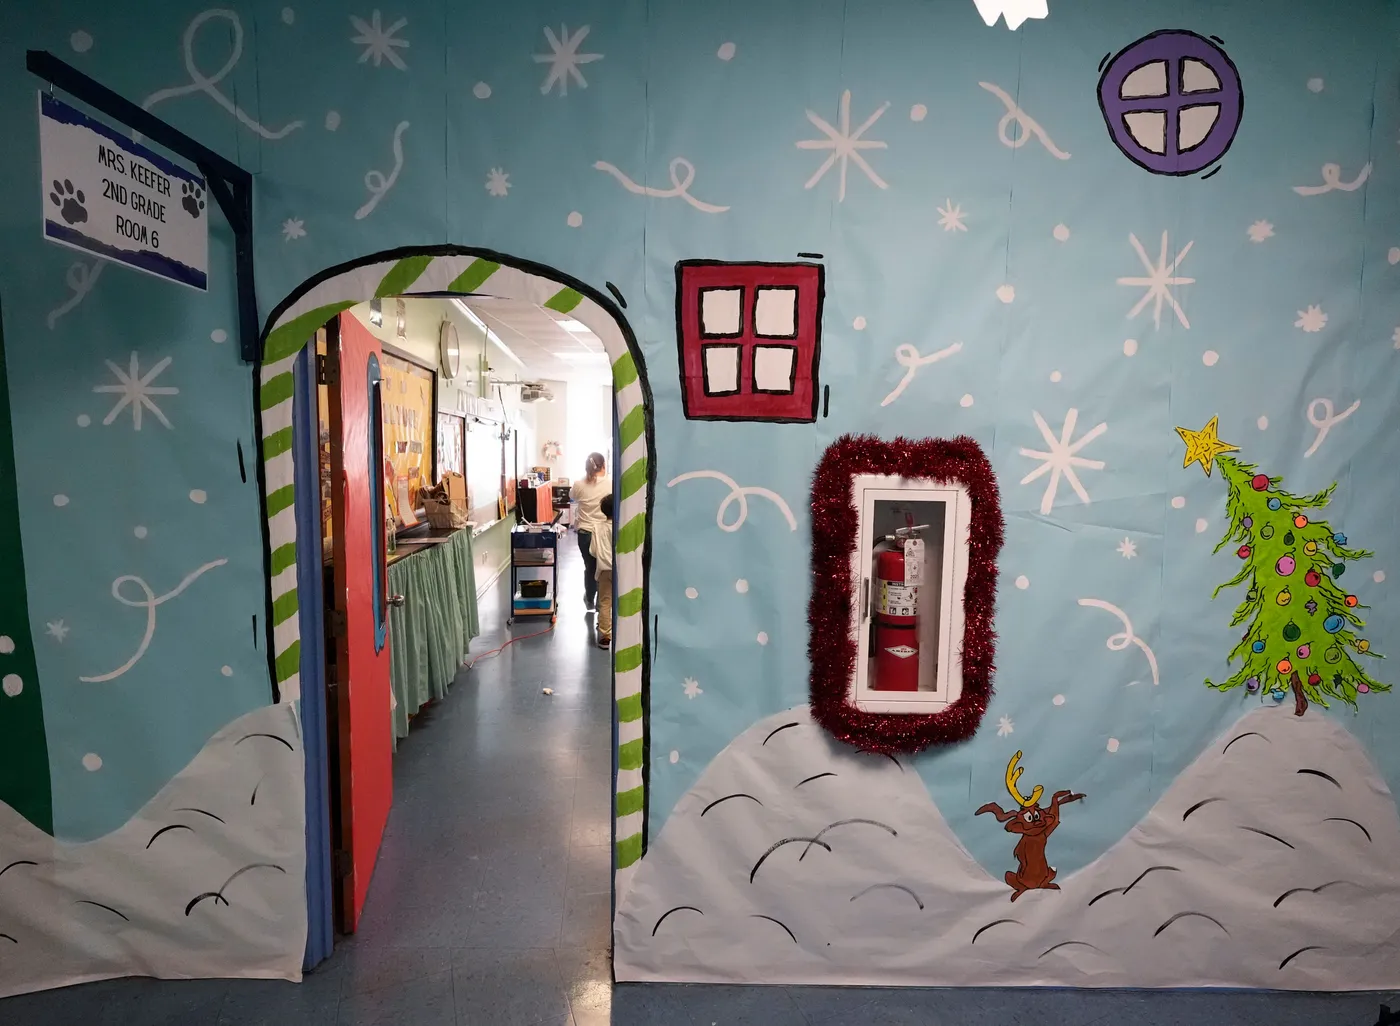
Two hours and under $15 in materials.
Here is the ratio that makes this Grinch-inspired wall land: roughly 50% light blue paper, 25% white drawing and cutouts, 15% red for the drawn window and tinsel, and 10% green for the candy cane arch. Change the blue to a deeper navy and the same proportions read as a night sky. Change the red to gold and it turns elegant instead of mischievous. The formula is really just one dominant background plus one accent color doing all the shouting.
9. Gingerbread Walls With Paper Chains and a Balloon Gingerbread Man
Two things will bite you with a gingerbread build. First, balloons — a gingerbread man balloon looks great for about four days in a warm building and then starts to lean; buy two and swap them mid-month. Second, brown kraft paper seams. Overlap each panel by at least 2 inches and tape the seams on the back so they don’t lift. Also check your district’s policy on hanging anything from ceiling grids before you commit to paper chains strung wall to wall.
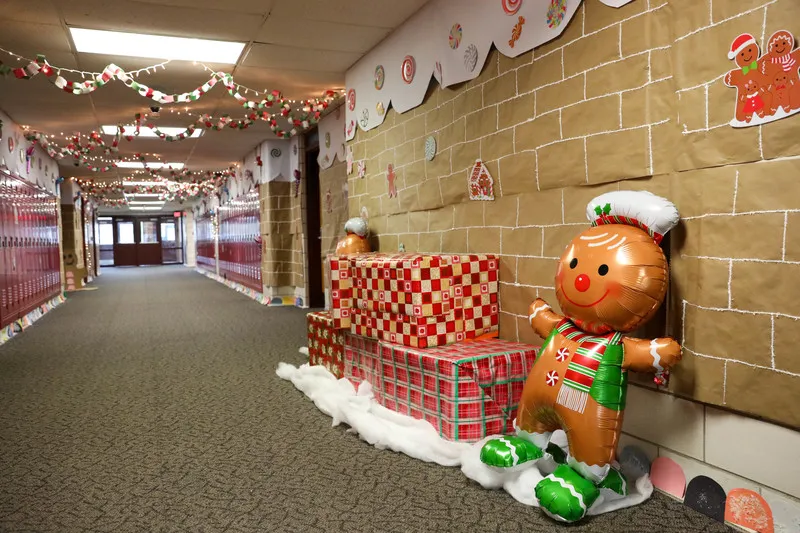
- Brown kraft paper rolls (4–6 rolls): $24–$42
- White paint pen and markers for icing lines: $8–$20
- Paper chain strips and precut gingerbread figures: $15–$35
- Fairy lights (4–6 strands): $20–$45
- Gingerbread balloon, wrapped gift boxes, snow batting: $30–$70
Budget alternative: have students cut their own candy shapes and chain strips from construction paper in class — that drops the decor cost to roughly $10. Compare with Idea #5 — same gingerbread language, much bigger scale.
10. Paper Lightbulb Garland Over a White Brick Wall
Two horizontal bands, one empty middle. Keep the paper lightbulb garland at 60–66 inches off the floor so students pass under it, and run the candy cane garland at 32–36 inches so it sits at hip level against the brick. Leave everything between those bands bare. That gap is what keeps a decorated wall from feeling cluttered, and it gives your eye a resting place between the colorful top and the busy bottom.
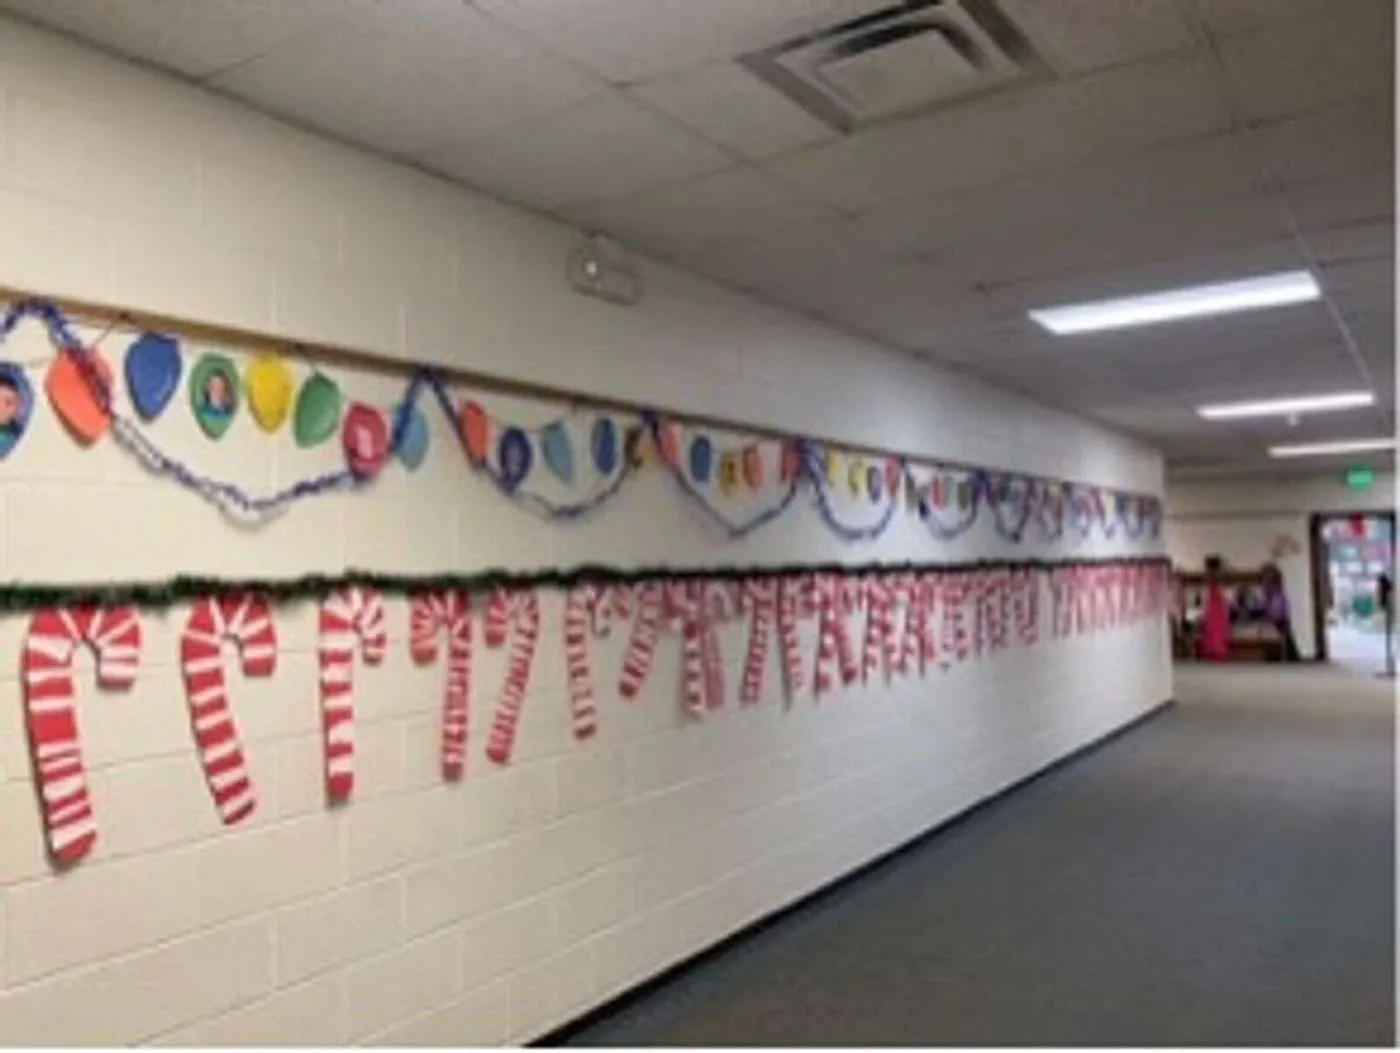
The multicolored paper lightbulb garland is the piece that makes this wall. It is paper, it costs almost nothing, and it does the job of a string of real bulbs without a single outlet or extension cord. Pull it down and you are left with a standard green garland and candy canes — perfectly nice, completely forgettable. The lesson: on a long, flat wall, one oversized graphic element beats five small decorations every time.
11. Evergreen Garland Framing Wooden Double Doors and a Nativity
This entryway treatment needs at least 8 feet of wall width to breathe — the double doors, the small tree on one side, and the nativity table on the other all want their own room. Ceiling height matters less here, so 8-foot ceilings are perfectly fine; the vertical interest comes from the doors themselves, not from anything overhead. In a narrower entry, drop the side table and keep just the garland and the tree. The geometric green, yellow, and white floor tile is doing quiet work too — it is the one place in the hall where the palette repeats.
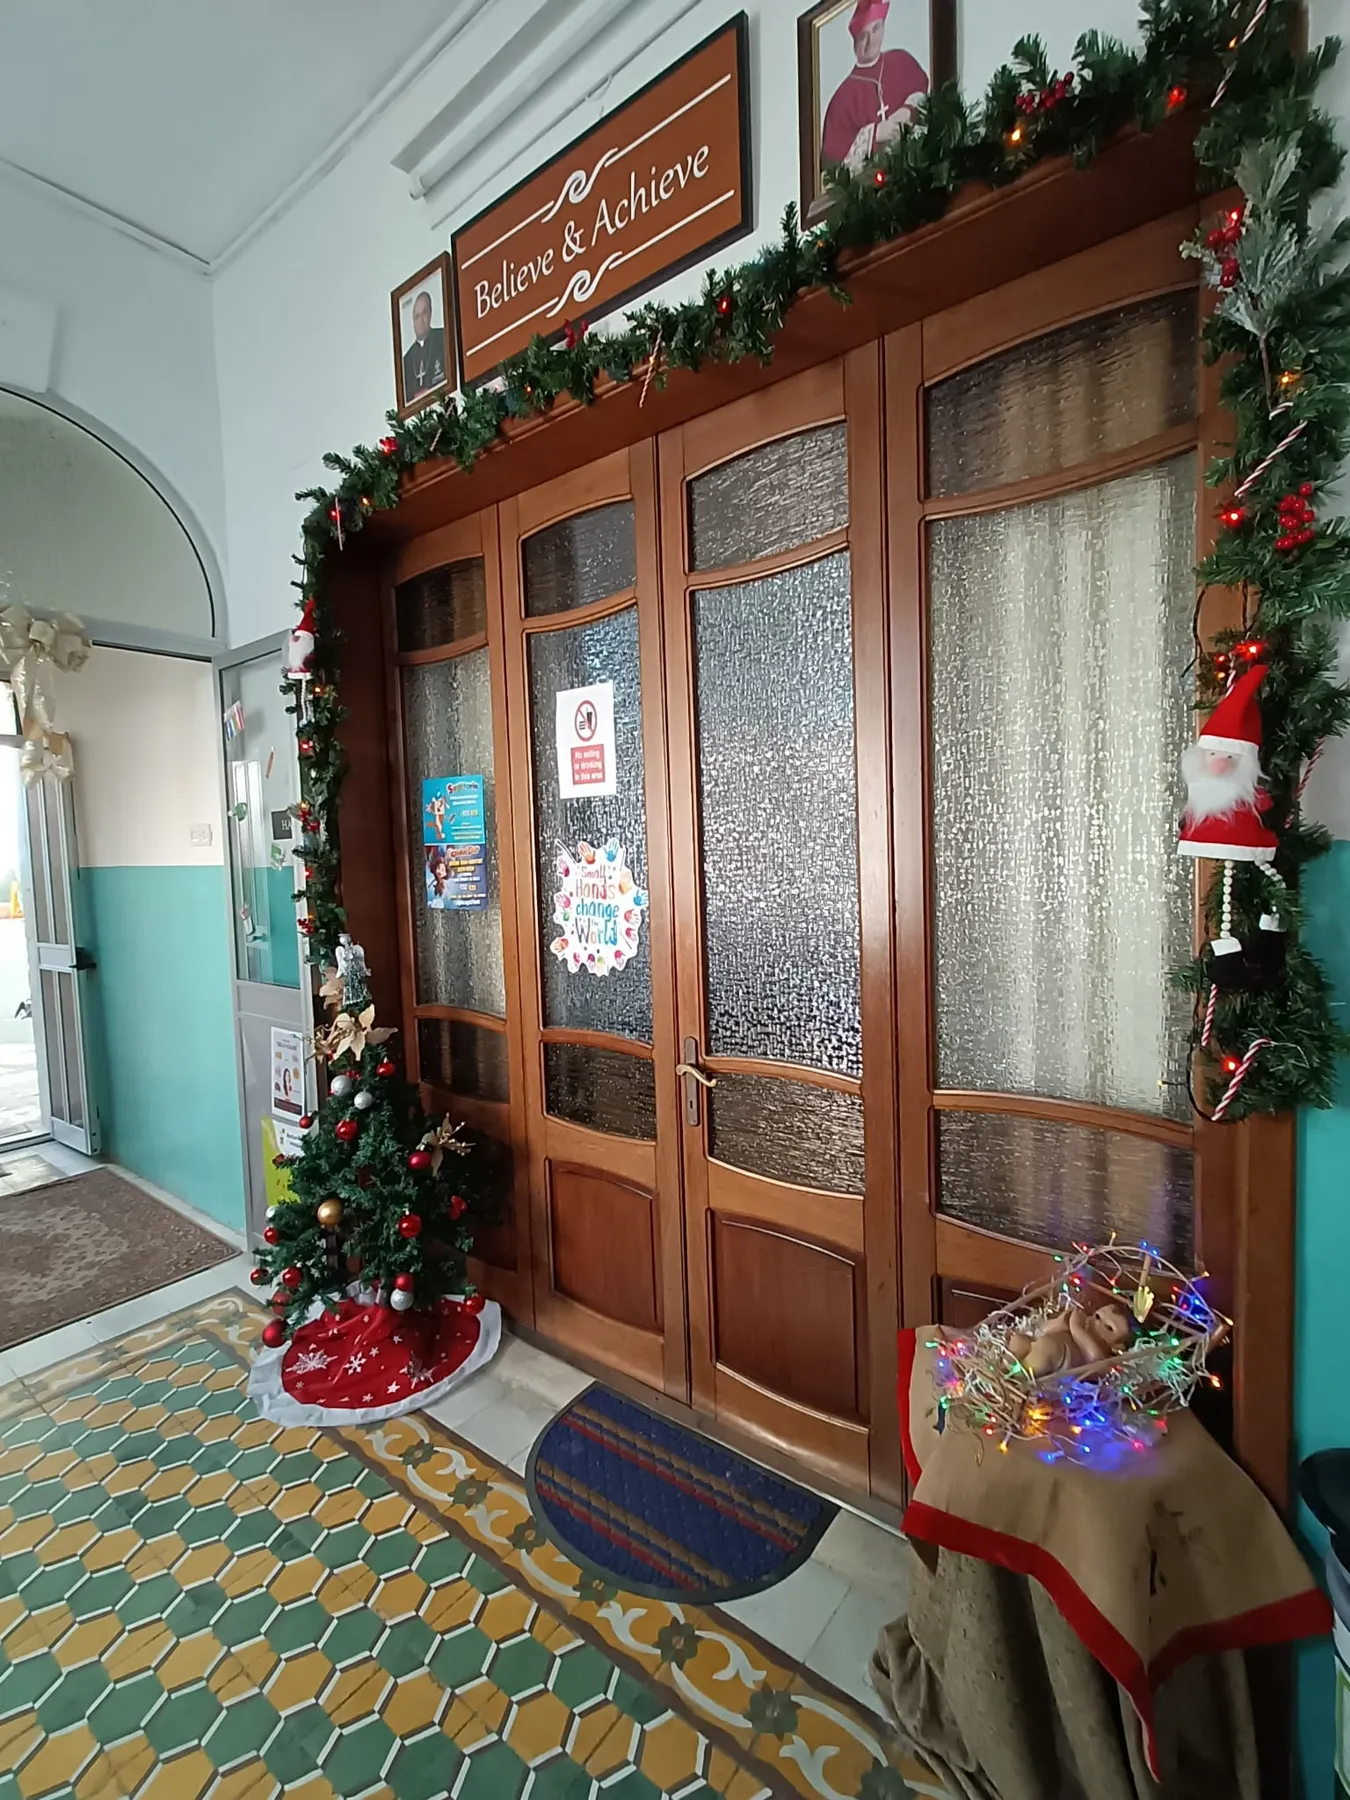
Traditional Christmas is having a real resurgence, and 2026 searches keep circling back to the vintage stuff: full-look garlands with red berries, nativity scenes, textured glass doors, old-fashioned gold ornaments. Part of it is a backlash against the all-white minimalist holiday look that dominated the last decade. Part of it is that this style never looks dated, so a school can store the same garland and nativity for fifteen years and it still reads as intentional in December.
12. A Railroad Crossing Sign Marking the Fifth Grade Wing
Restraint is the whole story here. One prop — the railroad crossing sign with two lit red bulbs — does more for this stretch of gray block wall than a dozen paper cutouts would, because it is the only thing asking for attention. The black sign against textured gray block creates strong value contrast, and the small green paper display beside the light wood door gives your eye a secondary stop without competing. Decorating every surface usually looks desperate. Decorating one reads as confident.
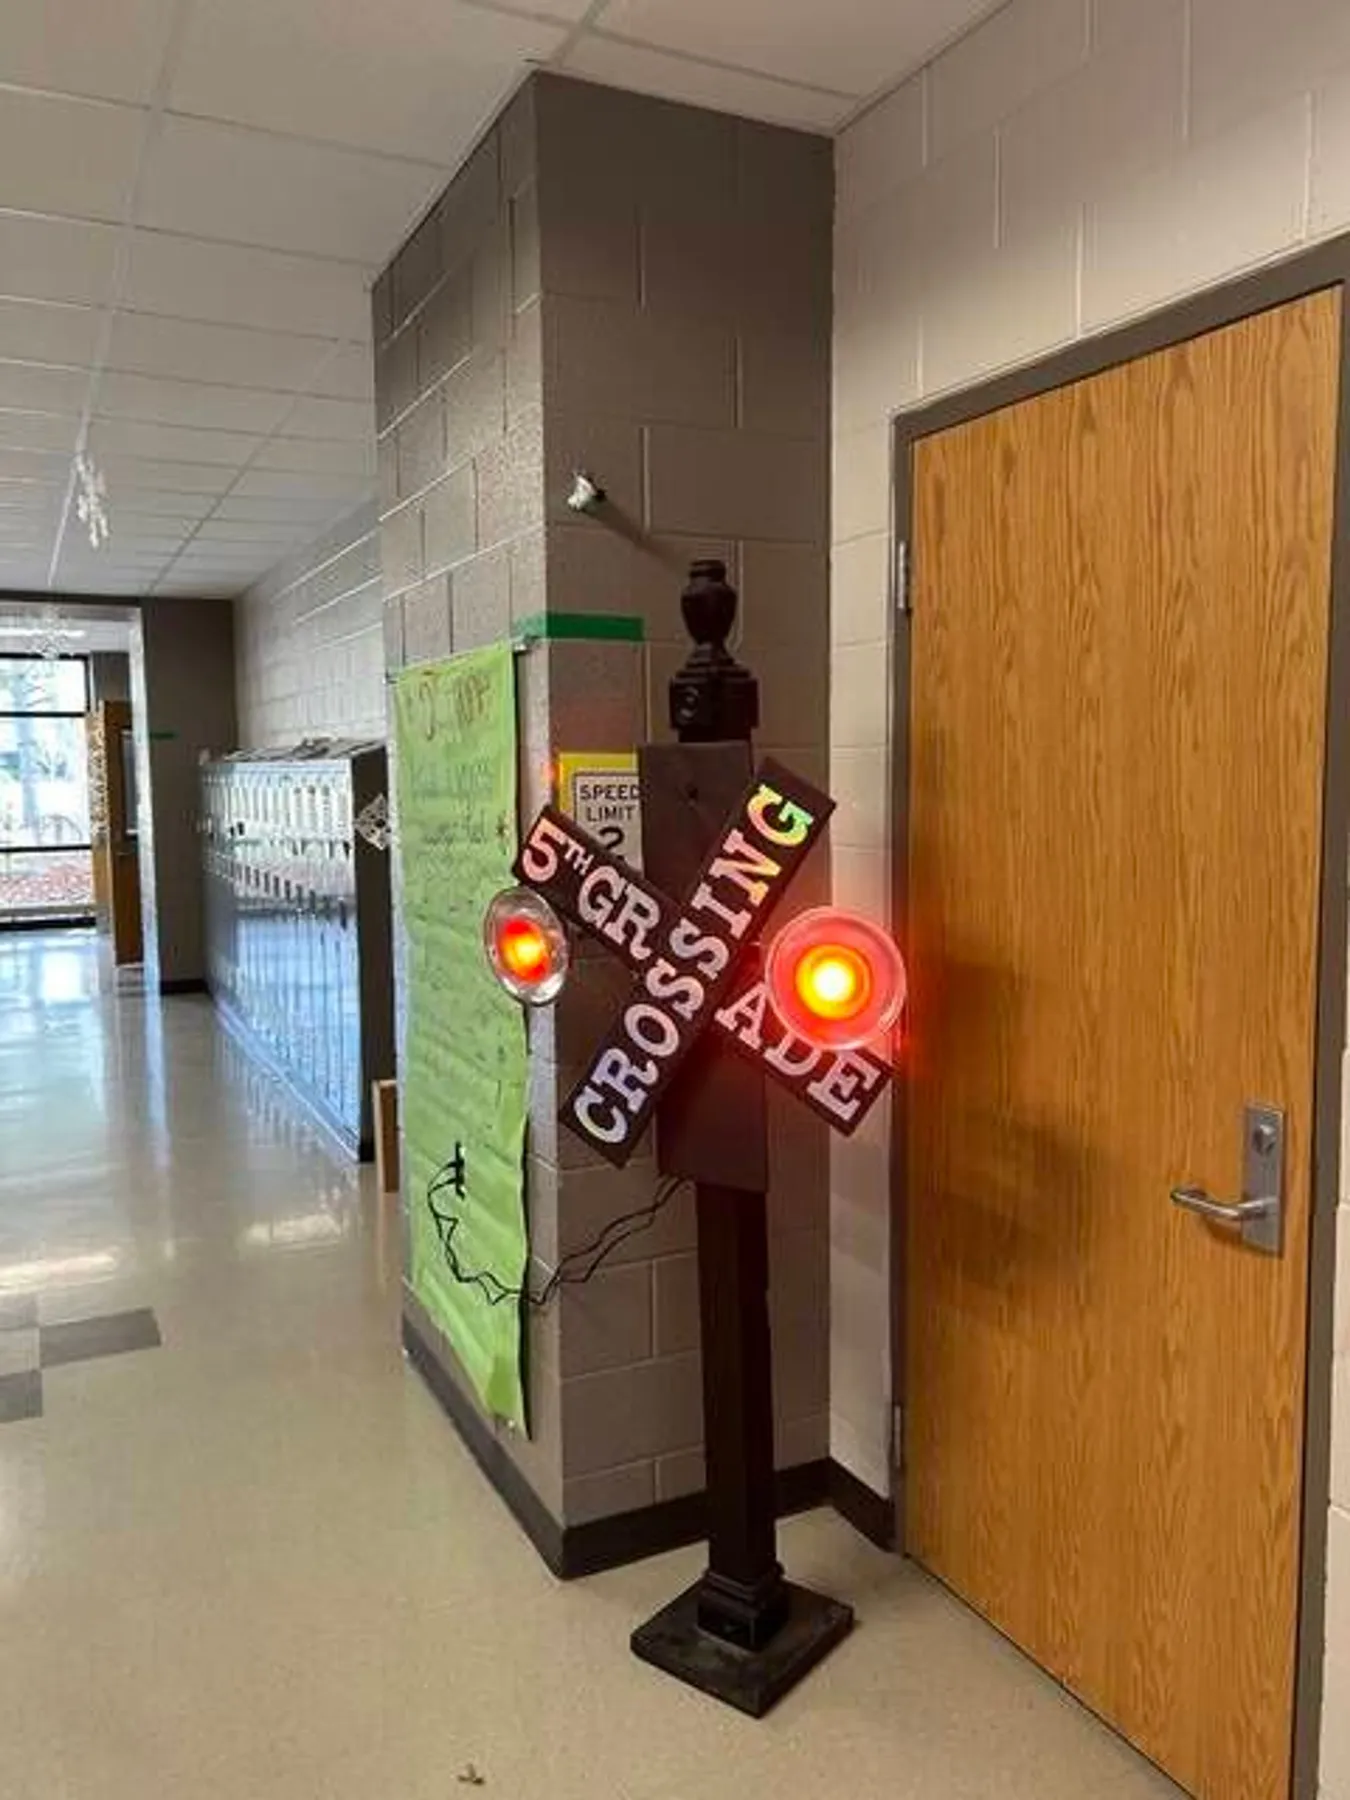
You can build this yourself for about $20. A sheet of black foam board, two red LED puck lights from the dollar aisle, and white vinyl or paint pen for the lettering gets you most of the look in an afternoon. Mount the pucks behind small holes cut in the board so the red glow spills out rather than sitting on the surface. If your school already owns a real crossing sign from a transportation unit, borrow it — that is the free version, and it is the best one.
13. A Single Tree and Merry Christmas Banner Against Yellow Walls
Yellow walls are the trickiest backdrop in a school, because yellow plus warm white light turns everything slightly orange. If your hallway is this color, skip the green ornaments and lean on red, gold, and white — those hold their own against yellow. If you insist on green, choose a deep forest tone rather than a bright kelly green, which goes muddy under warm bulbs. One test: hold your ornament against the wall under the actual hallway lights before you commit.
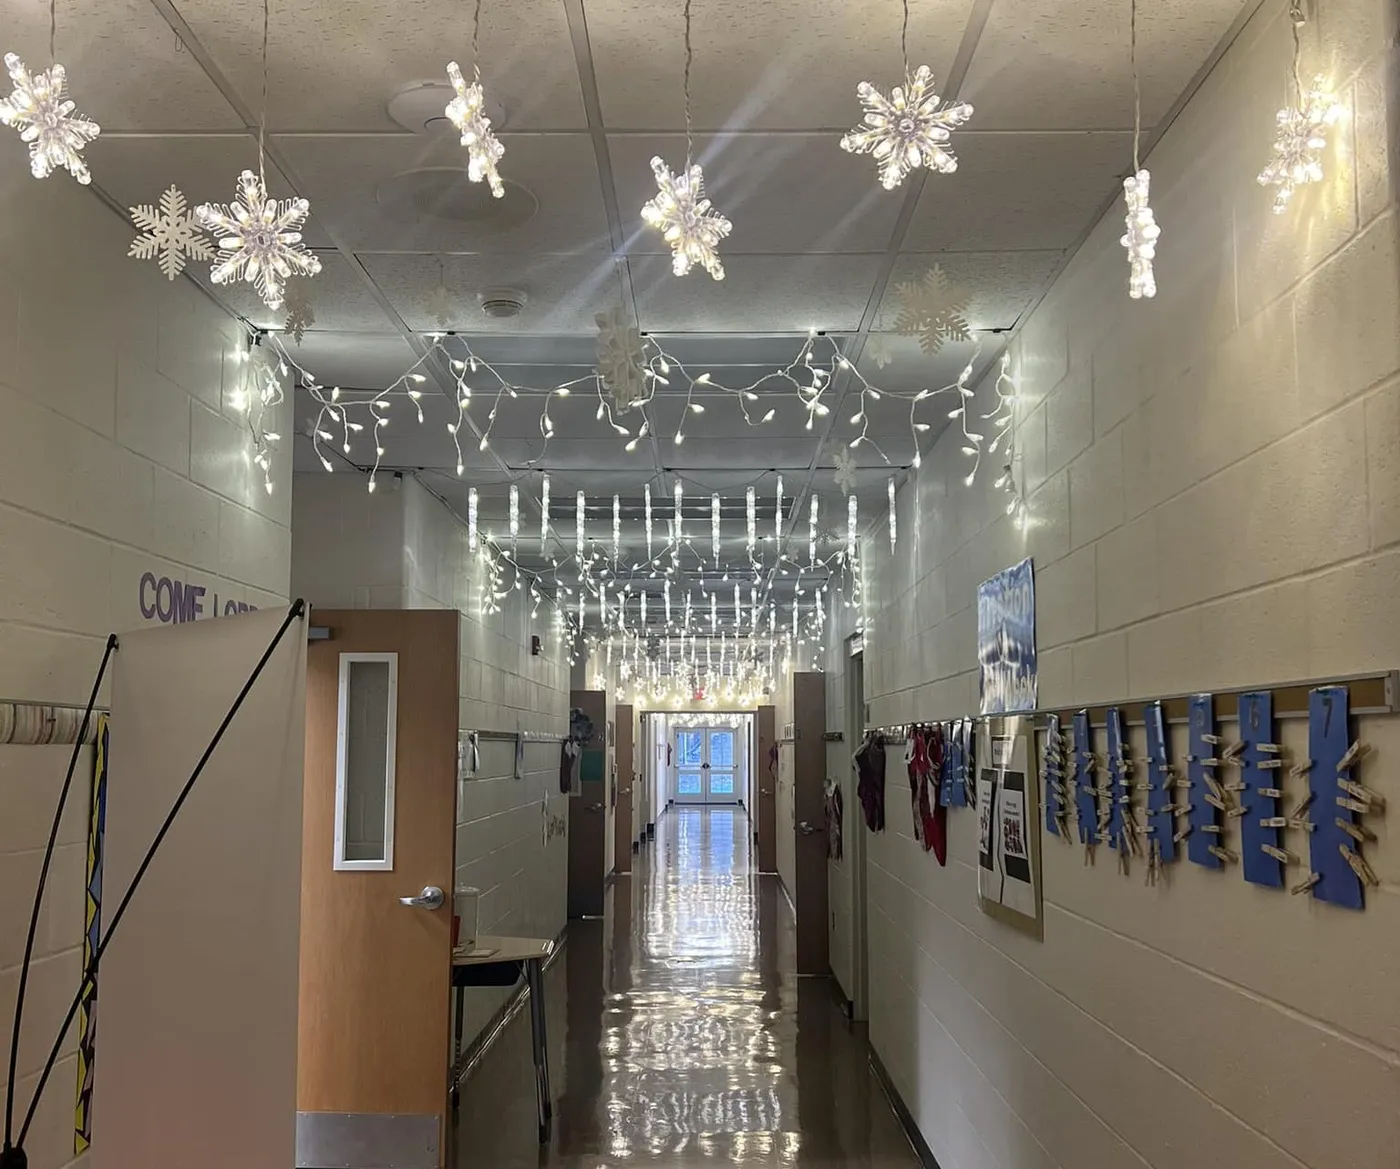
A single tree and a banner is a clean, honest look — but only if the tree is genuinely full and the banner hangs dead level. Sparse branches read as unfinished rather than minimal, and a banner that sags on one side undoes the whole effort. The rule of three helps here: one vertical element, one horizontal element, and one light source. If you add a fourth thing, add a fifth and sixth too, because two extra decorations alone always look like an afterthought.
14. Paper Dove Mobiles Above Handmade Teacher Banners
- Measure hallway width and ceiling height before cutting a single sheet of paper.
- Confirm whether your school allows items hung from ceiling tiles, and whether clips or tape are required.
- Check the fire code limit on combustible materials in corridors and stairwells.
- Set a hang height that clears heads — 7 feet is the safe floor.
- Decide how banners will attach without damaging door frames or paint.
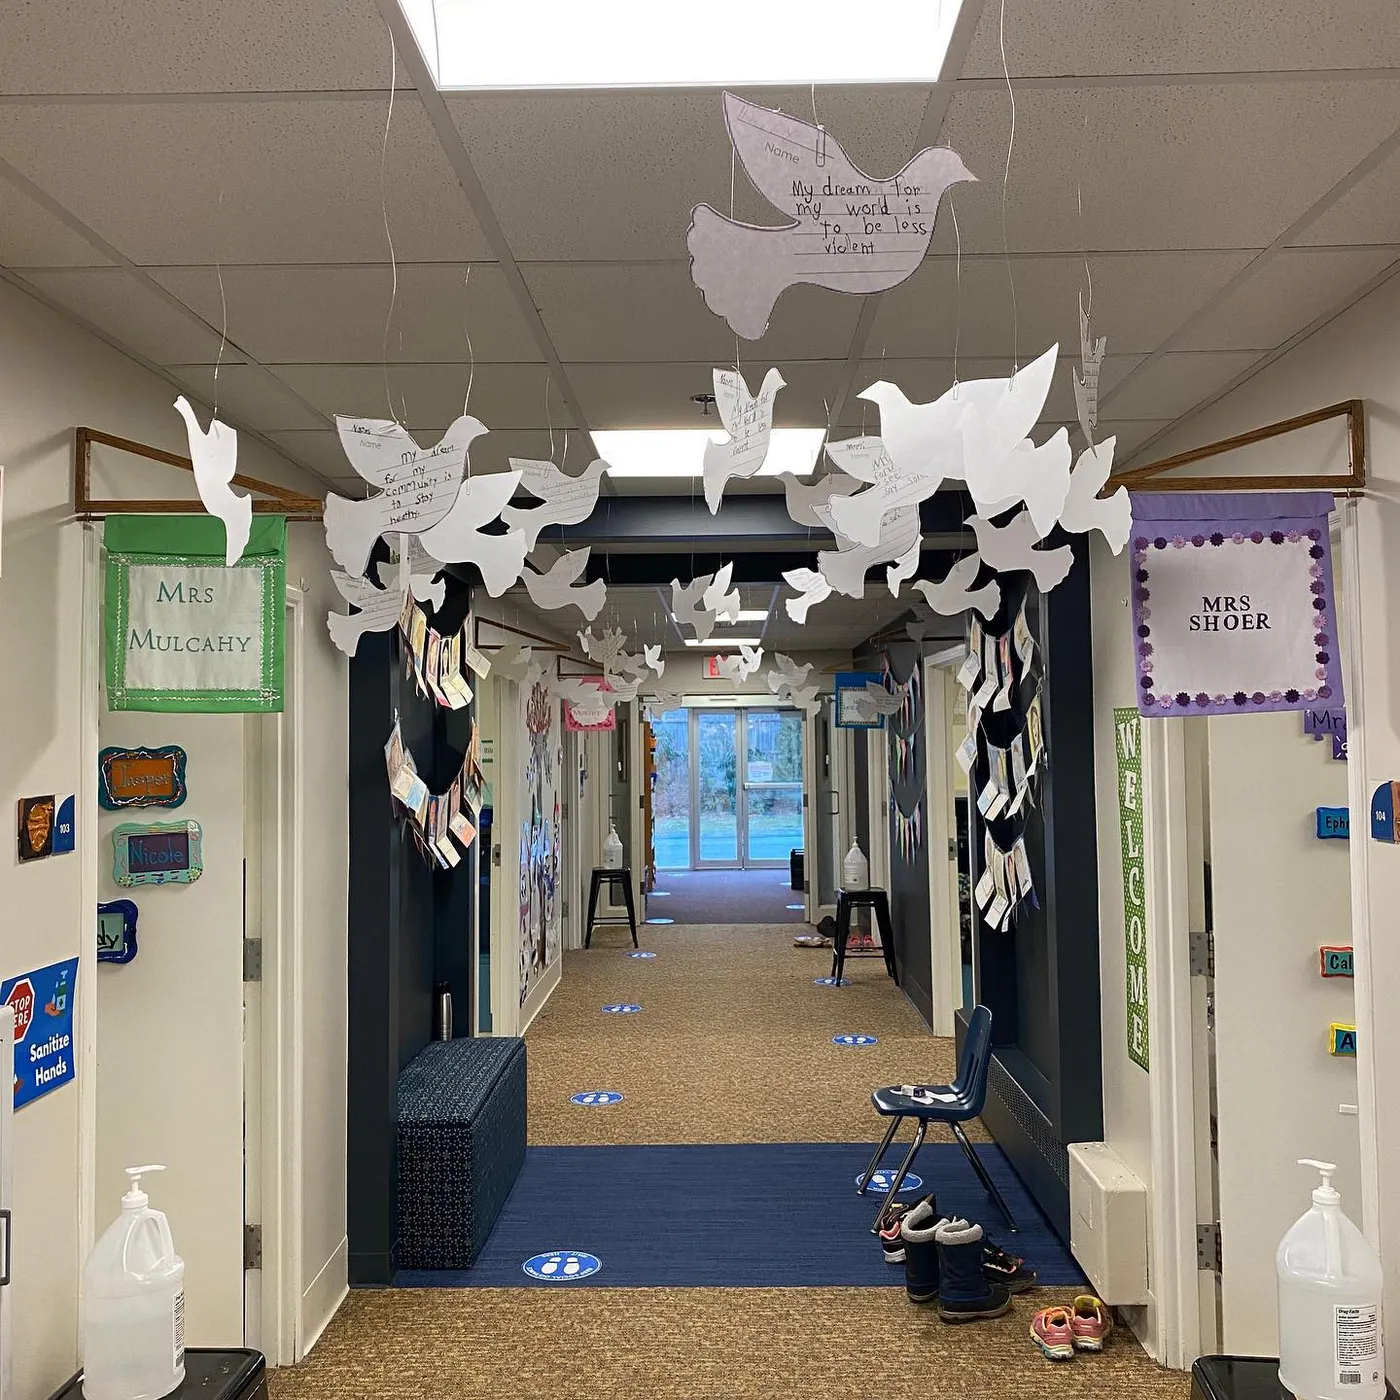
Five minutes of checking saves a week of redoing.
The palette math on this hallway is almost entirely neutral: about 60% white from the doves and walls, 30% split between the green and purple teacher banners, and 10% warm brown from the carpet. That lopsided ratio is why it feels calm instead of busy — the color lives up high, and everything at eye level stays quiet. Swap the purple banners for navy and gold and the mood shifts from elementary-school warm to something more formal without changing a single dove. Compare with Idea #7, which trades doves for snowflakes at the same height.
15. Garland and Oversized Red Bows Along Blue Lockers
Real garland is gorgeous for about ten days and then it starts dropping needles on the floor and leaving sap on locker fronts. Faux garland costs more up front — $15–$30 for a good six-foot piece — but it comes back every year for a decade. If you go real, mist it lightly every other day and keep it away from heat vents. Either way, zip ties beat tape: thread them through locker vent slits and the garland stays put through a month of middle-schoolers.
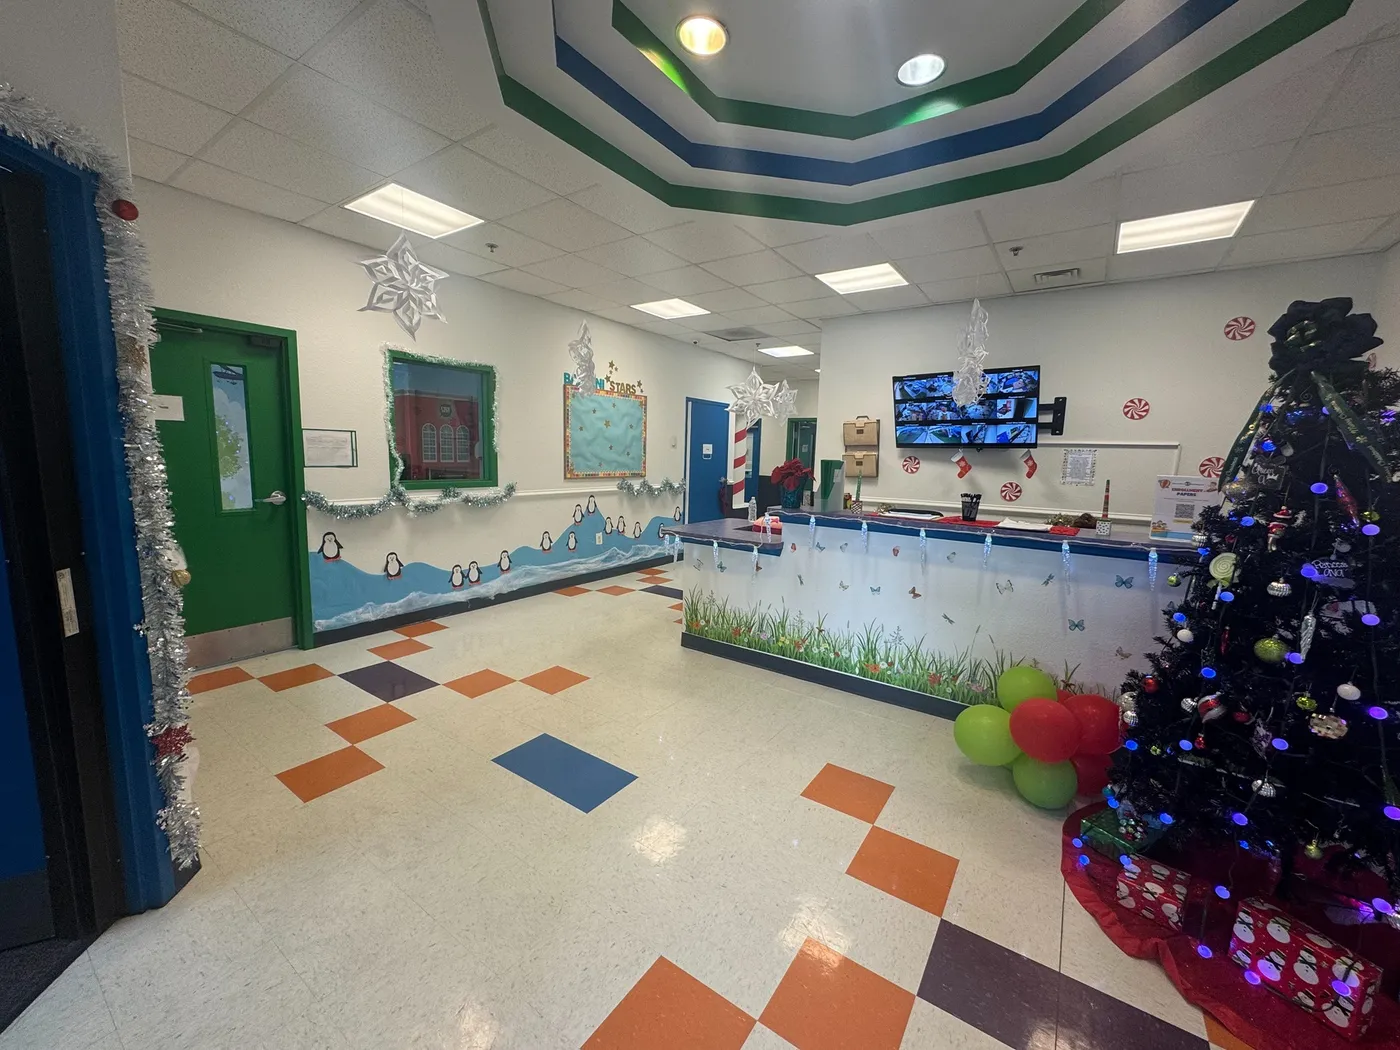
Bow size is everything on a locker run. A bow should be roughly one-third the width of the locker door — about 10 to 12 inches across for a standard 15-inch locker — or it reads as an afterthought. Space them every third locker, not every one; the rhythm matters more than coverage. And clip the garland to the top edge of the lockers rather than draping it forward, so doors still open all the way without dragging decorations onto the floor.
16. A Snowflake Canopy Over Blue Paper and Cartoon Murals
- Fold a square of paper in half diagonally, then in half twice more to make a wedge.
- Cut the open edge into a shallow curve so the finished flake has a round silhouette.
- Notch V shapes along both folded edges — varying sizes, not repeating ones.
- Unfold slowly and press flat under a book for an hour.
- Hang on fishing line from the ceiling grid at three staggered heights.
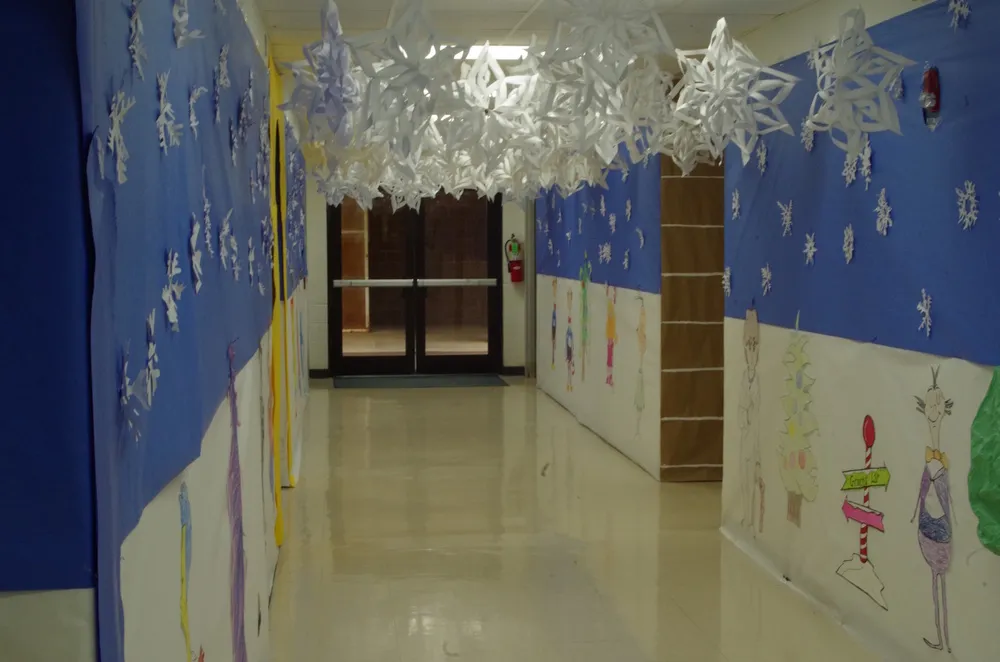
About 10 minutes per large flake and pennies in materials.
The split wall is the thing to steal here. Blue paper above, white paper below, with the dividing line running at a consistent height down the entire corridor. It instantly gives the hallway architecture it does not have — a horizon line that makes a flat, endless wall feel designed. Without that split, all those snowflakes and cartoon characters would just float in a void. Mark the line with a chalk line before you tape anything, and do not let it wobble.
17. Faux Snow Banks and a Winter Forest Mural on the Wall
- Artificial trees (6–10 small, thrifted or post-holiday): $60–$150
- White fabric or batting for snow ground cover: $25–$60
- Hanging paper snowflakes (30 or more): $15–$40
- Ceiling string lights (8–10 strands): $40–$90
- Printed winter forest mural (vinyl banner): $50–$140
- Decorative mailbox and props: $20–$50
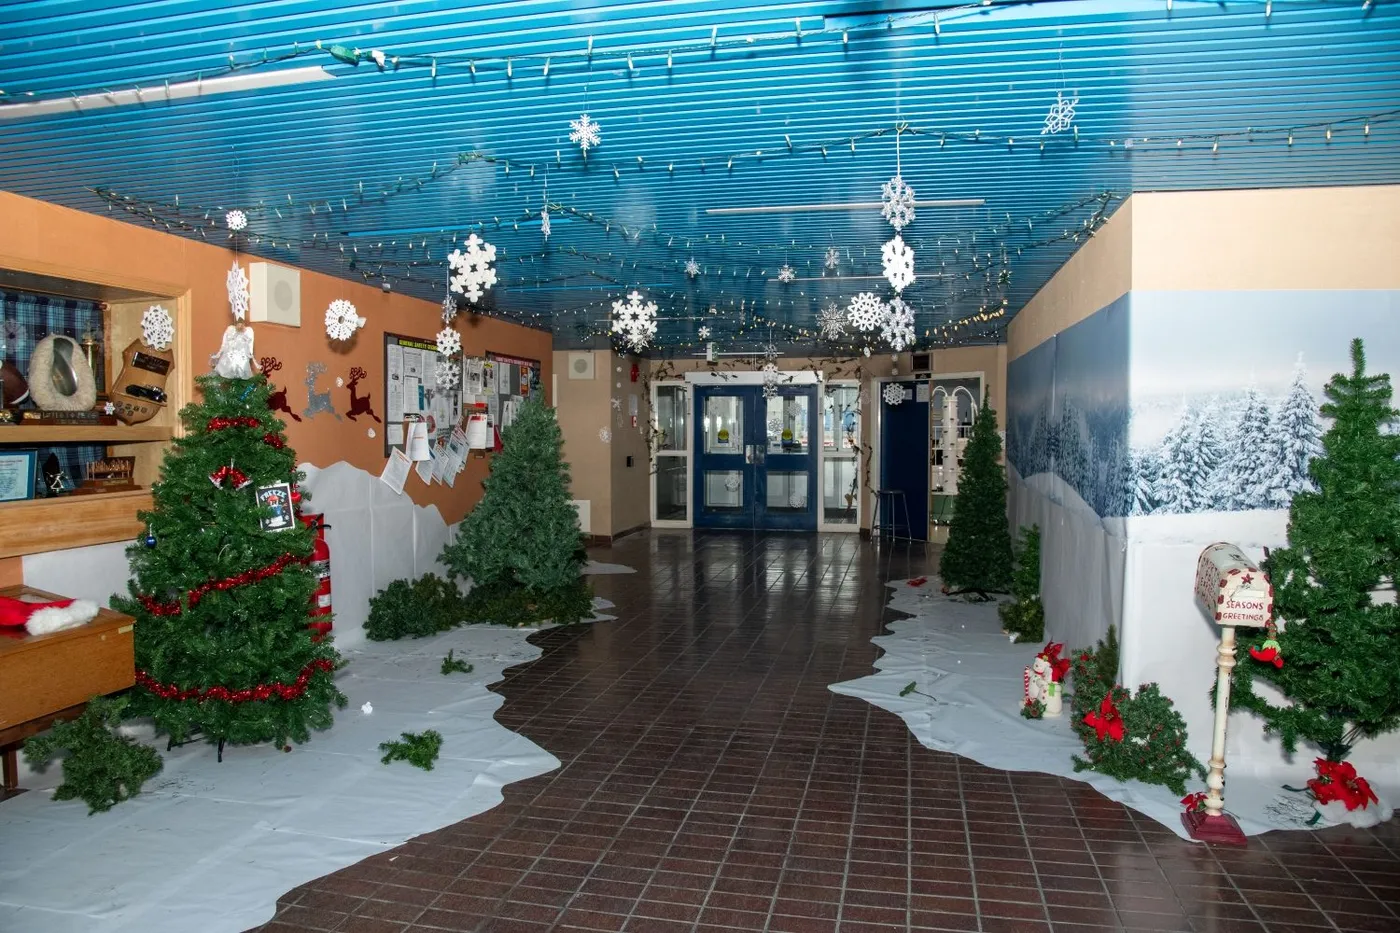
Budget alternative: paint the forest mural on butcher paper instead of printing it, and borrow trees from staff — that drops the build to about $110.
Ground-cover snow and freestanding trees eat floor space, so this one wants a genuinely wide corridor — 9 feet or more. In anything narrower, students end up walking through the display instead of past it, and trees get knocked over by the second week. You also want at least 9 feet of ceiling height so the snowflakes hang without crowding the tree tops. In a standard 8-foot hall, keep everything overhead and off the floor.
18. Polar Express Train Windows on Black Paper Walls
This is a bold, high-contrast formula: roughly 50% black paper, 20% red for the train band and details, 15% yellow for the lit windows, and 15% white and blue for snowflakes, lanterns, and the top stripe. The black is what makes the yellow glow, so do not lighten it to gray. If you swap the black for deep navy, the same layout becomes a night-sky theme instead of a train theme — a useful escape hatch if your paper order arrives late.
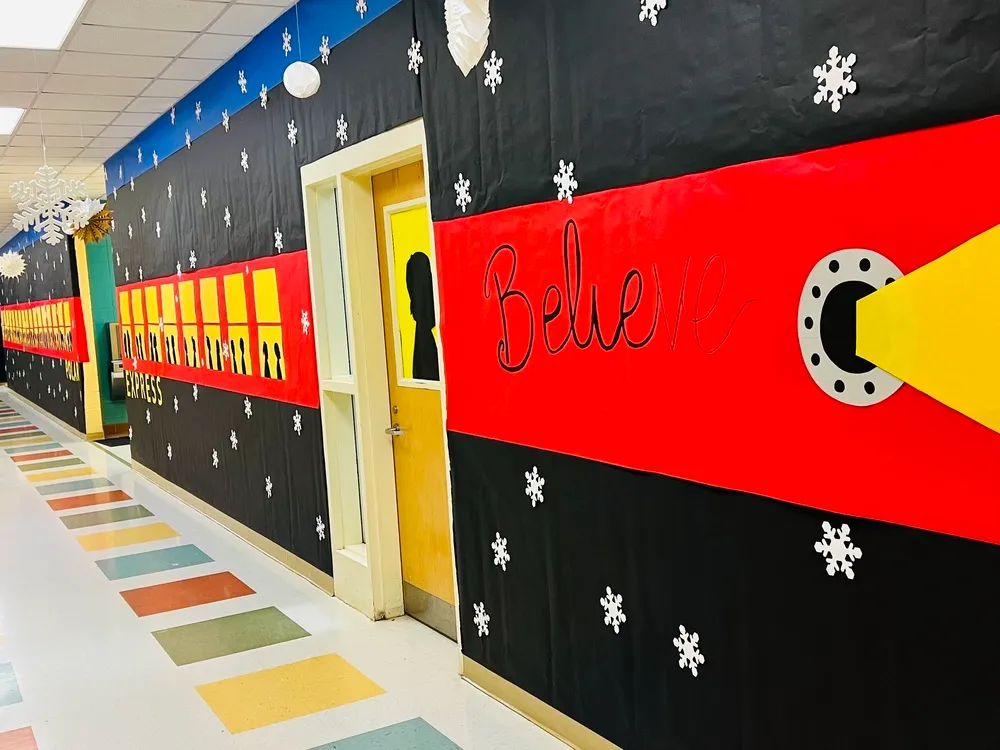
Black butcher paper runs about $20 for a 30-inch by 100-foot roll — enough for a long corridor stretch. Cut window shapes from yellow paper and back each one with a second layer so it reads as lit. White paper lanterns from a dollar store run $1.25 to $3 apiece and do the job of far pricier hanging pendants. Total for a 40-foot wall, including snowflakes and the blue stripe, lands around $60–$80, most of it paper.
19. Reindeer Cutouts Under a Wash of Multicolored Lights
More is more here, and it works because the hallway commits completely. Multicolored lights on every surface, oversized reindeer and sleigh cutouts, red tinsel accents — nothing is understated, so nothing looks out of place. The cutouts are what keep it from becoming a blur: large flat shapes read clearly against a busy light field in a way small ornaments never could. If you try this look at half intensity, it looks like leftovers. Go all the way or pick a different theme.
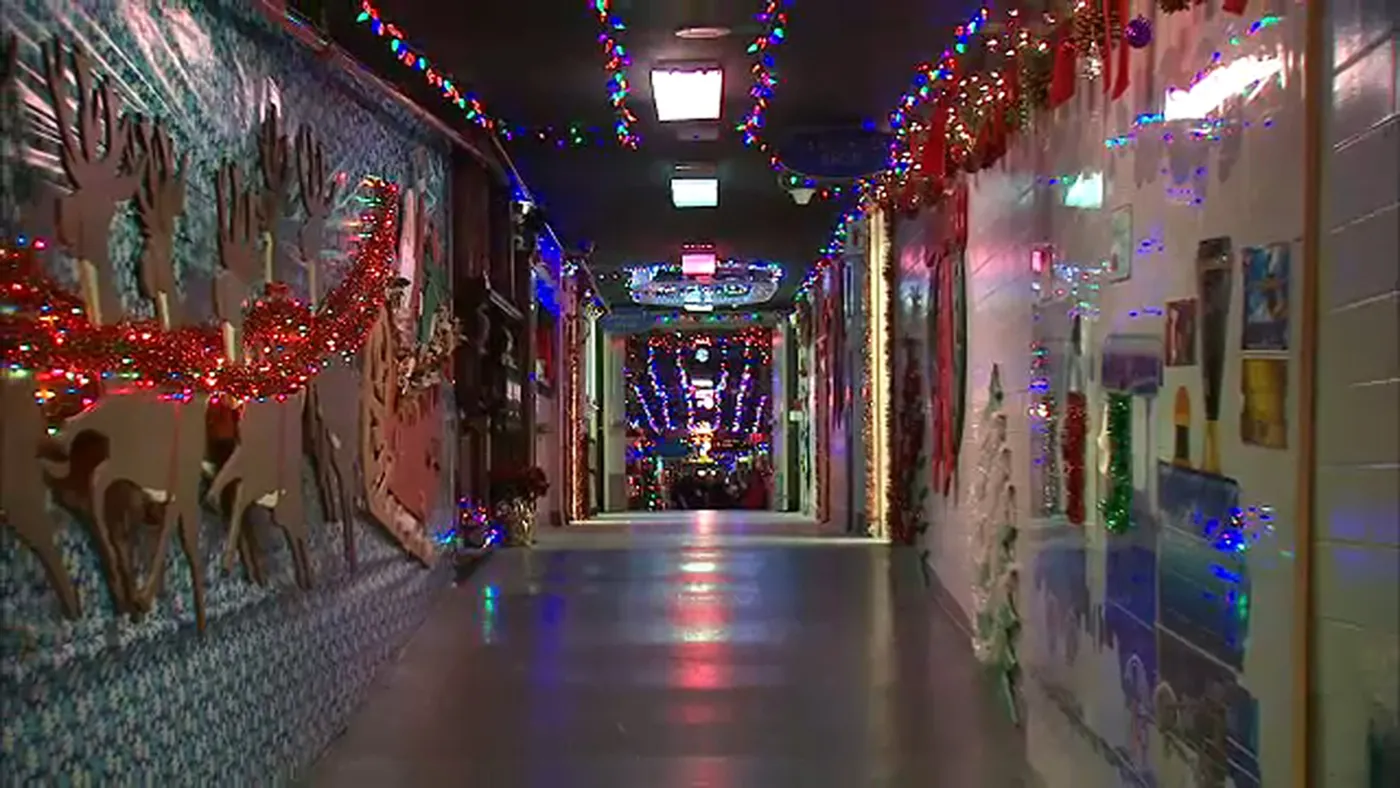
Light overload is a real electrical issue, not just an aesthetic one. Most school circuits handle 15 to 20 amps, and a single 100-bulb strand of incandescent minis can pull nearly an amp. Never chain more than three strands end to end, use LED whenever possible, and keep extension cords off the floor where kids walk and custodians mop. Also check with your facilities team before adding load to hallway outlets — some are already shared with vending machines and copiers.
20. A Photo Ornament Tree and Menorah on a Three-Tier Shelf
Photo ornaments are the fastest way to make a hallway tree feel personal. Print images at 3 inches across, laminate them, punch a hole, and hang with a simple loop. Two rules: keep every photo the same size and shape so the tree stays visually calm, and put the strongest images at eye level where they will actually be seen. A tree with forty mismatched frames in forty sizes looks like a lost-and-found box, no matter how good the photos are.

- Confirm which holidays your school community observes before planning a display.
- Check whether a shared shelf or table can stay up for the full month without blocking traffic.
- Ask families for photo permissions before printing student faces.
- Verify outlet access near the tree and shelf, and bring a surge strip.
- Decide who takes the display down and where it gets stored.
Ten minutes of planning prevents an awkward January conversation.
21. Student Paper Plate Crafts Under Warm and Blue Icicle Lights
Student-made decor is the trend that keeps growing, and it is not just nostalgia. Displays built from paper plate crafts, hand-cut snowflakes, and classroom art give kids ownership of the space, which is why behavior in decorated hallways genuinely tends to improve in December. In 2026, more schools are photographing the process — the folding, the cutting, the hanging — and posting it alongside the finished hallway. The making has become as shareable as the result.
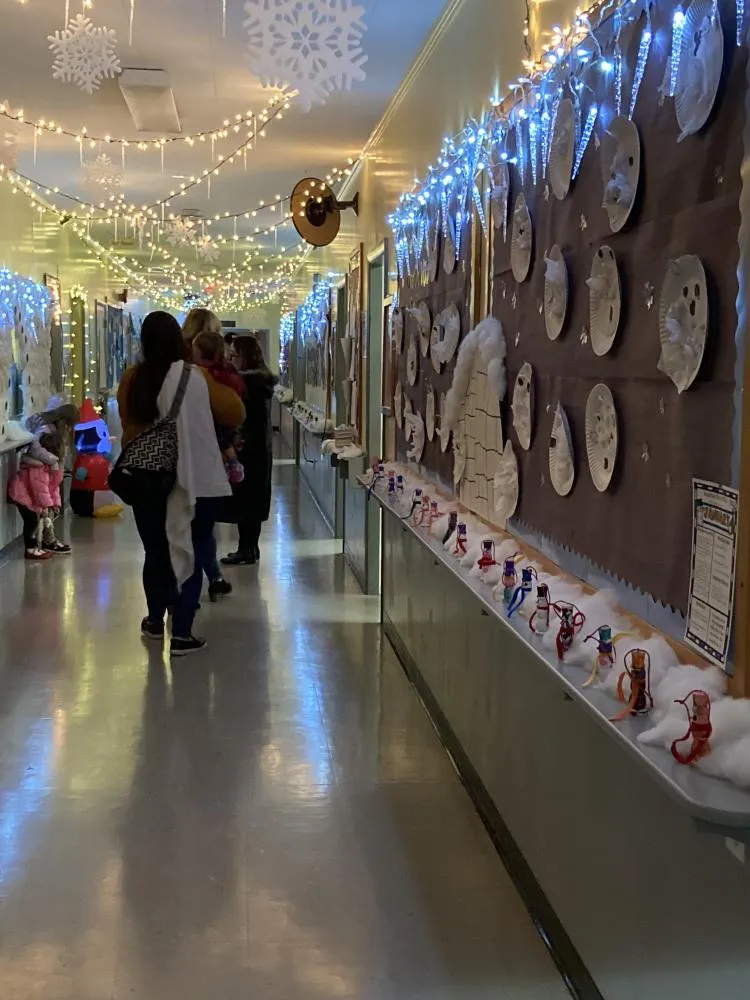
- Clear and dust the display ledge before anything goes up.
- Lay white batting or cotton along the ledge to create a snow line.
- Group student crafts in clusters of three to five rather than one long row.
- Drape warm icicle lights behind the crafts, not in front, so they backlight.
- Add one cool blue strand along the wall for contrast with the warm drops.
Roughly 90 minutes for an eight-foot ledge and about $30 in lights and batting.
22. Two-Tone Blue Walls With Cutout Characters and Snowflakes
That thin yellow vertical strip is the smallest thing on this wall and the most important. It cuts through both the blue and white paper sections, tying the two halves together and giving the composition a spine. Without it, you would have a blue rectangle stacked on a white rectangle — fine, but static. A single narrow band of a third color is one of the cheapest, most effective tricks in school hallway decorating, and it takes about four minutes to tape up.
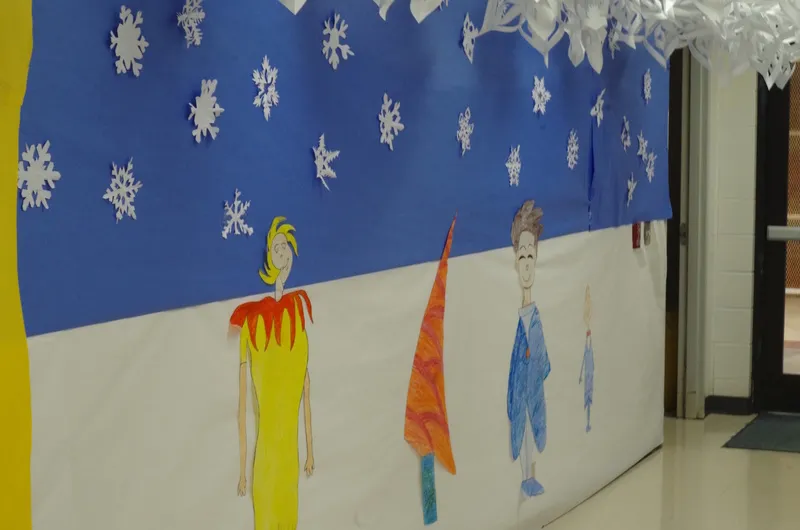
Flat paper cutouts look flat. Stick each character or snowflake onto the wall with two small squares of double-sided foam tape instead of one long strip, and it lifts about a quarter inch off the surface, throwing a soft shadow that makes the whole display read as dimensional. It costs a few extra dollars for a roll of foam squares, and it is the difference between a wall that looks printed and a wall that looks built. Compare with Idea #16, where the same two-tone split gets a snowflake canopy.
23. A Starry Night Wall With a Streetlamp and Stacked Gift Cutout
Dark blue paper is the hero here and it is cheap — a 48-inch roll runs $15 to $25 and covers a surprising amount of wall. White paper stars, mountain cutouts, and snowflakes are scrap-paper projects. The stacked gift cutout is the one piece worth making sturdy: use foam board, wrap the front in colored paper, and stack three boxes in decreasing sizes. The whole display for a 10-foot wall lands between $35 and $55, with the streetlamp cut from a single sheet of black cardstock.
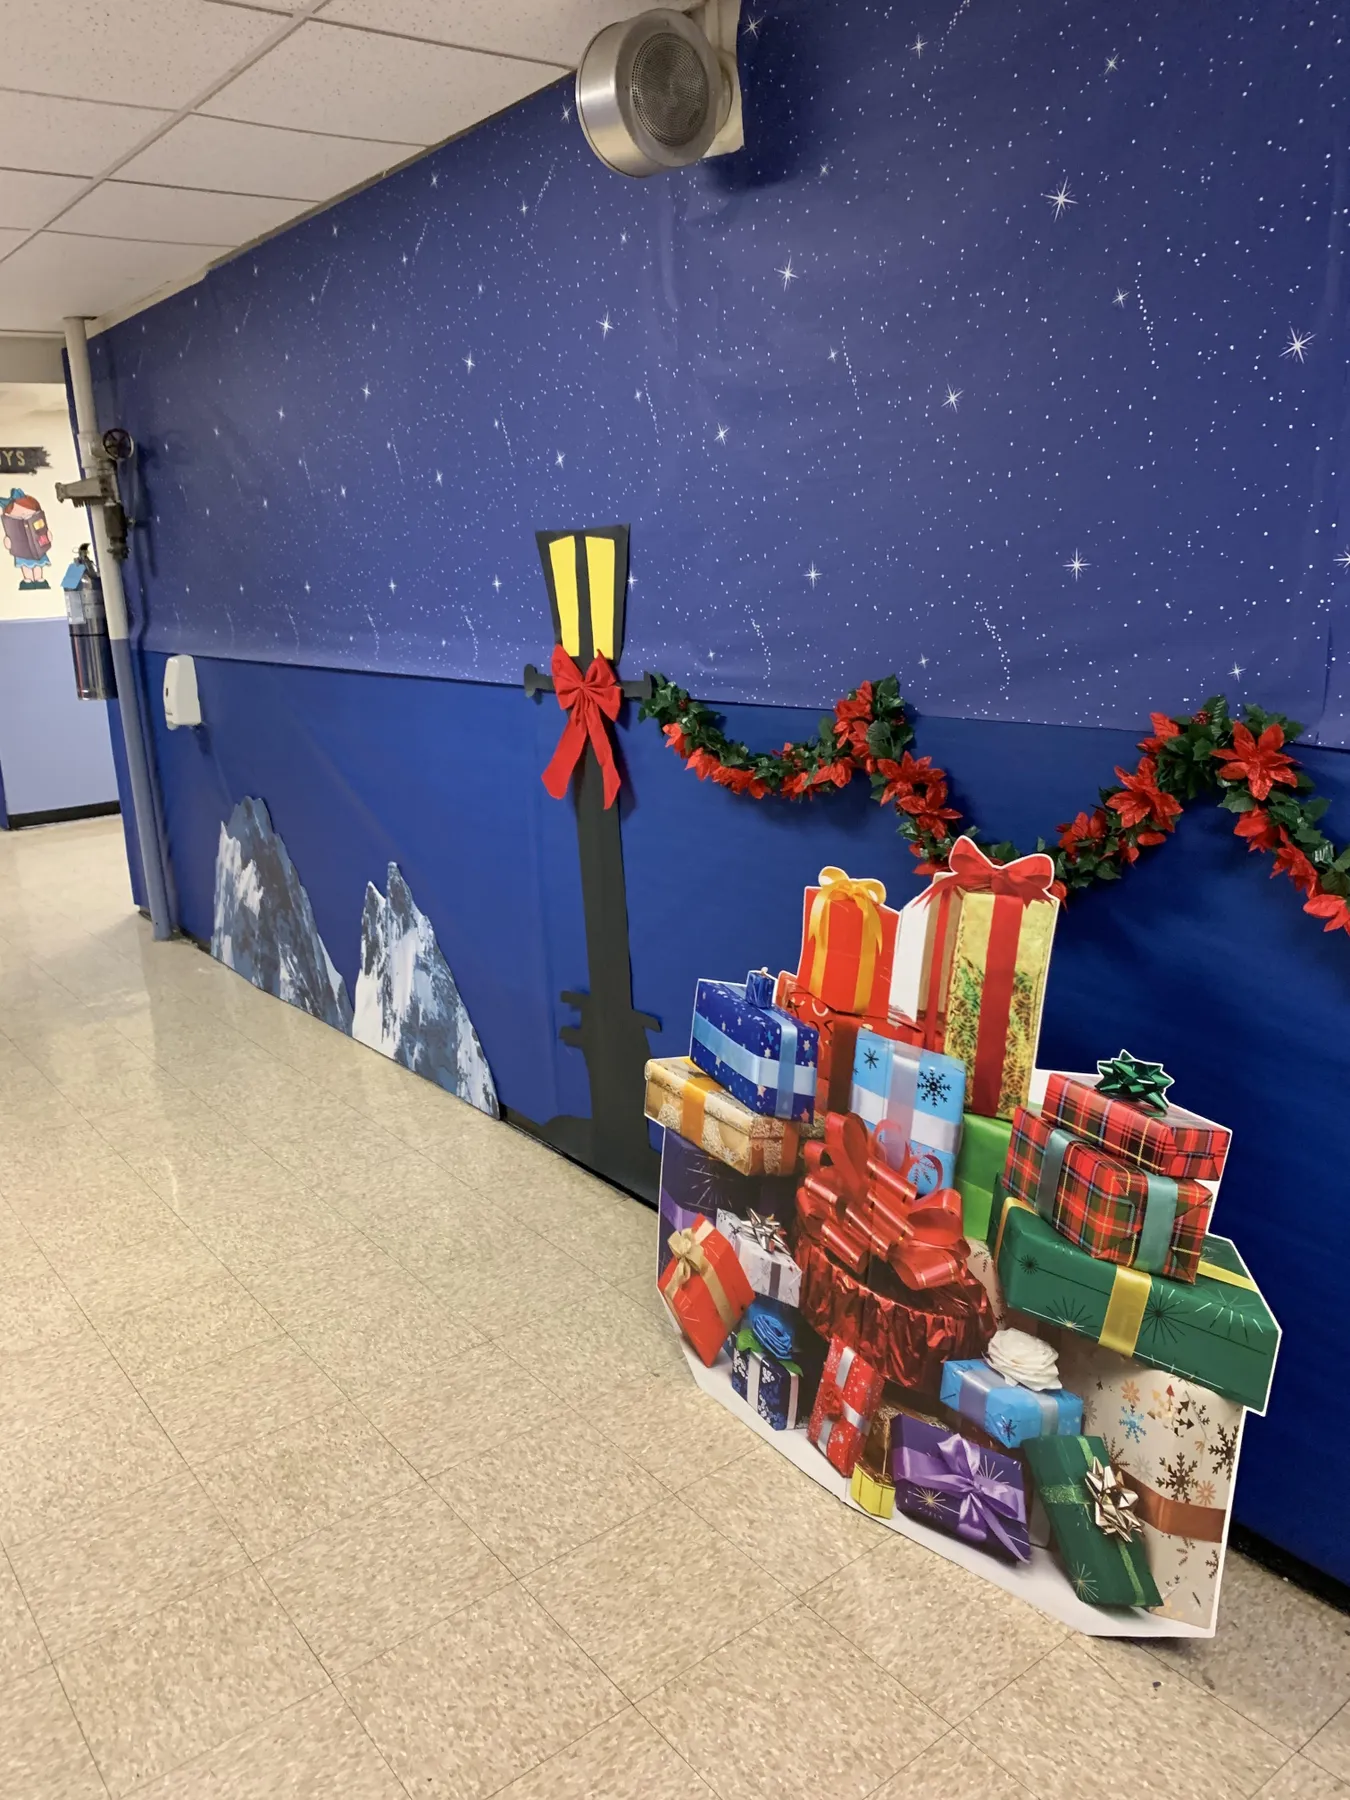
Negative space is doing the work on this wall. The dark blue backdrop is mostly empty, and that emptiness is what makes the stars, the streetlamp, and the mountain range feel deliberate instead of scattered. Most hallway displays fail because every inch gets filled; this one gives each element a wide margin of quiet around it. The other smart move is the vertical layering — sky, mountains, ground, and a freestanding gift stack that steps out of the wall and onto the floor.
24. Storybook Doors With a Snowy Night Scene and Elf Figures
This storybook entrance works in moderate spaces — about 6 to 8 feet of wall width per themed section, with at least a 12-foot ceiling run if you are covering the whole corridor. The fabric-covered doors need a flat, unobstructed surface, so avoid hallways with recessed alcoves or handrails. The bench is the tell for sizing: if a red perforated metal bench fits under the window without blocking traffic flow, the corridor is wide enough for everything above it.
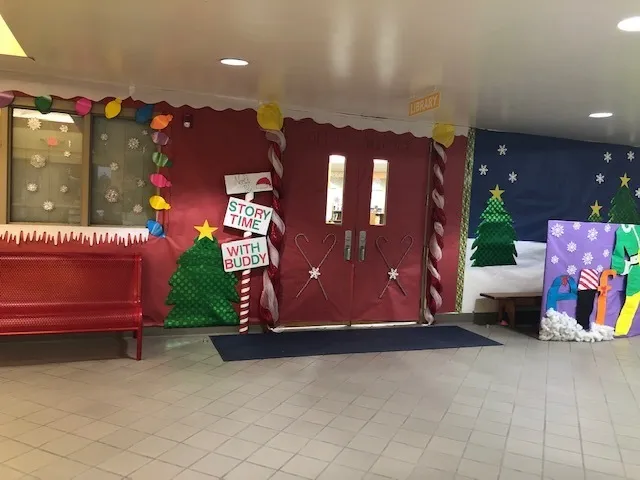
Fabric wall coverings are the dirtiest thing in any school hallway by February. They collect dust, hold onto fingerprints, and absorb whatever gets spilled at lunch. Stick with paper and non-woven fabric you can spot-clean with a damp cloth, and avoid anything with a fuzzy texture. If your district requires flame-retardant materials, check labels before buying — most craft fabric is not treated, and a spray-on retardant costs about $20 for enough to cover a full wall.
25. A Snow-Coming Banner Behind a Tall Beaded Tree
Red string lights around windows look fantastic and also, occasionally, like an emergency warning. Keep it to one row per window and do not outline the entire frame in red — a single clean line at the top or bottom reads festive, while a full outline reads alarming. On the banner side, fabric banners over 4 feet long need more than tape; use two grommets at minimum and check that the hanging point can take a few pounds of pull without tearing out of drywall.
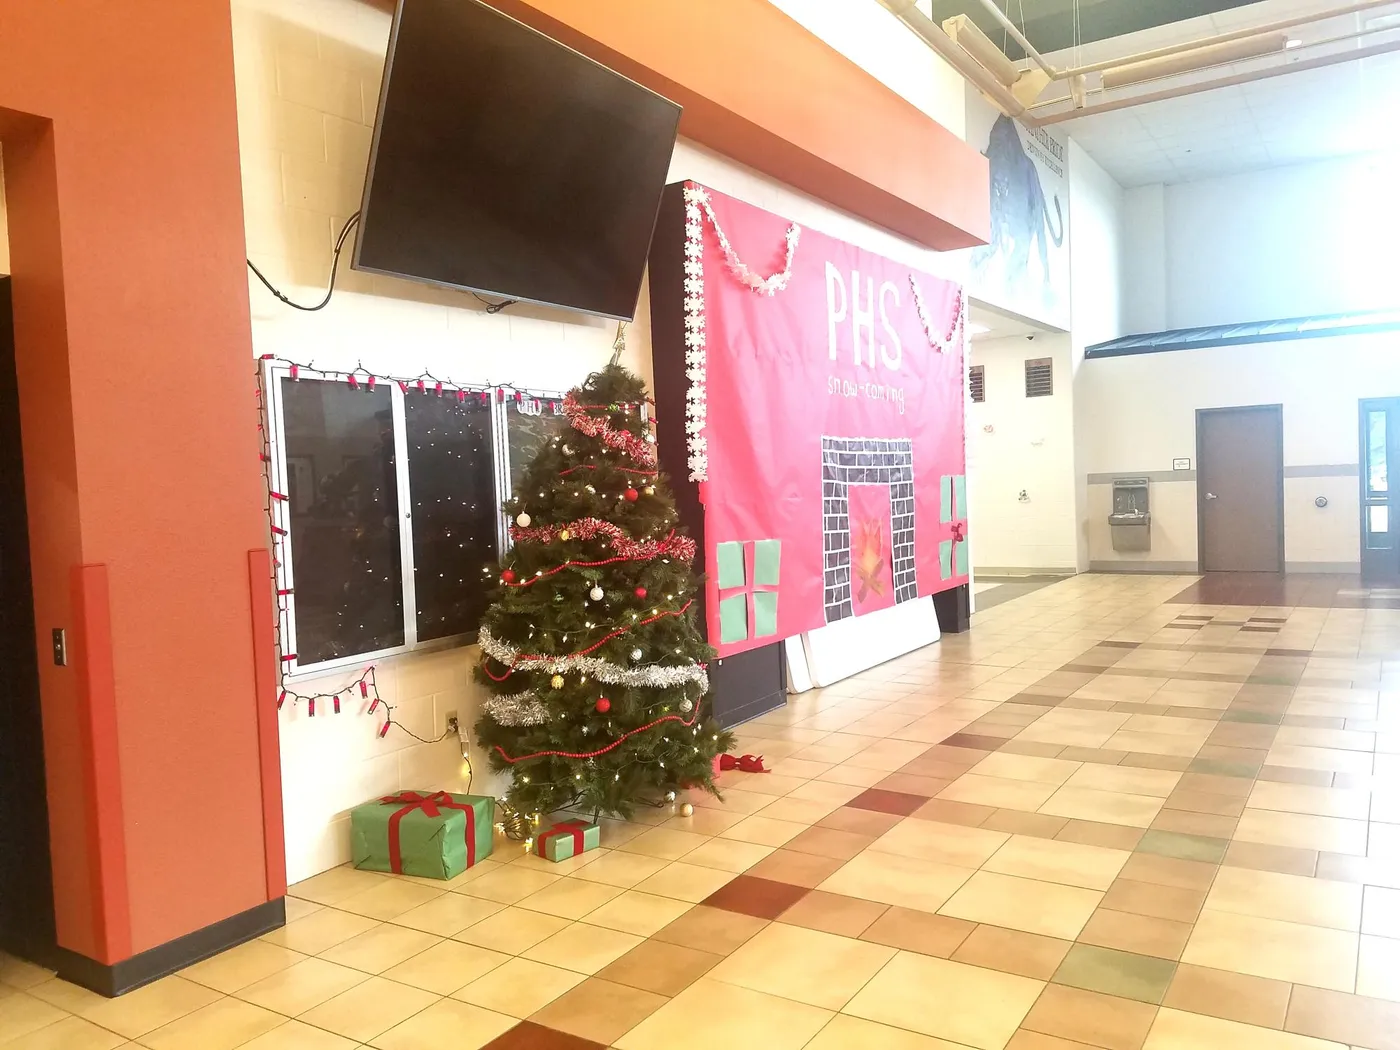
- Artificial tree, 6–7 feet: $60–$150
- Red bead garland, silver tinsel, ornaments: $25–$55
- Red string lights for window framing: $12–$25
- Custom red fabric banner: $30–$75
- Wrapped gift boxes and ribbon: $15–$30
Budget alternative: skip the custom banner and make one from red butcher paper with white paint-pen lettering — roughly $8 and an hour of work.
26. A Grinch Carrying a Flocked Tree Down the Hall
Look at the color ratio in this hallway: about 70% neutral — white walls, blue-grey carpet, the orange bulletin board doing its own thing — with 20% red from the Santa suit and 10% green from the Grinch and the flocked tree. That is backwards from how most holiday displays work, and it is why the character pops instead of blending in. If you are building a character moment, keep the surroundings neutral and let the costume be the only saturated thing in the frame.
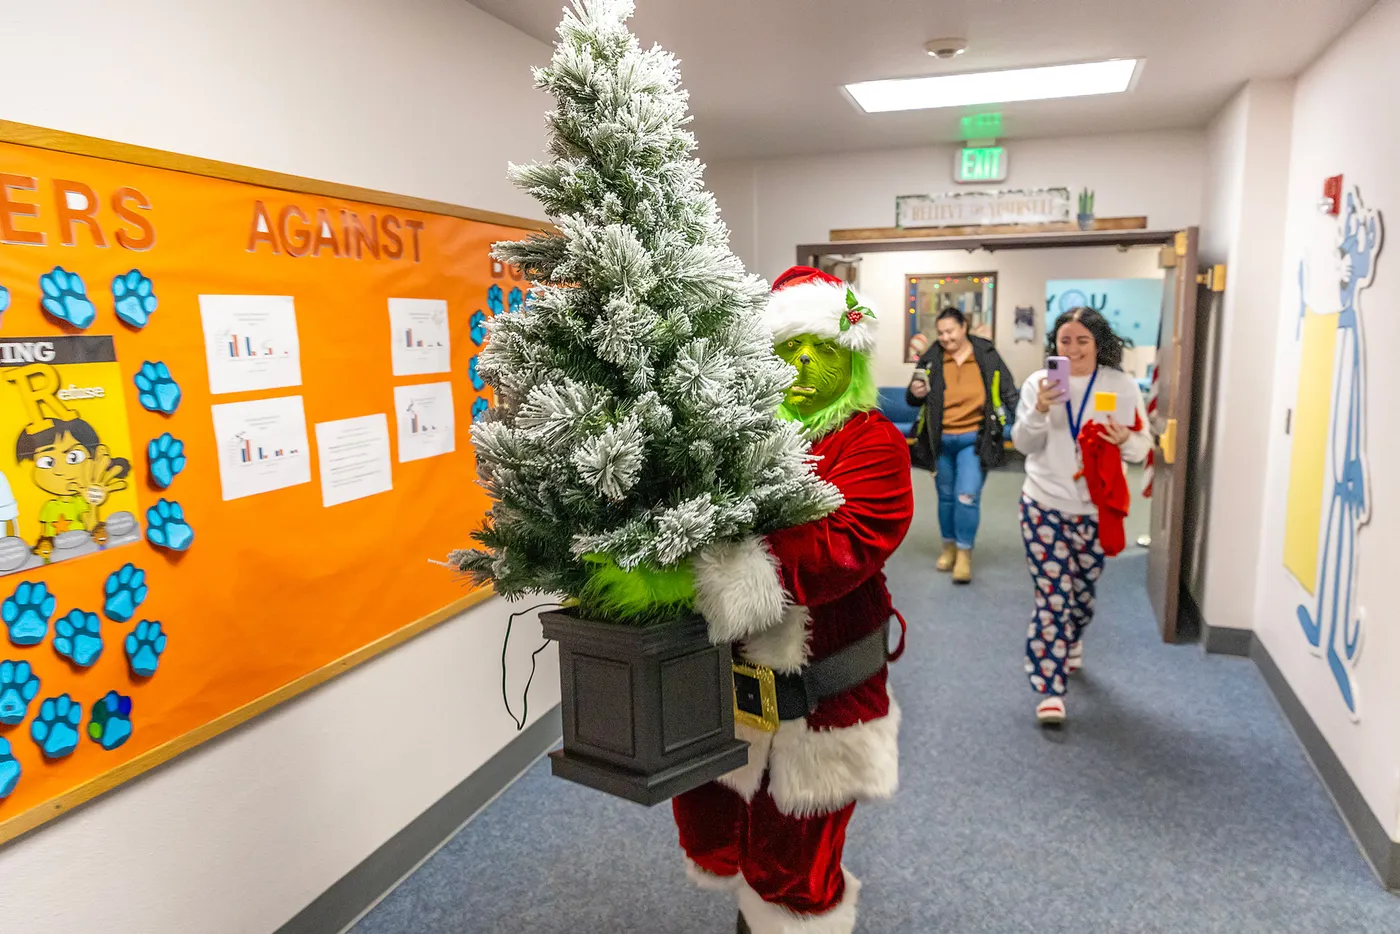
Flocked trees shed. A lot. Before you carry one down a carpeted hallway, snug a clean plastic trash bag over the base and cinch it around the trunk — that catches most of the fallout and takes ten seconds. Also fluff the branches outdoors if you can, then spray the flocking with a light coat of matte sealer. It sets the faux snow so you are not vacuuming white dust out of blue-grey carpet for the rest of December.
27. A Log Cabin Facade With Paper Pine Trees and Pencil Arch
- Measure the door frame and cut a cardboard arch 6 inches wider on each side.
- Layer brown kraft paper in overlapping horizontal bands to mimic stacked logs.
- Draw bark lines with a dark marker, following the curve of each paper band.
- Crumple a few strips before gluing them down for real wood texture.
- Hang the arch around the frame with removable hooks, not on the door itself.
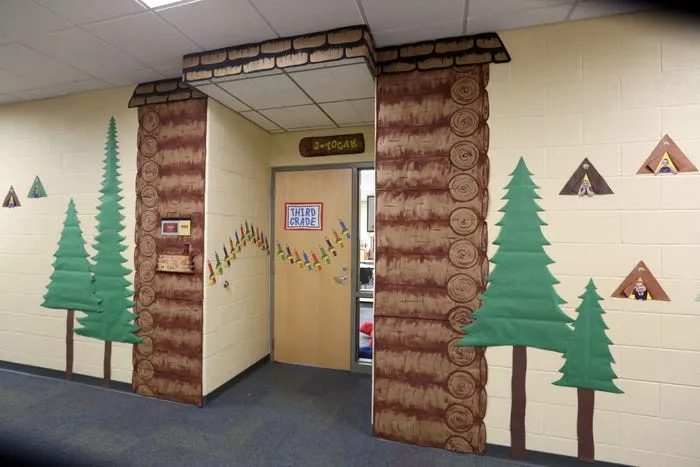
About three hours and roughly $25 in paper and glue. Compare with Idea #17, which builds a whole forest instead of a single cabin.
The arch of colorful paper pencils over the door is the detail that makes this hallway a school decoration rather than a generic cabin. It nods to the classroom without a single printed sign, and it is the kind of thing that costs about $4 in construction paper. Without it, you would have a nice log cabin facade that could belong anywhere. With it, the whole build knows exactly where it lives.
28. Glowing Snowmen Under Blue Backlighting and Projected Light
Blue backlighting is the sneaky budget win here. A single blue LED floodlight aimed at the wall costs $15 to $25 and does more for the atmosphere than three more inflatables would. Inflatable snowmen sized for indoor use run $25 to $45 each, and you genuinely only need one big one — the small ones read as a family and cost about $12 apiece. Projected light units start near $30 and can cover a whole hallway ceiling with falling snow.
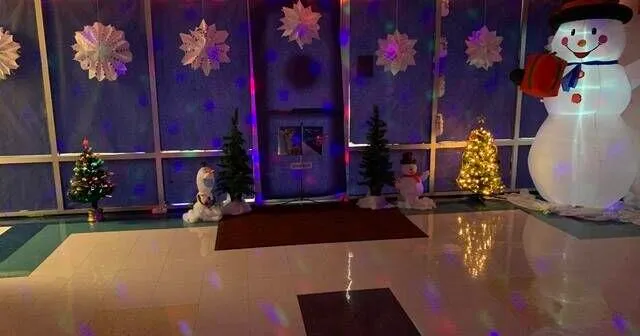
Backlighting needs wall distance to work; if the lights sit right against the surface, you get a bright spot instead of a wash. Keep at least 3 feet between the light source and the wall, which means this setup wants a corridor 6 feet wide or more. Inflatables need roughly 2 feet of clearance around them so they do not get leaned on. Ceiling height of 8 feet is plenty — the drama here is all horizontal.
29. Evergreen Garlands and Red Baubles Through a Stone Archway
Cluster your baubles in threes. A garland hung with evenly spaced single ornaments looks like a retail display; groups of three — one large at 4 inches, two smaller at 2.5 inches, hung at slightly different drops — look collected and expensive. Attach them with florist wire rather than loops so they sit tight against the greenery instead of dangling away from it. On a 10-foot garland run, you want roughly 15 to 20 bauble clusters, not 40 individual balls.
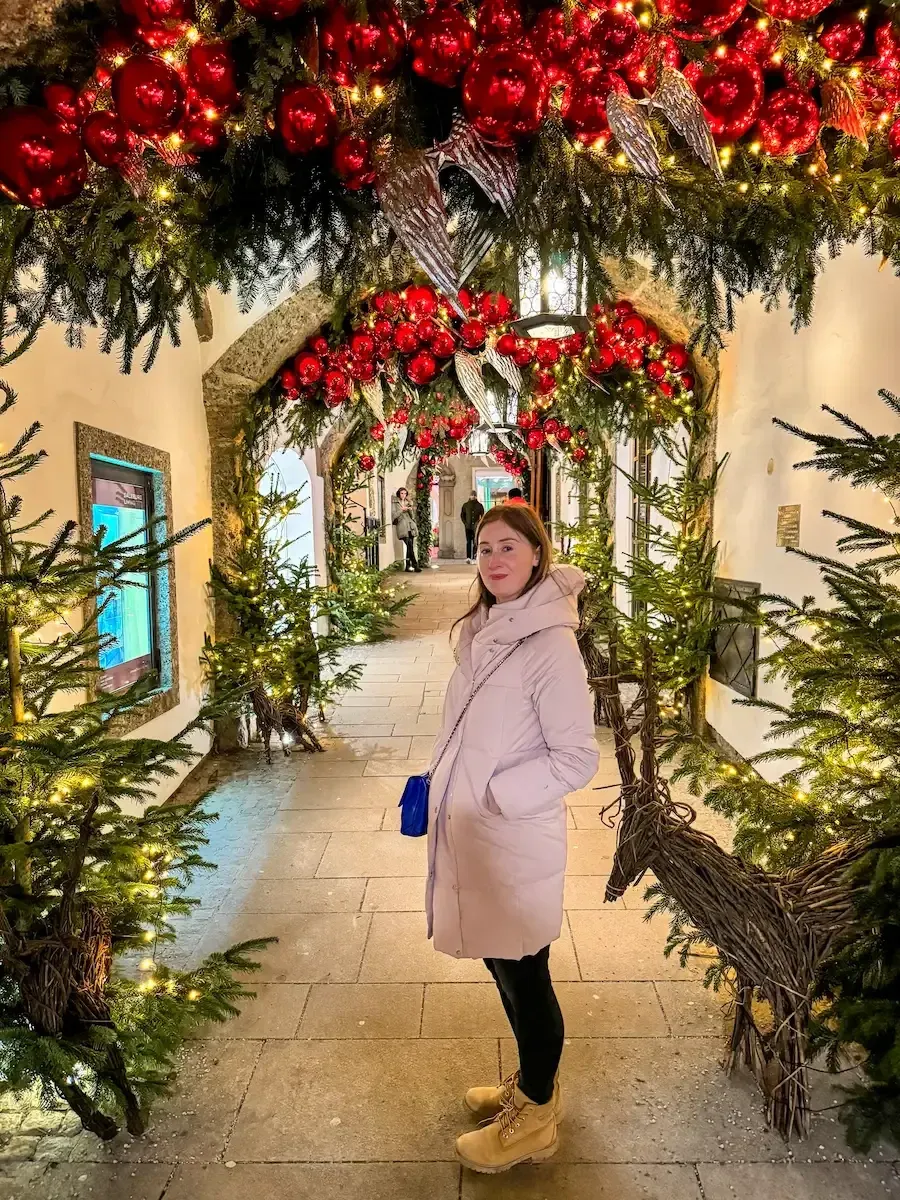
Repetition at scale is the entire effect. The same garland, the same red baubles, and the same warm white lights repeat through every arch, so the hallway reads as one continuous experience rather than a series of separate displays. Density matters too — the greenery covers the ceiling completely, which means there is no gap for your eye to catch on the architecture. And the woven branch reindeer at ground level gives the sequence a full stop at the end.
30. Candy Cane Pillars and Spoon Garland in a Winter Wonderland
- Measure pillar circumference before ordering wraps — most candy cane fabric comes in fixed widths.
- Confirm the ceiling grid can hold hanging snowflake weight; paper is light, but armatures are not.
- Check that no decoration blocks signage, exits, or fire extinguisher cabinets.
- Decide on a single dominant color before you buy anything — red or blue, not both.
- Plan storage bins before the build, not after.
Most of these take five minutes and save a full weekend.
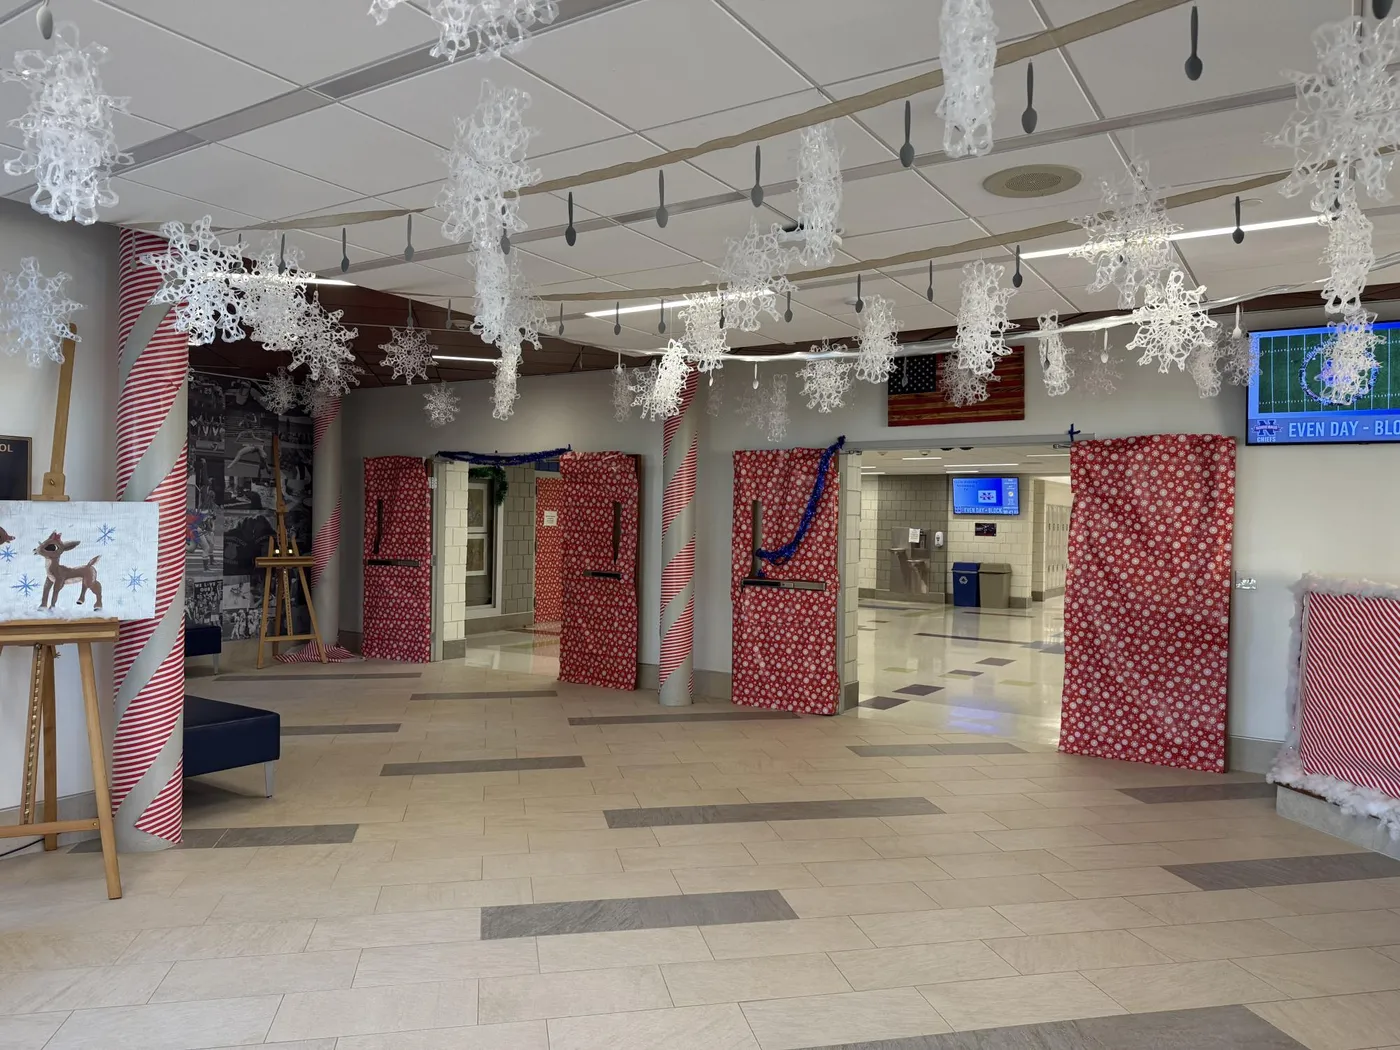
This hallway commits to a two-color formula: about 55% red, 35% white, and 10% blue tinsel accents. Red-and-white candy cane stripes on the pillars, red fabric with white snowflakes on the wall panels, white snowflakes overhead. Restricting yourself to two colors is what lets you go this dense without it turning into noise. Swap the red for green and you get a completely different holiday look from the exact same layout — that is the value of a strict formula.
31. A Faux Brick Fireplace With Mini Stockings and Lanterns
A freestanding faux fireplace in a hallway is a tipping hazard, and it will get bumped. Anchor it to the wall with a strap or L-bracket at the top, or weight the base with sandbags hidden behind the firebox. Keep the mantel clear of anything that hangs low enough to snag a backpack. And check before you buy: many faux brick fireplaces arrive in three pieces and need assembly, so give yourself an evening, not a lunch break.
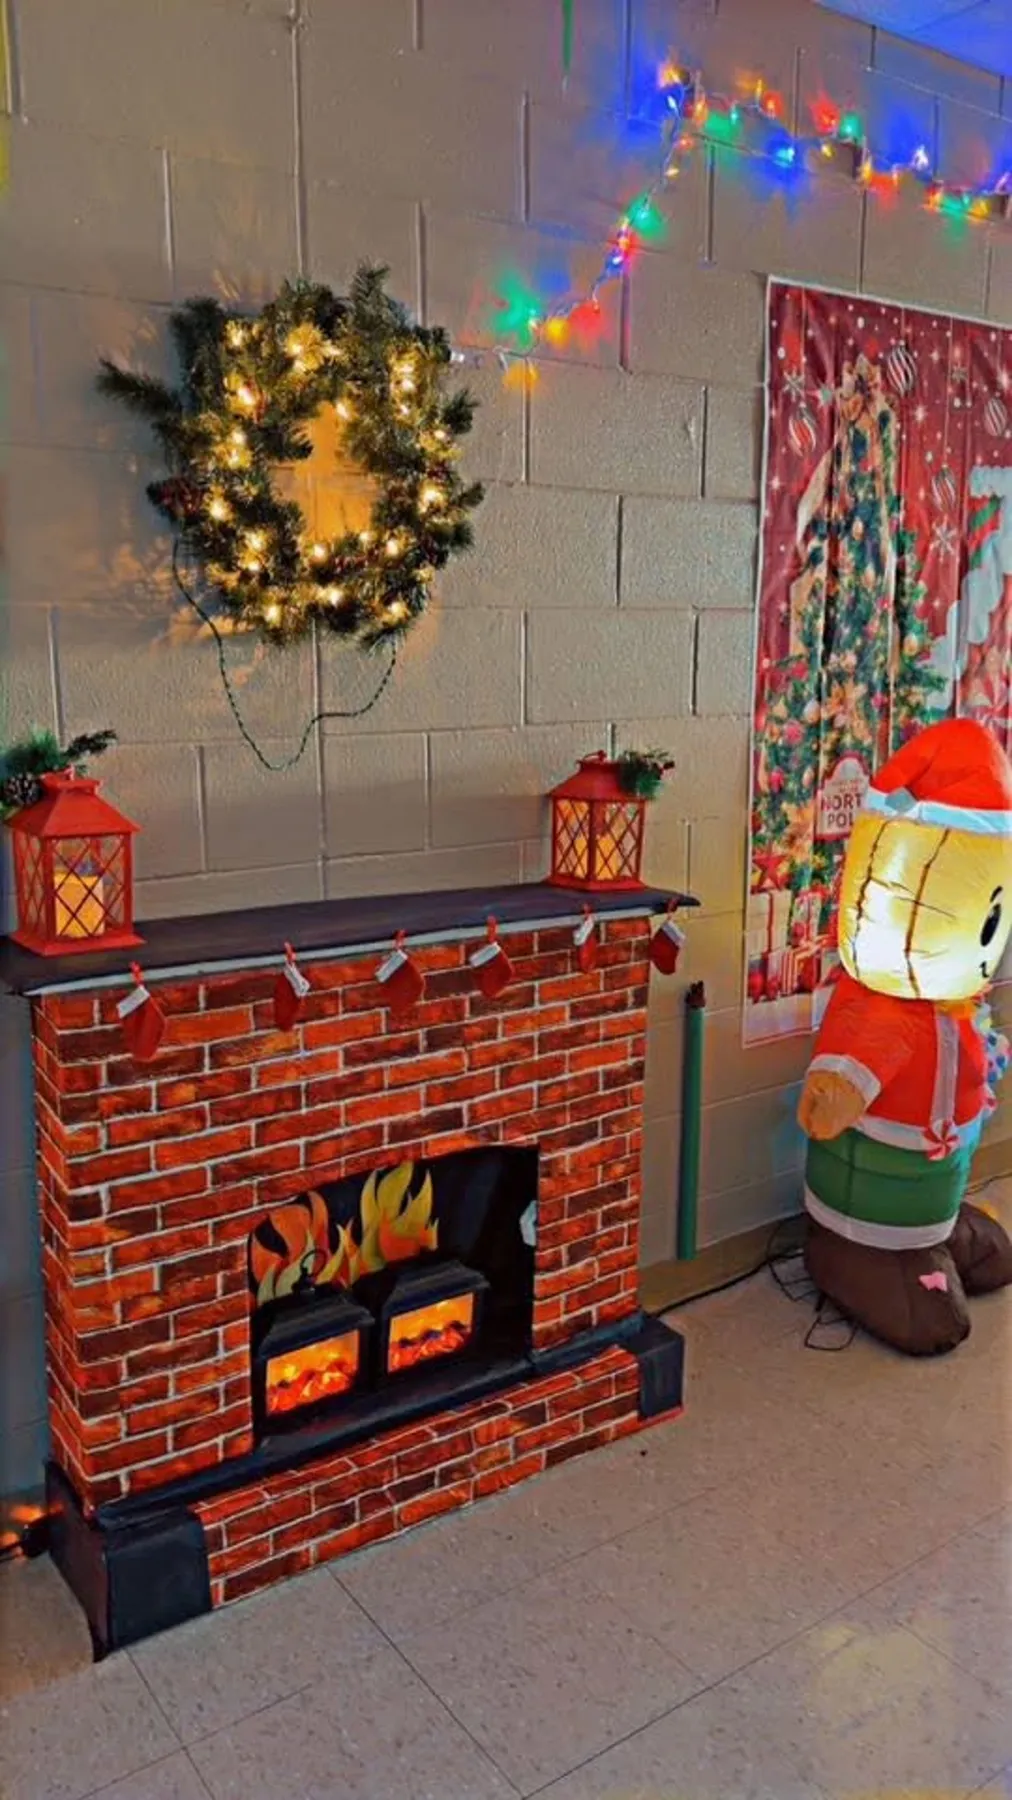
- Faux brick fireplace mantel unit: $120–$280
- Lit evergreen wreath (24-inch): $25–$55
- Mini stockings (12-pack) and lanterns: $20–$45
- Colorful string lights (6–8 strands): $25–$55
- Fabric banner and inflatable character: $30–$70
Budget alternative: build the firebox from stacked cardboard boxes wrapped in brick-print paper for about $30, and put the money into the wreath and lights instead. Compare with Idea #3 — same chimney idea, going up instead of across.
32. A Vintage Red Truck Hauling Trees Across a Paper Wall
Everything on this wall is paper and it still reads as a scene, which is the point. The red truck gives you one saturated focal point, the white snow paper establishes ground, and the bare branches with red cardinals add the vertical interest that keeps the display from being a flat rectangle. Notice how the icicle border runs along the top edge — it frames the whole thing like a stage set. A wall display needs a frame, and paper icicles are the cheapest frame there is.
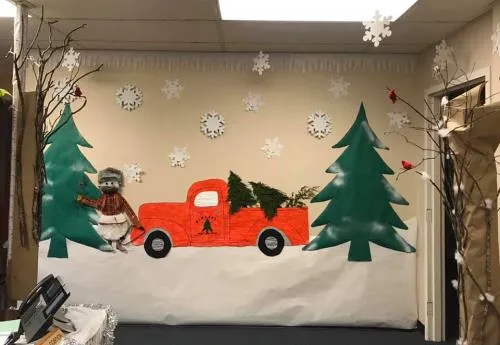
Vintage red trucks have been a holiday staple for years, and 2026 keeps them going because the shape is instantly readable from down a long hallway. The bigger shift is that schools are now building these as flat, photographed backdrops — a wall you can stand in front of for parent-night photos — instead of scattered decorations. If a display is designed to be photographed, it needs a clear frame and one strong focal point, and this one has both.
Hang the First Snowflake — Your Hallway Is Waiting
Forget the perfect hallway. Pick one idea above, buy the paper, and get a few people folding — a corridor that looks like somebody cared beats a corridor that looks like a catalog every single time. And if the build goes sideways, at least you will have a story for the staff room.
📌 Pin your favorite version now so you have it ready when December sneaks up again.