Candy land Christmas is having a major moment on Pinterest right now — and after scrolling past roughly 400 flocked trees and giant balloon candy canes, we understand the obsession.
We spent serious time browsing Etsy, Target, Walmart, and World Market to bring you only what’s worth your attention this year, and the picks run from about $6 for a set of sprinkle-covered ornaments to roughly $1,200 for a full pastel tree install. Inside you’ll find 35 curated candy land Christmas ideas — pastel sprinkle trees, red-and-white candy cane classics, flocked gingerbread villages, and a glam black top hat wreath — with budget and luxury versions compared side by side and shoppable links for every look.
2026’s version leans softer than the candy-stripe maximalism of a few years ago: iridescent pastels, handcrafted felt candy canes, and heavily flocked branches are the details getting pinned hardest. Pin this guide for later — your future self will thank you when it’s time to actually do this.
1. Candy Cane Balloon Arch Meets a Green Velvet Chair
The trick here isn’t the balloon garland — it’s that there’s real furniture sitting in the middle of it. A dark green velvet armchair with slim gold legs faces out from behind a red and white striped panel, so the whole display reads as a place someone might actually sit with a mug of cocoa. The oversized candy cane inflatables are roughly four times the height of that chair, which makes the chair feel normal and the candy feel happily absurd. Red and white stripes repeat three times — the backdrop panel, the balloon garland, the ribbon woven through the tree — and that repetition is what keeps it from looking like a party store exploded.
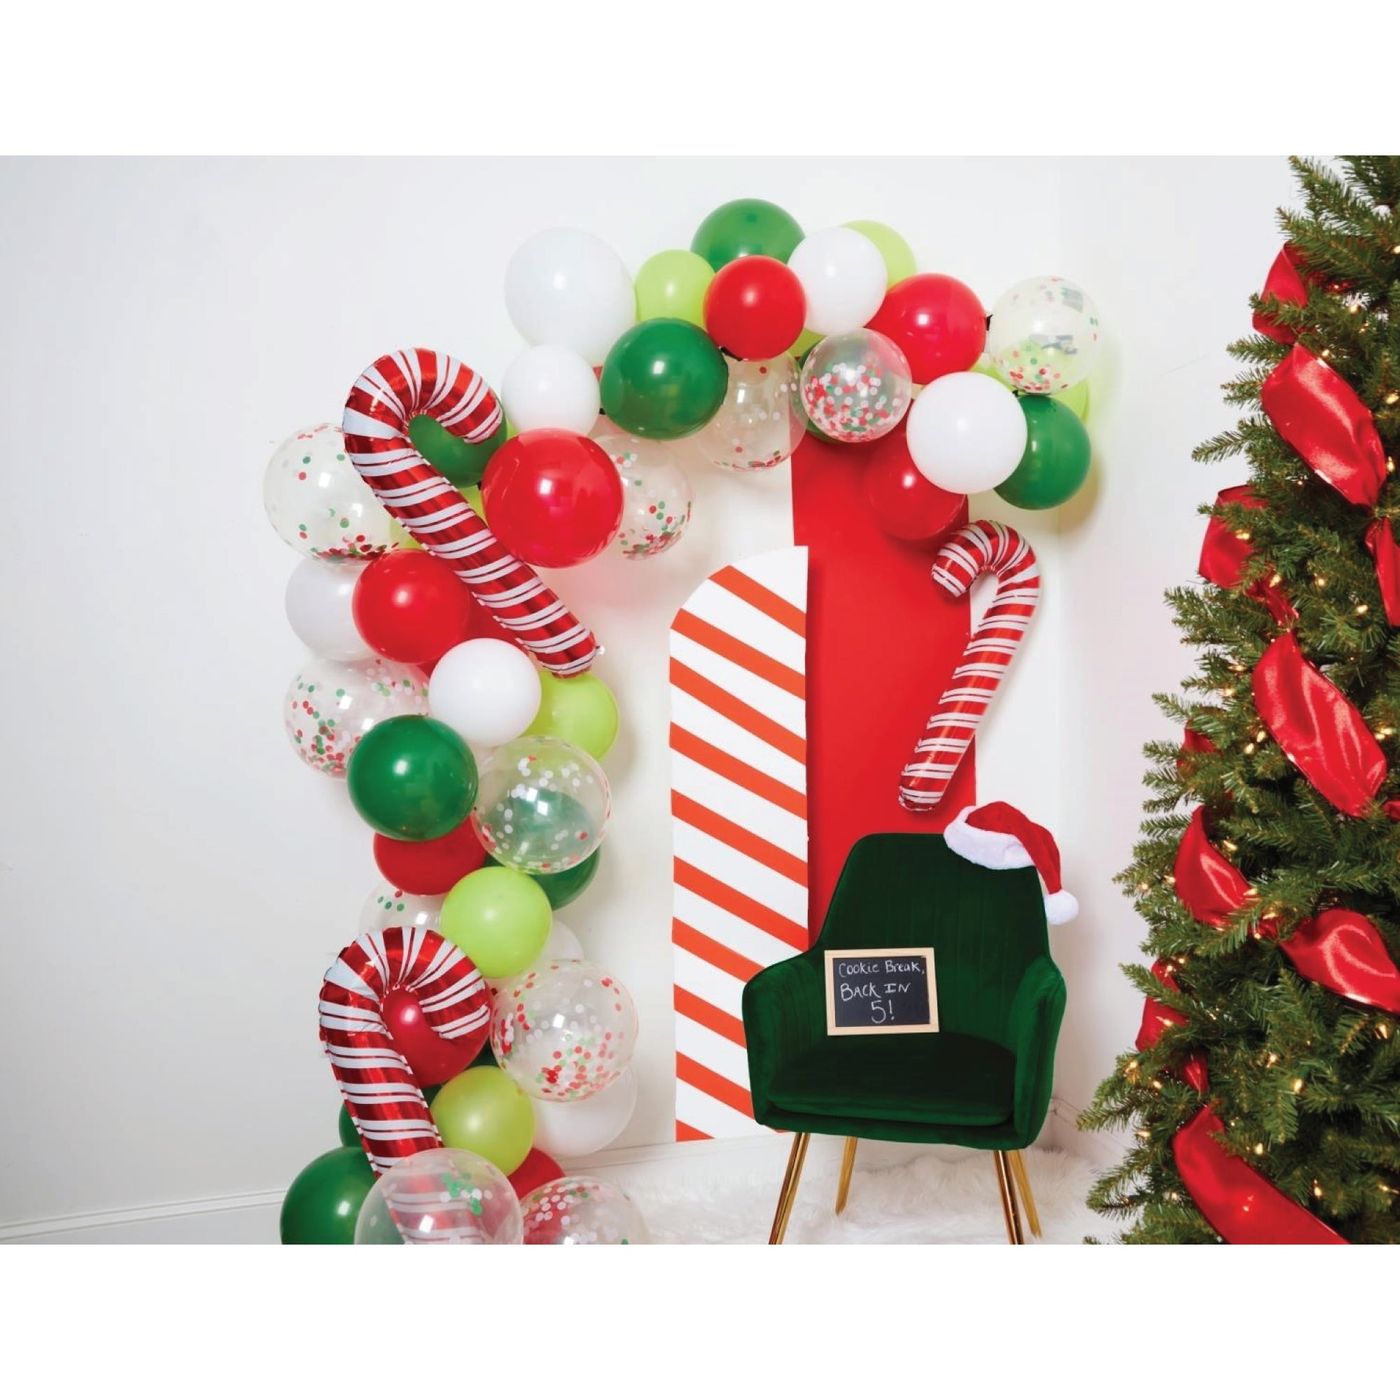
Rough numbers if you want to build the same corner at home:
- Balloon garland kit in red, green, white, plus confetti balloons: $35–$75
- Two giant candy cane inflatables: $50–$120
- Velvet armchair with gold legs (or a thrifted chair plus a green slipcover): $250–$900
- Striped backdrop panels or fabric: $25–$70
- Tree with red ribbon and warm lights: $150–$600
Total: $510–$1,765.
Budget alternative: skip the inflatables and wrap two pool noodles in red and white ribbon for about $12, then hunt Facebook Marketplace for a green velvet chair — they flood the listings every January.
2. Flocked Tree Loaded With Iridescent Pastel Candy Ornaments
Here’s what separates a designer-decorated flocked tree from a crowded one: big ornaments vanish if you hang every single one on the outside. Push the 5- and 6-inch iridescent spheres 3 to 4 inches into the branches so the snowy flocking frames them like a picture mat, then cluster the smaller lollipop, donut, and ice cream cone ornaments in threes at the outer branch tips. Space those clusters 8 to 10 inches apart and you’ll get depth without anything competing. The woven basket collar finishes it — a metal stand peeking out under all that white would undo the whole thing.
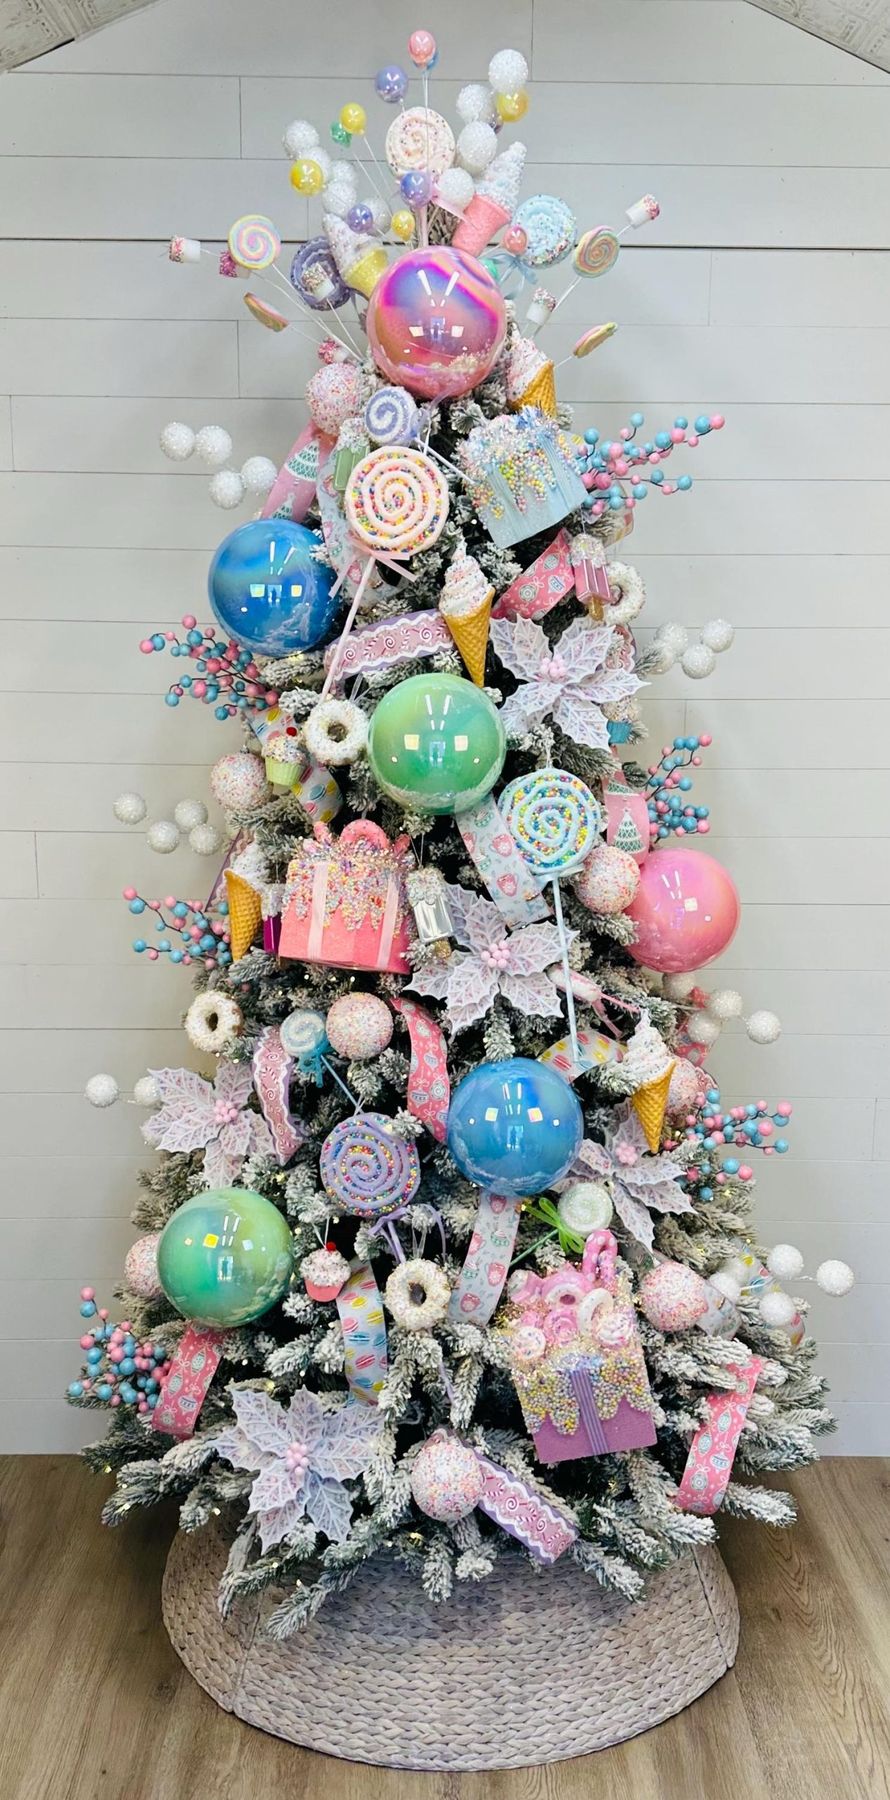
This tree is basically a color formula you can swap: 50% snowy white flocking and white berry picks, 30% pastel candy ornaments in pink, mint, and baby blue, 12% iridescent spheres, and 8% dessert-motif ribbon. Change the palette and the math still works — trade pastels for jewel tones and you get a completely different tree with the same balance. Keep the largest ornaments near the bottom and the smallest at the top and the whole thing reads intentional instead of collected.
3. Gingerbread Cocoa Bar Between Two Lit Evergreens
The cocoa station itself takes about 90 minutes and $60–$120 to pull off.
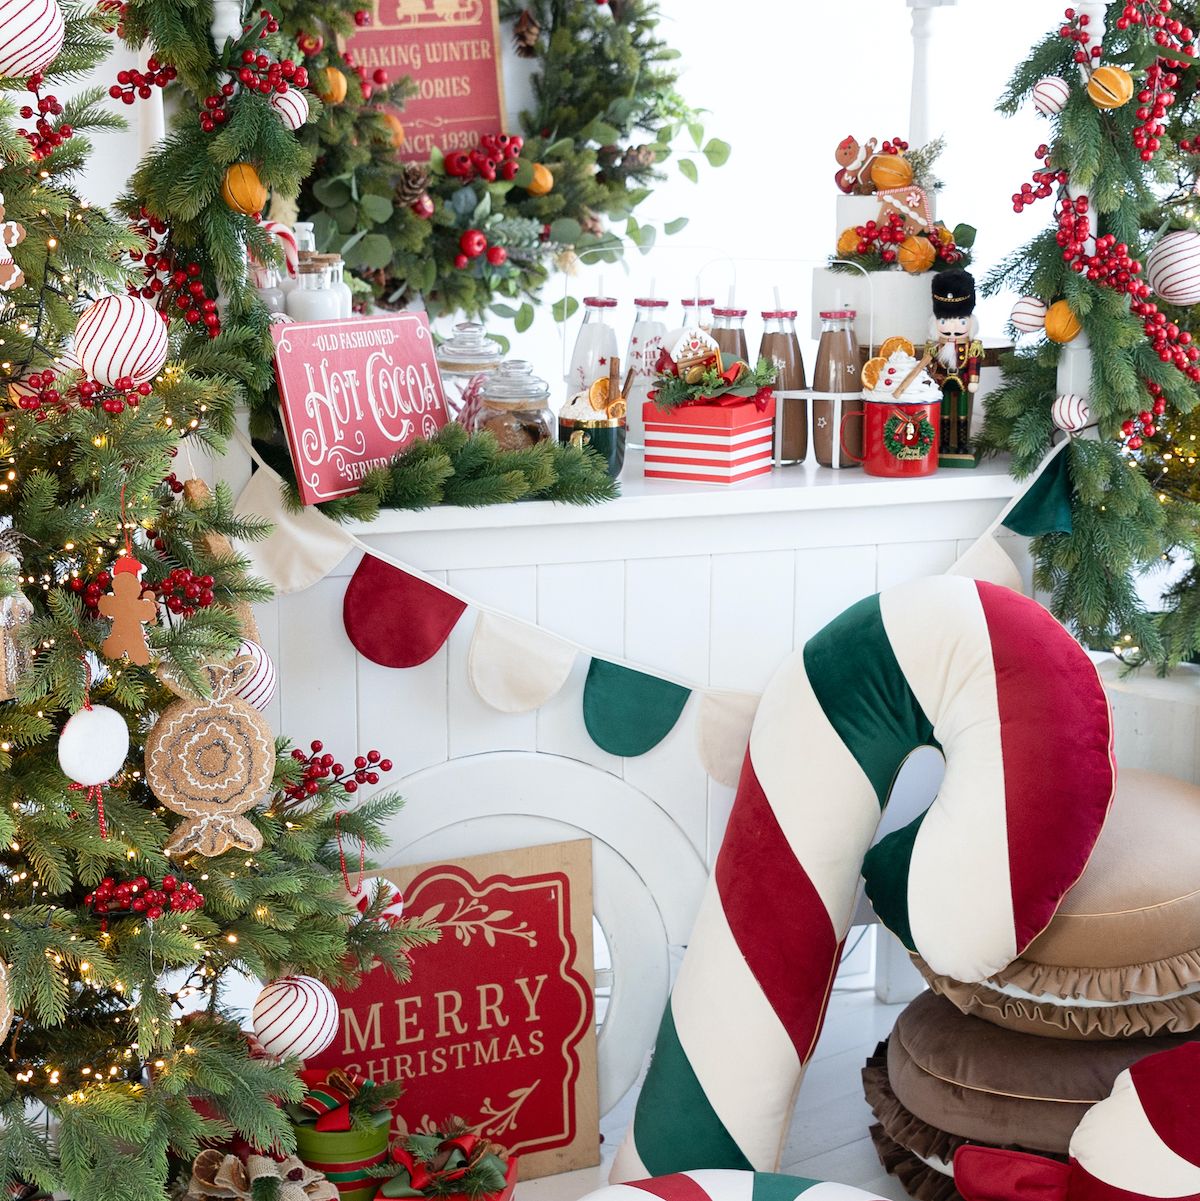
- Choose a white console 30 to 36 inches tall — counter height, so guests can pour without hunching.
- Set the slow cooker of cocoa on the left, cups and lids in the center, and clear jars of crushed candy canes, marshmallows, and sprinkles on the right.
- Flank the console with two small lit evergreens, one on each side, and hide the cords behind the tree skirts.
- Hang the red, green, and cream scallop banner at 70 inches so it clears everyone’s head.
- Finish low: the big candy cane pillow and round ruffled floor cushions make the whole setup feel like a floor picnic.
Two honest cautions. Hot cocoa plus lit trees plus kids equals a cord situation — run everything into one switched power strip and keep the slow cooker at the back edge of the console, never the front. And those cream floor cushions? They will meet a dropped marshmallow within a week. Pick washable covers or lean into gingerbread brown, which forgives everything.
4. Red, White and Silver Flocked Tree With a Disco Ball Base
The disco ball on the floor is the whole personality of this tree. Without it you’d have a perfectly nice flocked tree with red, white, and silver ornaments, warm white lights, red and white striped gift boxes, and two plush candy canes — pretty, but seen a thousand times. Add the oversized mirrored sphere and suddenly every string light in the branches has a second life bouncing off the floor. It also does something practical: it fills the empty gap between the lowest branches and the carpet, which is the spot most trees look unfinished. One $30 ornament, one entirely different room.
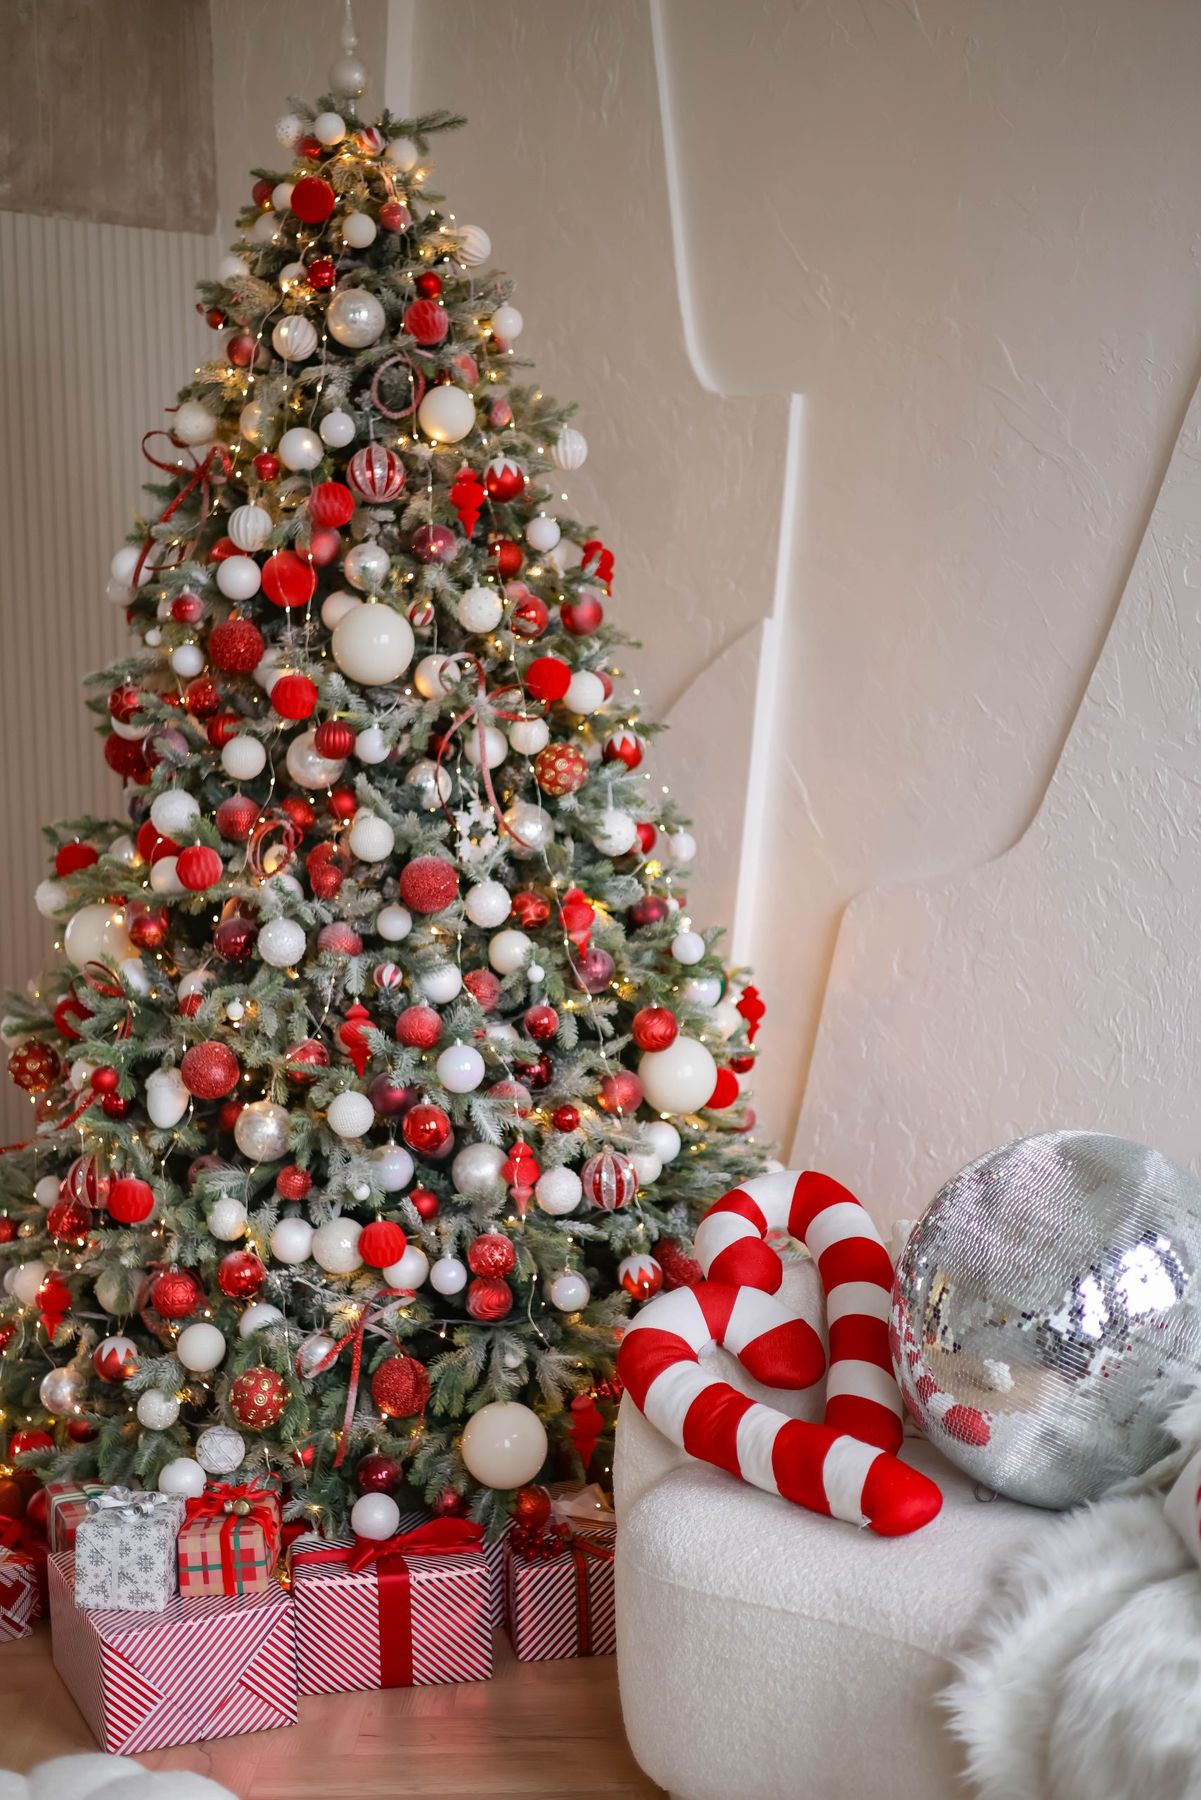
You don’t need a designer budget for this. Shop the dollar store for shatterproof red and white baubles (about $1.25 for a six-pack), then add a few larger statement pieces at $8–$15 each so the tree has size variety. One roll of red and white striped wrapping paper from Target runs about $5 and covers enough gifts to fill the base, and the plush candy canes are widely available around $12–$20. Total for this look minus the tree: roughly $60–$120.
5. Pastel Candy Tree Against a Pink and Blue Two-Tone Wall
This one needs room to breathe. The two-tone wall — pastel pink on the lower half, light blue above, with a thin gold chair rail — only works when you can see both colors at once, which means at least 10 feet of uninterrupted wall and ceilings of 9 feet or higher. A 9-foot tree is the right partner here; anything under 7 feet gets visually swallowed. The giant pastel nutcracker needs about 30 inches of clearance in front of the tree, and the wicker baskets of cupcake and lollipop decor want to sit forward of that, closer to the viewer. If your space is tighter, see Idea #16 for a pastel look that reads beautifully in a small corner.
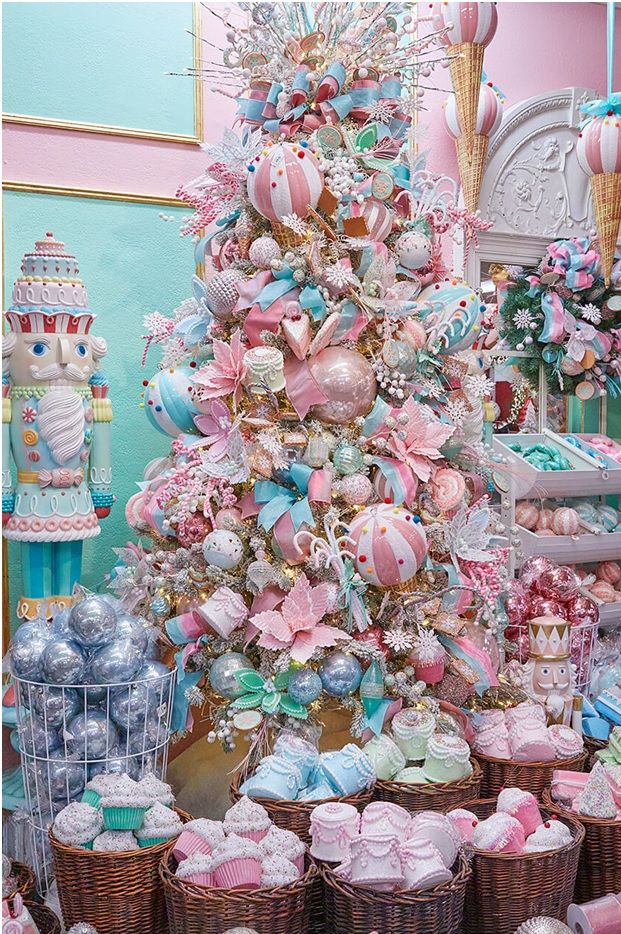
Why now: pastel Christmas has quietly grown from a niche Pinterest board into one of the most saved holiday palettes of the season, riding the same wave as dopamine decor and the broader move away from strict red-and-green tradition. It photographs beautifully, which matters in a year where everyone’s holiday content lives online. Pastel trees also have real staying power because the ornaments are easy to layer into neutral decor the rest of the year — pink and mint don’t scream December the way candy apple red does.
6. Overhead Candy Cane Garland With Rainbow Glitter Baubles
Hanging garland overhead changes how a room feels more than anything you could put on a wall. This one works because it layers at three heights: pine needle garland at the top, big red and white spherical baubles hanging in the middle, and candy cane striped picks with white berry clusters dangling below on thin ribbon. The multicolor glitter ornaments are the wild card — without them the whole thing reads traditional, with them it reads candy land. Hang the main run at about 7 feet so tall guests clear it, then let the lowest picks drop to 6 feet 4 inches for that floating feeling.
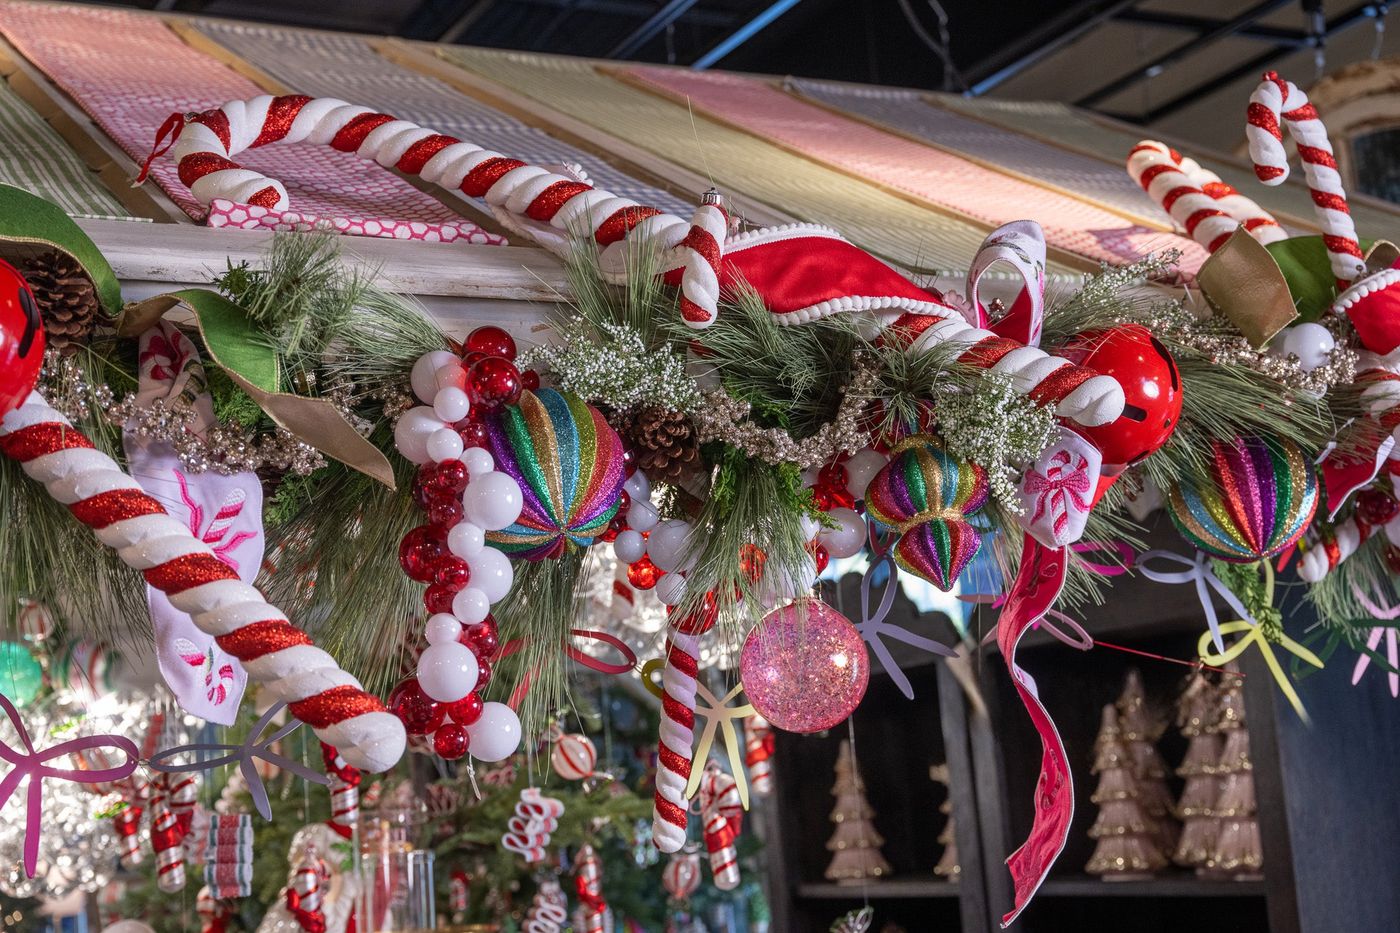
What this actually costs:
- Two 9-foot pine garlands (real-touch or lit): $60–$140
- Red and white baubles, 40-count: $25–$50
- Rainbow glitter ornaments, dozen: $18–$40
- Candy cane striped picks and berry clusters: $20–$45
- Gold and red glitter ribbon spools: $12–$30
Total: $135–$305.
Budget alternative: buy plain green garland from Walmart for around $15 per 9-foot strand and zip-tie in ornaments you already own. Nobody counts baubles from the couch.
7. Sprinkle-Covered Baubles in a Pink Snowy Window Display
Make the sprinkle ornaments yourself and you’ll spend about $30 and one afternoon.
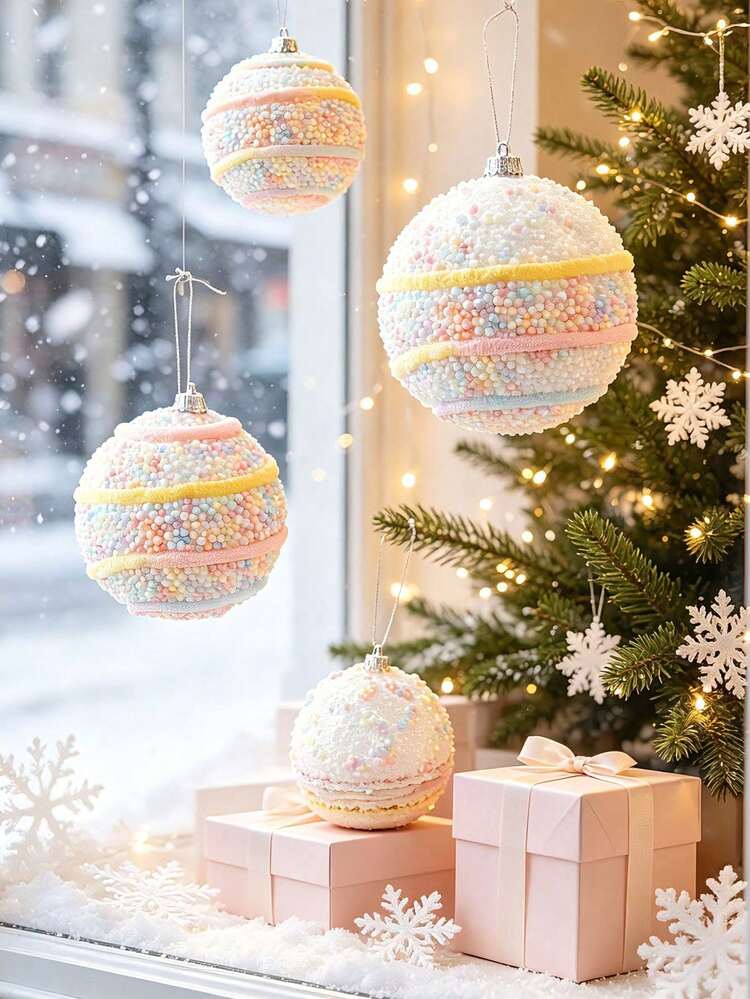
- Buy clear fillable disc ornaments in 4- and 6-inch sizes, roughly $10 for a set of six.
- Coat the front face with matte Mod Podge and let it get tacky for 60 seconds.
- Roll the ornament face-down in a tray of white and pastel faux sprinkles, pressing gently at the edges.
- Seal with a light mist of clear matte acrylic so the sprinkles stop shedding onto the floor.
- Rest one large ornament on a base and hang the rest at staggered heights — 8, 14, and 20 inches above the sill.
Light direction matters more than anything else in a window design. If your window faces south or west, the ornaments will backlight and glow, which makes the sprinkles sparkle — hang the biggest piece dead center in that light path. North-facing windows give you flat, cool light, so add a strand of warm 2700K string lights behind the branches to compensate. And keep the pale pink gift boxes low, at sill height, so they read as snow-covered presents rather than a second focal point.
8. Tiered Pastel Gingerbread Village With Twinkling Lights
It’s the tiers. A single gingerbread house is a decoration; a tiered village of pink, light blue, and white houses with icing snow, edible snowflakes, and tiny tree cutouts is a landscape. The stacking creates a hierarchy the eye follows naturally from the largest house at the base to the smallest up top, and it’s the reason this reads as a centerpiece instead of a collection of objects. Remove the tiers and you have a nice gingerbread display standing in a row — pleasant, forgettable, and about half the visual impact.
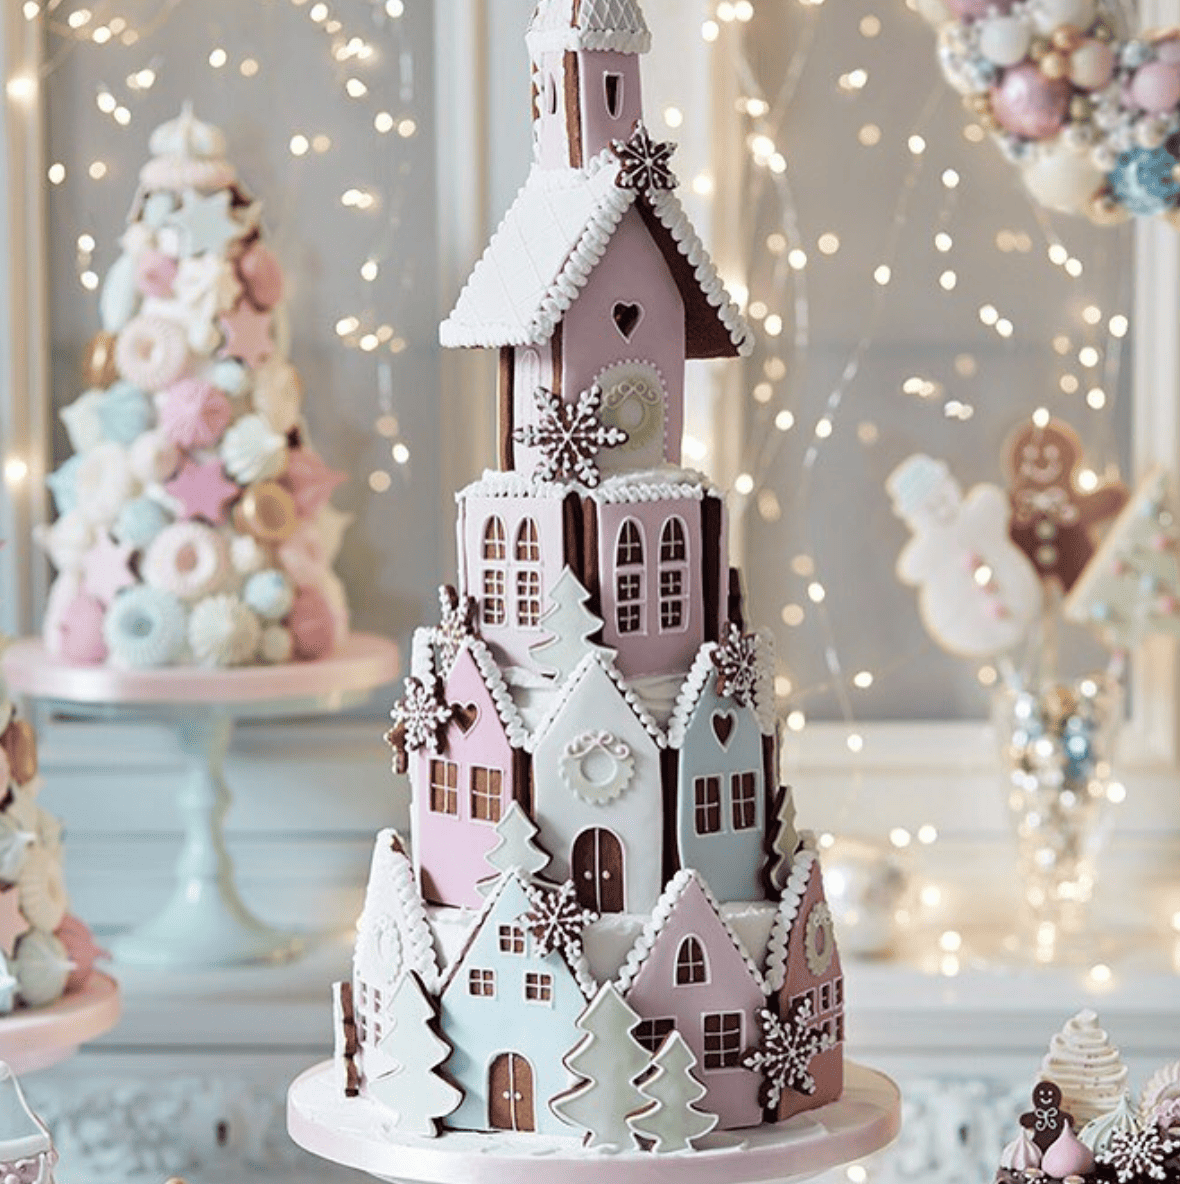
on upkeep: icing decorations are fragile and dust sticks to them within about two weeks. Keep the display at least 3 feet from any heat source or the icing will sweat and slump. A soft pastry brush once a week handles the dust, and a shallow acrylic riser under the whole thing catches crumbs and stray sprinkles. If humidity in your house runs above 60%, skip royal icing details and use air-dry clay painted white — from two feet away nobody can tell, and it stores for years without cracking.
9. Pink and Teal Nutcracker Beside a Frosted Bottle Brush Tree
The palette math here is simple enough to copy with anything: 55% cream and textured white (the wall, the miniature house), 25% pastel pink (nutcracker, ceramic tree), 12% light green and teal (bottle brush tree, nutcracker’s uniform), and 8% gold and warm light for sparkle. That last 8% is doing heavy lifting — it’s what keeps a pastel display from looking washed out. Swap pink for butter yellow and teal for navy and the formula holds perfectly.
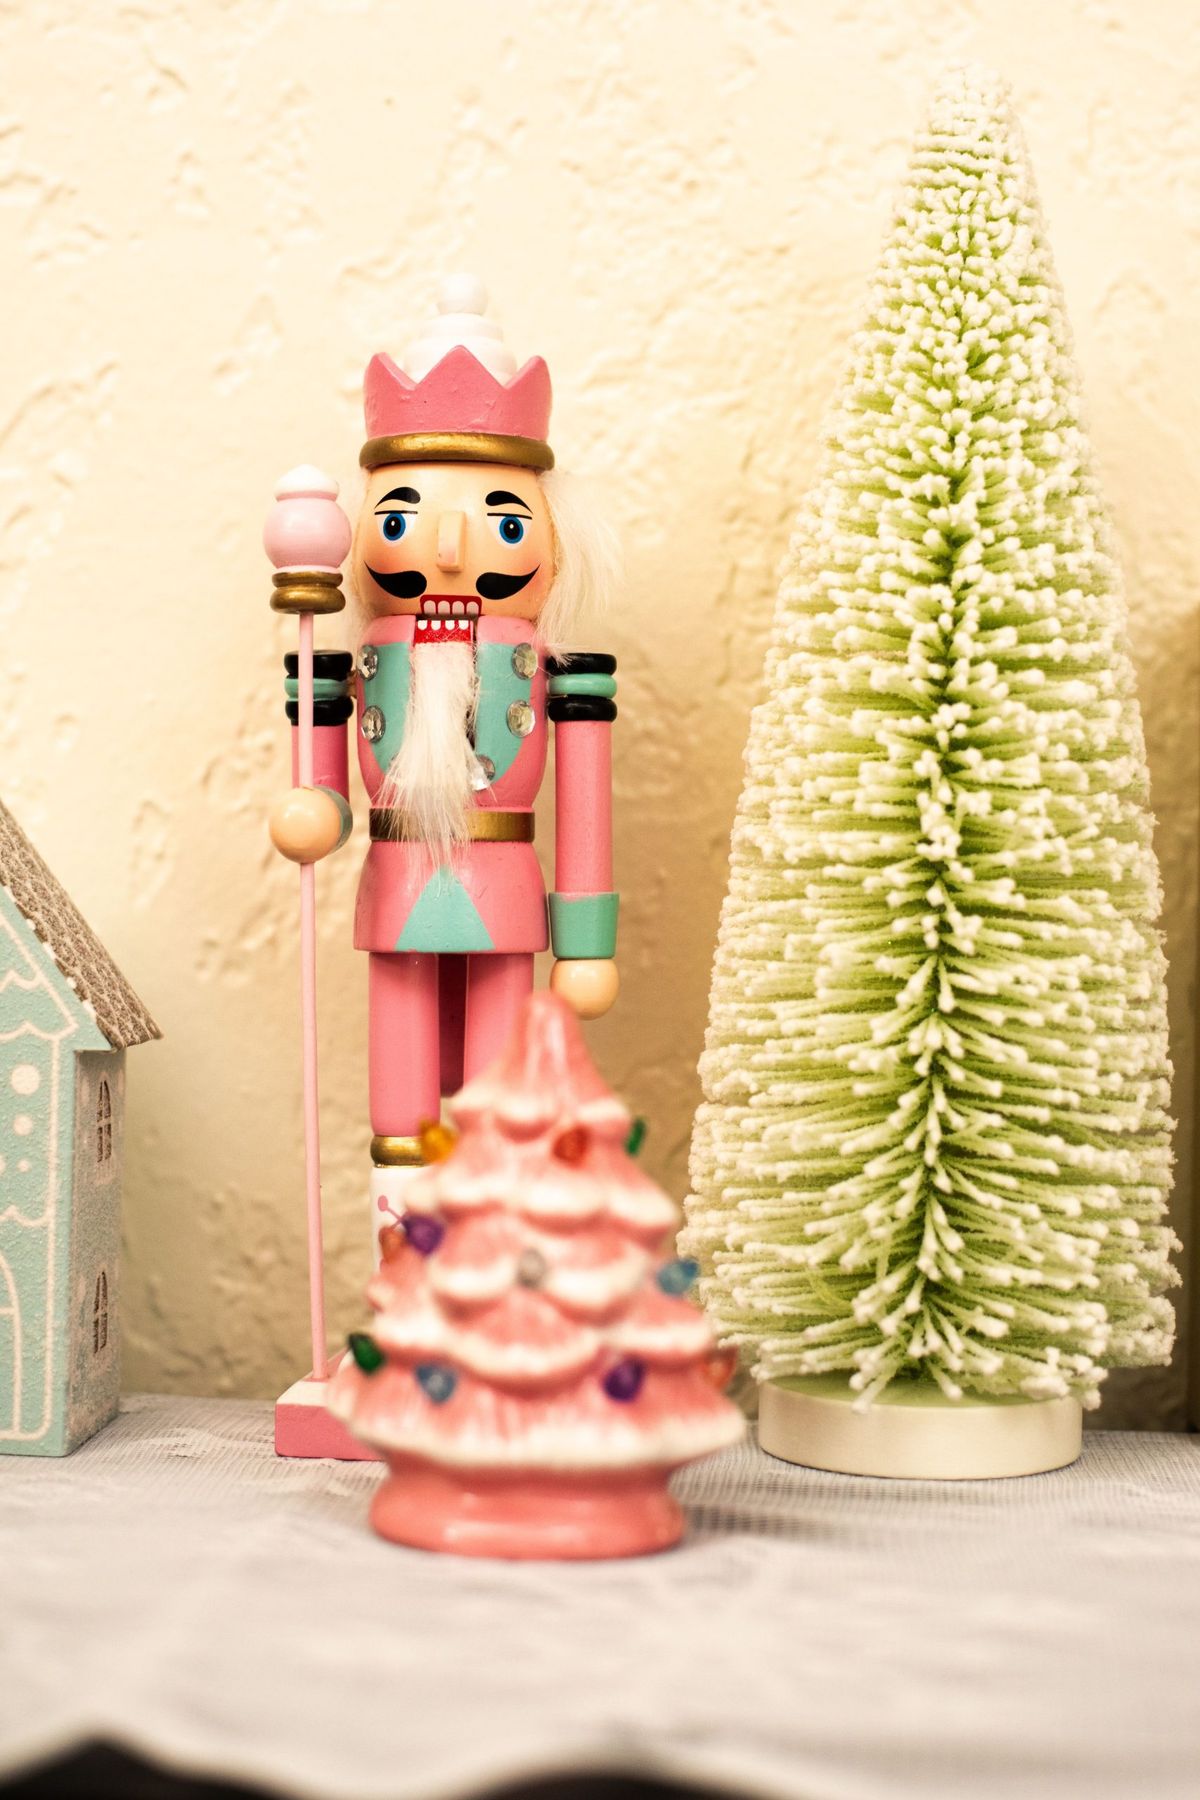
Getting this look on a budget is genuinely easy. Walmart and Target both carry pastel nutcrackers every November for $20–$40, and dollar store bottle brush trees run about $3–$5 each. The pink ceramic tree with colored bulbs is the splurge at $40–$90, but estate sales and Facebook Marketplace turn up the vintage originals for under $25 if you start looking in October. Group them at three heights — tall nutcracker, mid-size ceramic tree, small house — on a light cream surface and you’ve replicated the whole vignette for under $70.
10. Winter Village Cake With a Silver Glitter Path
Building this takes about two hours and roughly $45 in materials.
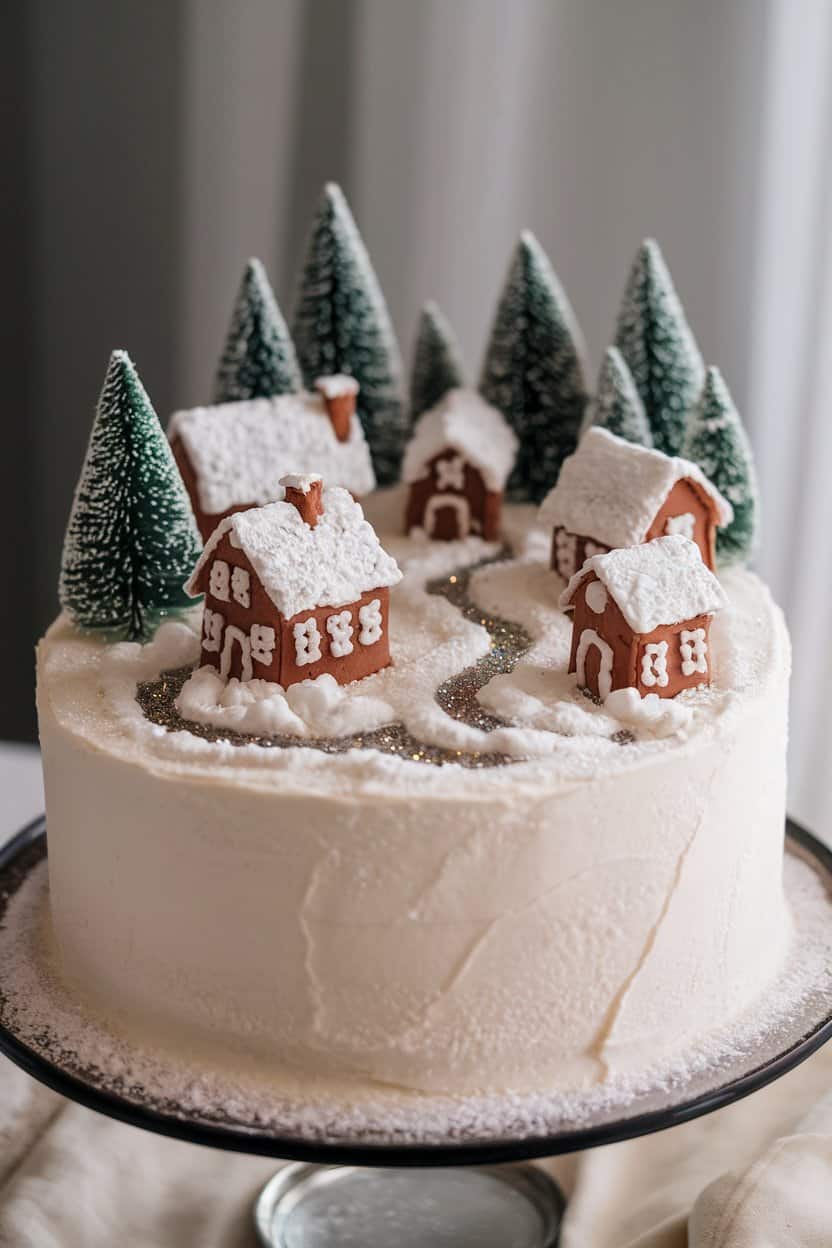
- Bake or buy a single round cake, 8 inches across, and cover it with a smooth white buttercream.
- Chill for 30 minutes so the surface firms up enough to hold weight.
- Pipe a winding path across the top with a small round tip, then fill it with edible silver glitter or sanding sugar.
- Press gingerbread-colored miniature houses into the frosting along the path, varying their distance so the village feels organic.
- Add green bottlebrush trees between houses, then dust everything with powdered sugar for fresh snowfall.
The single element that makes this special is the silver glitter path — it gives the village a narrative. Without it, you have houses sitting on a cake. With it, the eye travels, and the whole thing suddenly looks like a place someone lives. That one line of sparkle costs about $6 and changes the entire composition.
11. Flocked Garland and Wreath Arch Over a White Door
One measurement saves this whole look: keep the wreath centered at 60 inches from the floor and leave 2 to 3 inches of clearance on the hinge side of the door. Most door arches fail because the garland gets crushed every time someone walks through. Use two 9-foot flocked garlands, twist them together at the top center to form the arch, and secure with clear adhesive hooks rated for 5 pounds — never nails, since you’ll want them off in January without spackle.
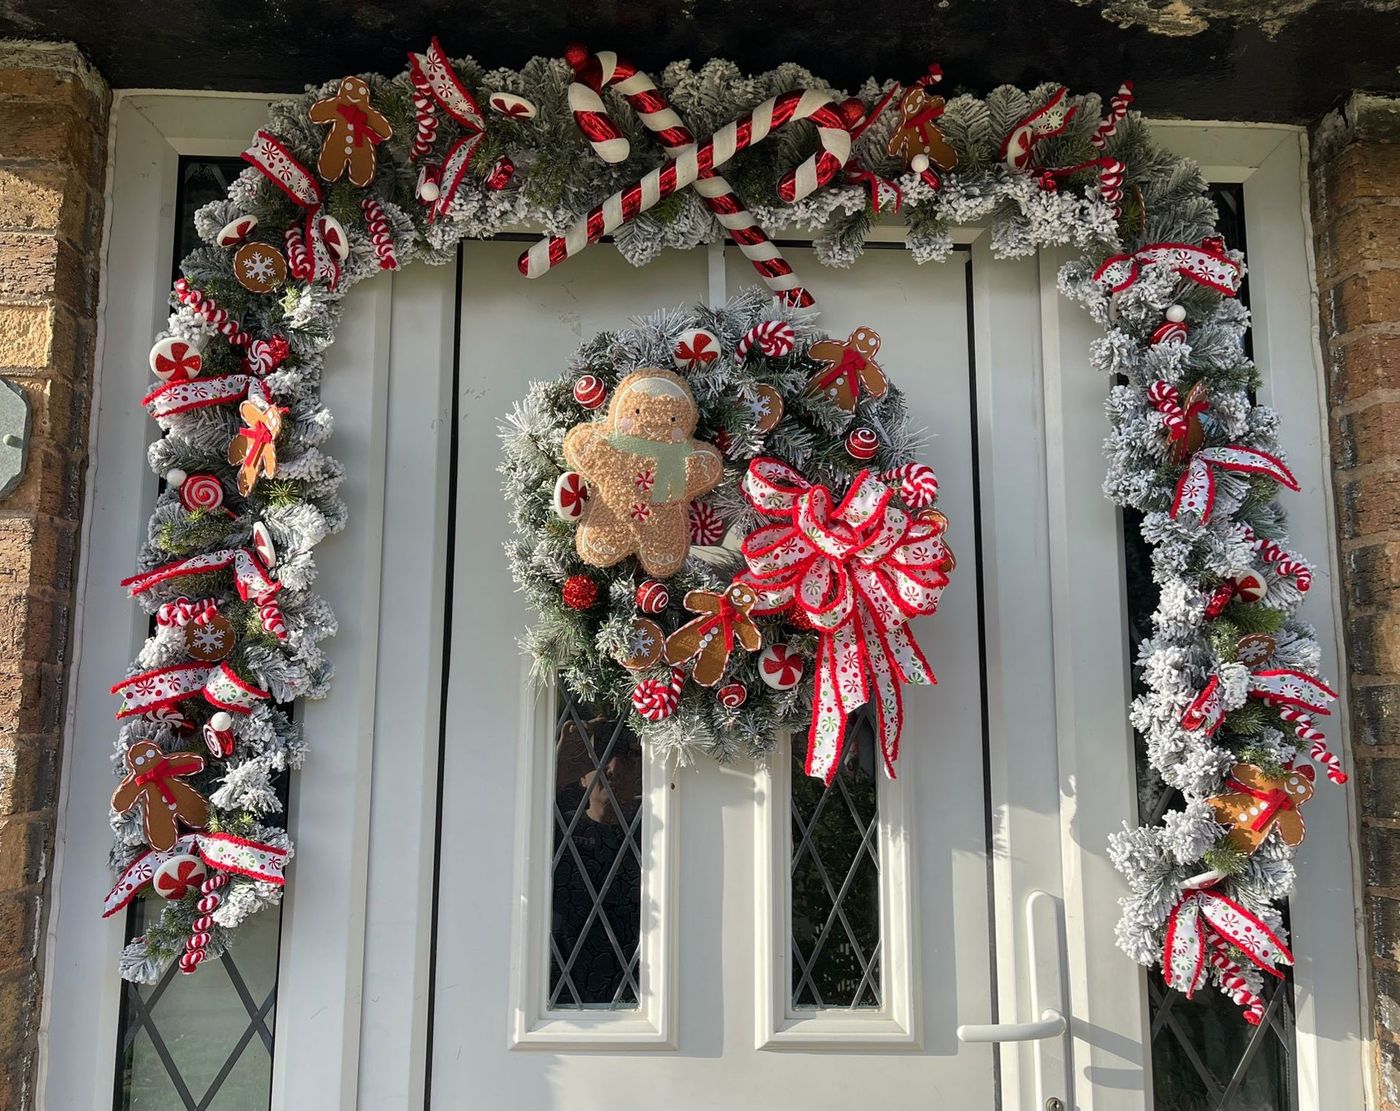
Honest warnings: flocking sheds. Expect a light dusting of white on your entry floor for the first week, and don’t hang it anywhere rain can reach it. If you have a storm door that swings inward, measure that clearance too — a 4-inch-deep gingerbread ornament will absolutely catch.
Rough costs:
- Two 9-foot flocked garlands: $70–$160
- Matching flocked wreath: $40–$90
- Gingerbread, lollipop, and candy cane ornaments: $35–$80
- Red and white patterned ribbon, 3 rolls: $18–$40
- Hooks and floral wire: $10–$20
Total: $173–$390.
12. Flocked Wreath of Peppermint Swirls on a Dark Door
The dark brown wooden door is doing more work than any ornament on that wreath. That deep, warm backdrop makes the snowy flocking pop in a way it never would on white trim, and it makes the glossy red peppermint swirls look like actual candy instead of plastic. Take the wreath off this door and hang it on a pale beige door and you lose half the drama — the contrast is the design. If your door is light, lean harder into the red berry clusters and glossy wrapped candy shapes to build your own contrast. For a bigger, bolder statement piece, compare with Idea #28, which goes full peppermint maximalism.
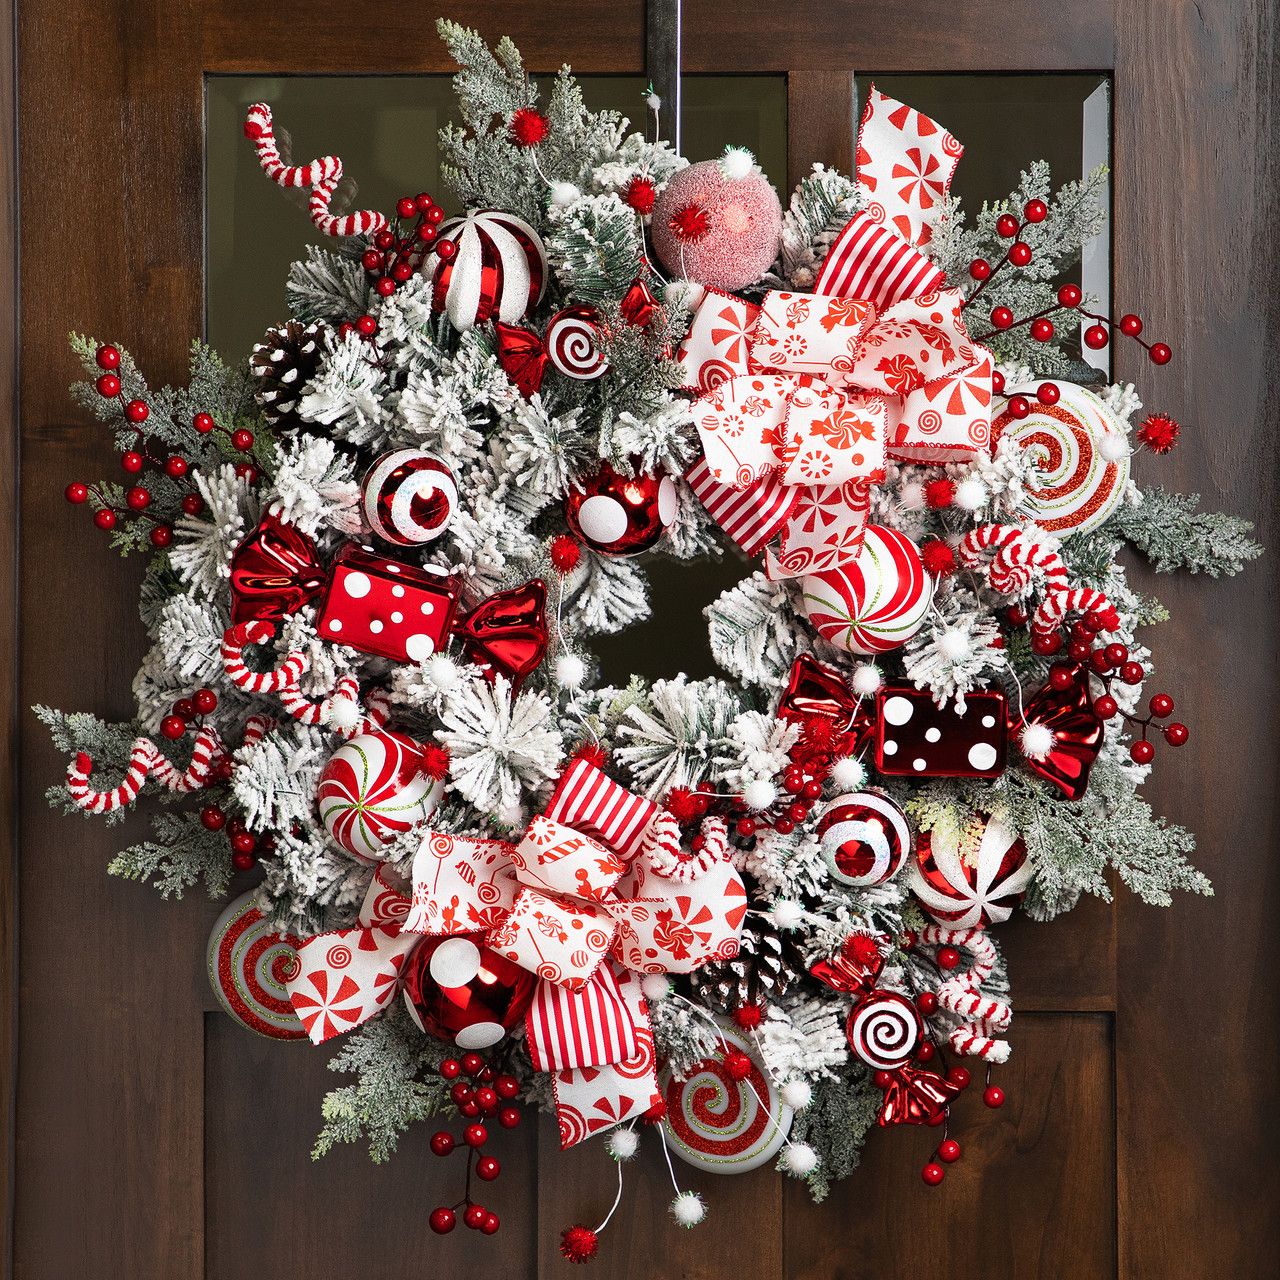
Before you hang anything:
- Measure your door height — a 24-inch wreath is right for a standard 80-inch door; 30 inches starts to look heavy.
- Check which way the door swings and keep the wreath under 4 inches deep.
- Confirm your hook can handle 5 to 8 pounds once the wreath is fully loaded.
- Look at your door color in daylight — dark doors carry flocking beautifully, light doors need more color.
13. Denim Blue and Coral Layered Bow With Gold Baubles
This bow works because of proportion discipline. The finished bow is about 1.5 times the width of the largest gold ornament sitting beside it, which sounds fussy but is exactly why it looks expensive rather than chaotic. Three ribbons stack: a 4-inch denim blue velvet as the base, a 2.5-inch gold ribbon with jewel-like sequins through the middle, and a 1.5-inch coral pink satin on top. Each layer narrows by roughly a third, and that gradual step-down is what makes a layered bow read as one object instead of three ribbons tied together.
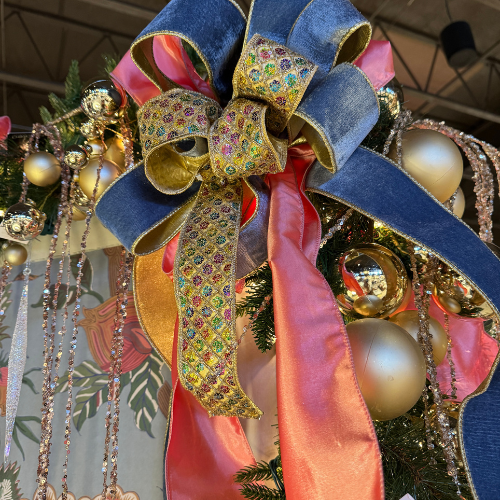
Color formula: 40% green foliage as the neutral base, 25% mixed gold ornaments — a blend of matte and reflective finishes so it doesn’t look like a matching set — 20% jewel-toned multicolor sparkle, and 15% coral pink and denim blue accents. Want to change it up? Swap coral for emerald and denim for burgundy, keep the gold and greens in place, and the formula still holds. It’s the ratios, not the colors, that make it look intentional.
14. Lollipop Cutouts and Light Blue Lanterns on the Porch
Porch candy decor is one of the few places you can go genuinely big without crowding anything.
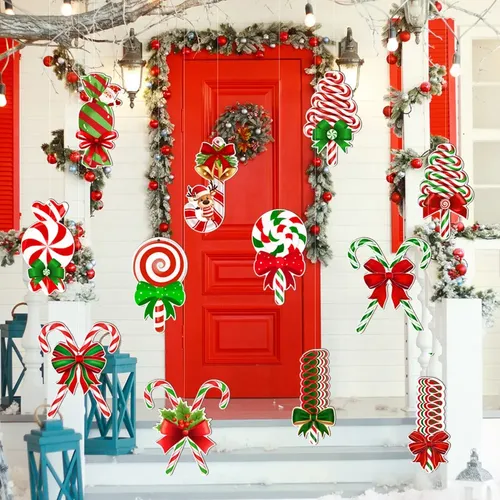
- Large candy and lollipop cutouts, 18 to 24 inches: $8–$18 each, or about $45 for a mixed set
- Green garlands with red ornaments, two 9-foot strands: $50–$110
- Wreath for a red door: $35–$80
- Two light blue decorative lanterns: $40–$90
- Ribbon, hooks, and outdoor zip ties: $15–$30
Total: $185–$355.
Scale matters more out here than indoors. A porch 6 by 8 feet with an 8- to 9-foot ceiling handles cutouts at 18 to 24 inches comfortably — hang them at two heights, around 6 feet and 4 feet from the floor, so they read as a floating canopy instead of a solid curtain. Leave at least 10 inches between pieces so wind can move them; tightly packed cutouts clatter. If your porch ceiling sits lower than 8 feet, look at Idea #12 — a wreath-and-door approach gives you the same candy feel with zero overhead clearance issues.
15. Glitter Cake Slice Ornament With a Mint Green Stripe
If you buy sparkly ornaments, spray them with a light coat of clear matte acrylic sealer before they go on the tree. Glitter sheds, and by mid-December you’ll have a carpet of pink sparkle that no vacuum fully removes. One $8 can of sealer treats roughly 30 ornaments and takes 20 minutes to dry. Also: hang a hero ornament like this one alone at the end of a branch rather than tucked into a cluster. A piece with that much texture and detail — pink glitter, mint stripe, scalloped white icing, multicolor beads — needs negative space around it to actually be seen.
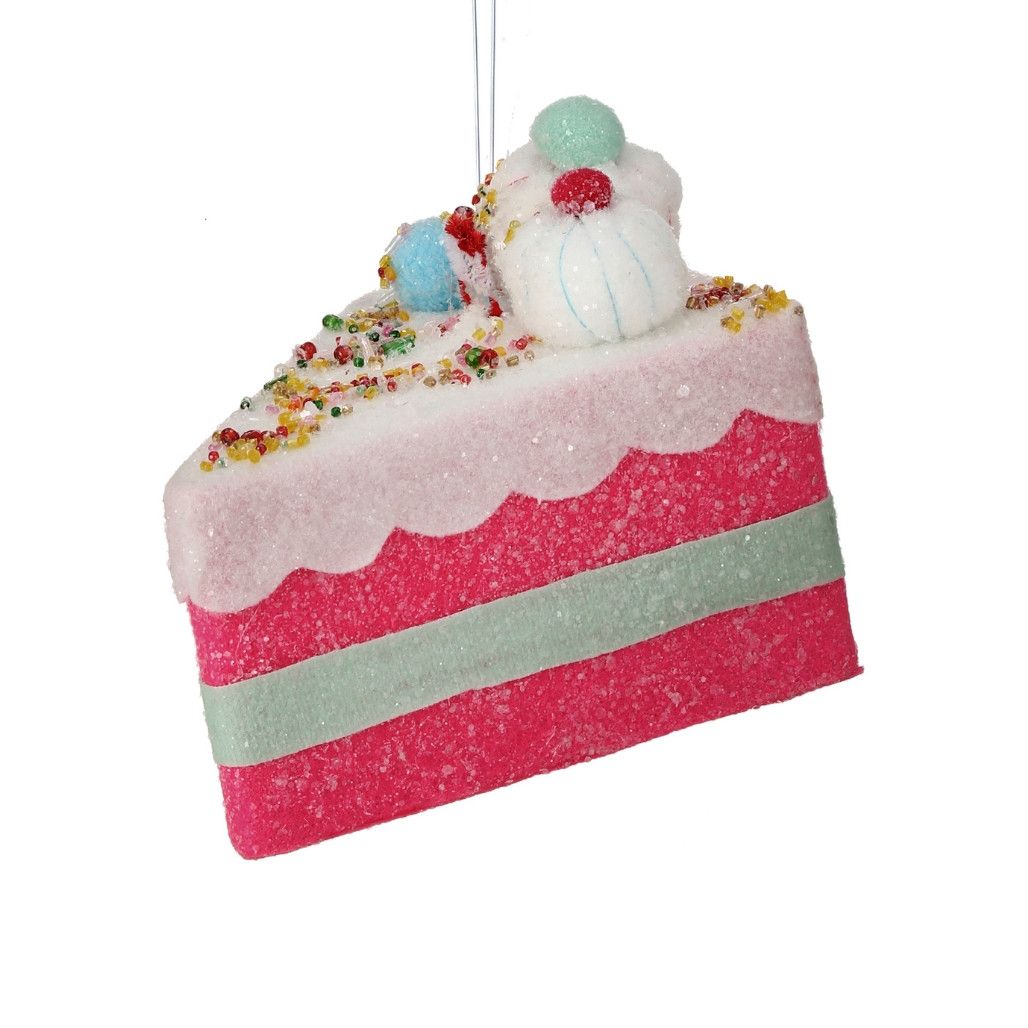
You can absolutely recreate this for less. Clear plastic cake-slice ornament blanks run about $1.50 each at craft stores, and a tube of fine pink glitter is $4. Paint the base solid, add a strip of mint ribbon, pipe on white dimensional icing from a $3 tube, then glue on seed beads and tiny foam balls for the sprinkle effect. Total per ornament: about $4. Fifty cents of that is the hanging string and nobody will ever ask.
16. Iridescent Pastels and White Bead Garlands on Flocked Branches
The ratio here is 60% snowy flocking, 28% iridescent pastel spheres in pink, blue, purple, and mint, 8% white textured balls and bead garland, and 4% warm white light. The bead garland is the sleeper element — draping it in loose swags 12 to 15 inches wide rather than tight wraps is what gives the tree a soft, hand-strung feeling. It also visually separates the ornament clusters so the branches never look stuffed, even though there are a lot of ornaments on there.
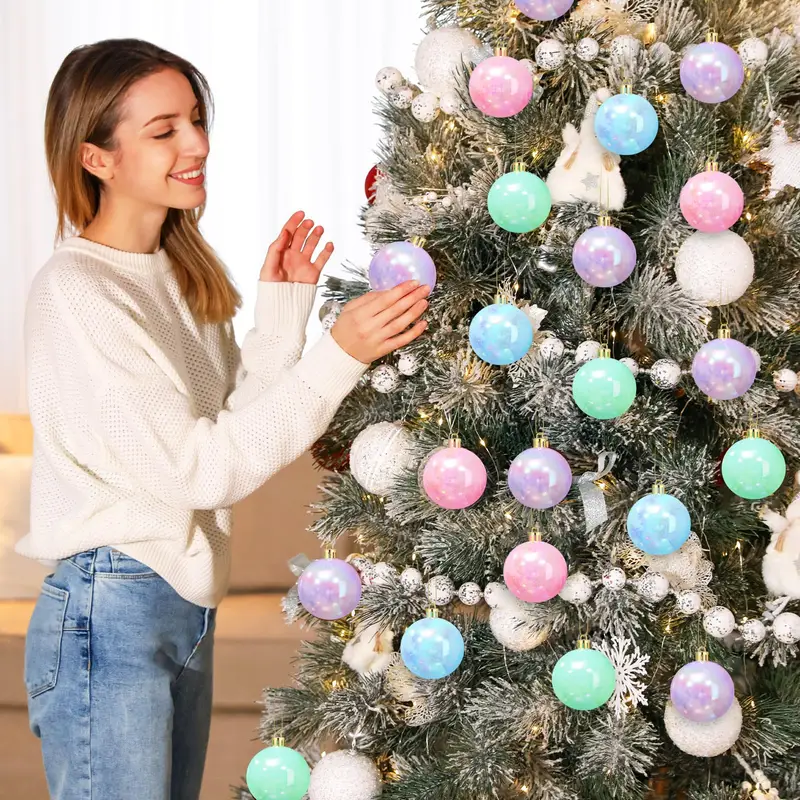
What makes this work is temperature harmony. Every element sits in the cool range — icy whites, pastels, lavender — and the only warmth comes from the string lights and a single small snowflake ornament. That contrast between cool materials and warm light is what makes the tree glow instead of look flat. It’s the same principle behind Idea #2, just pushed further into lavender and blue. If you swap the pastels for warm tones like peach and butter, the tree gets cozy instead of dreamy — same structure, entirely different mood.
17. Handmade Felt Candy Cane Garland on Brown Paper
This is a two-evening project, and most of it is cutting.
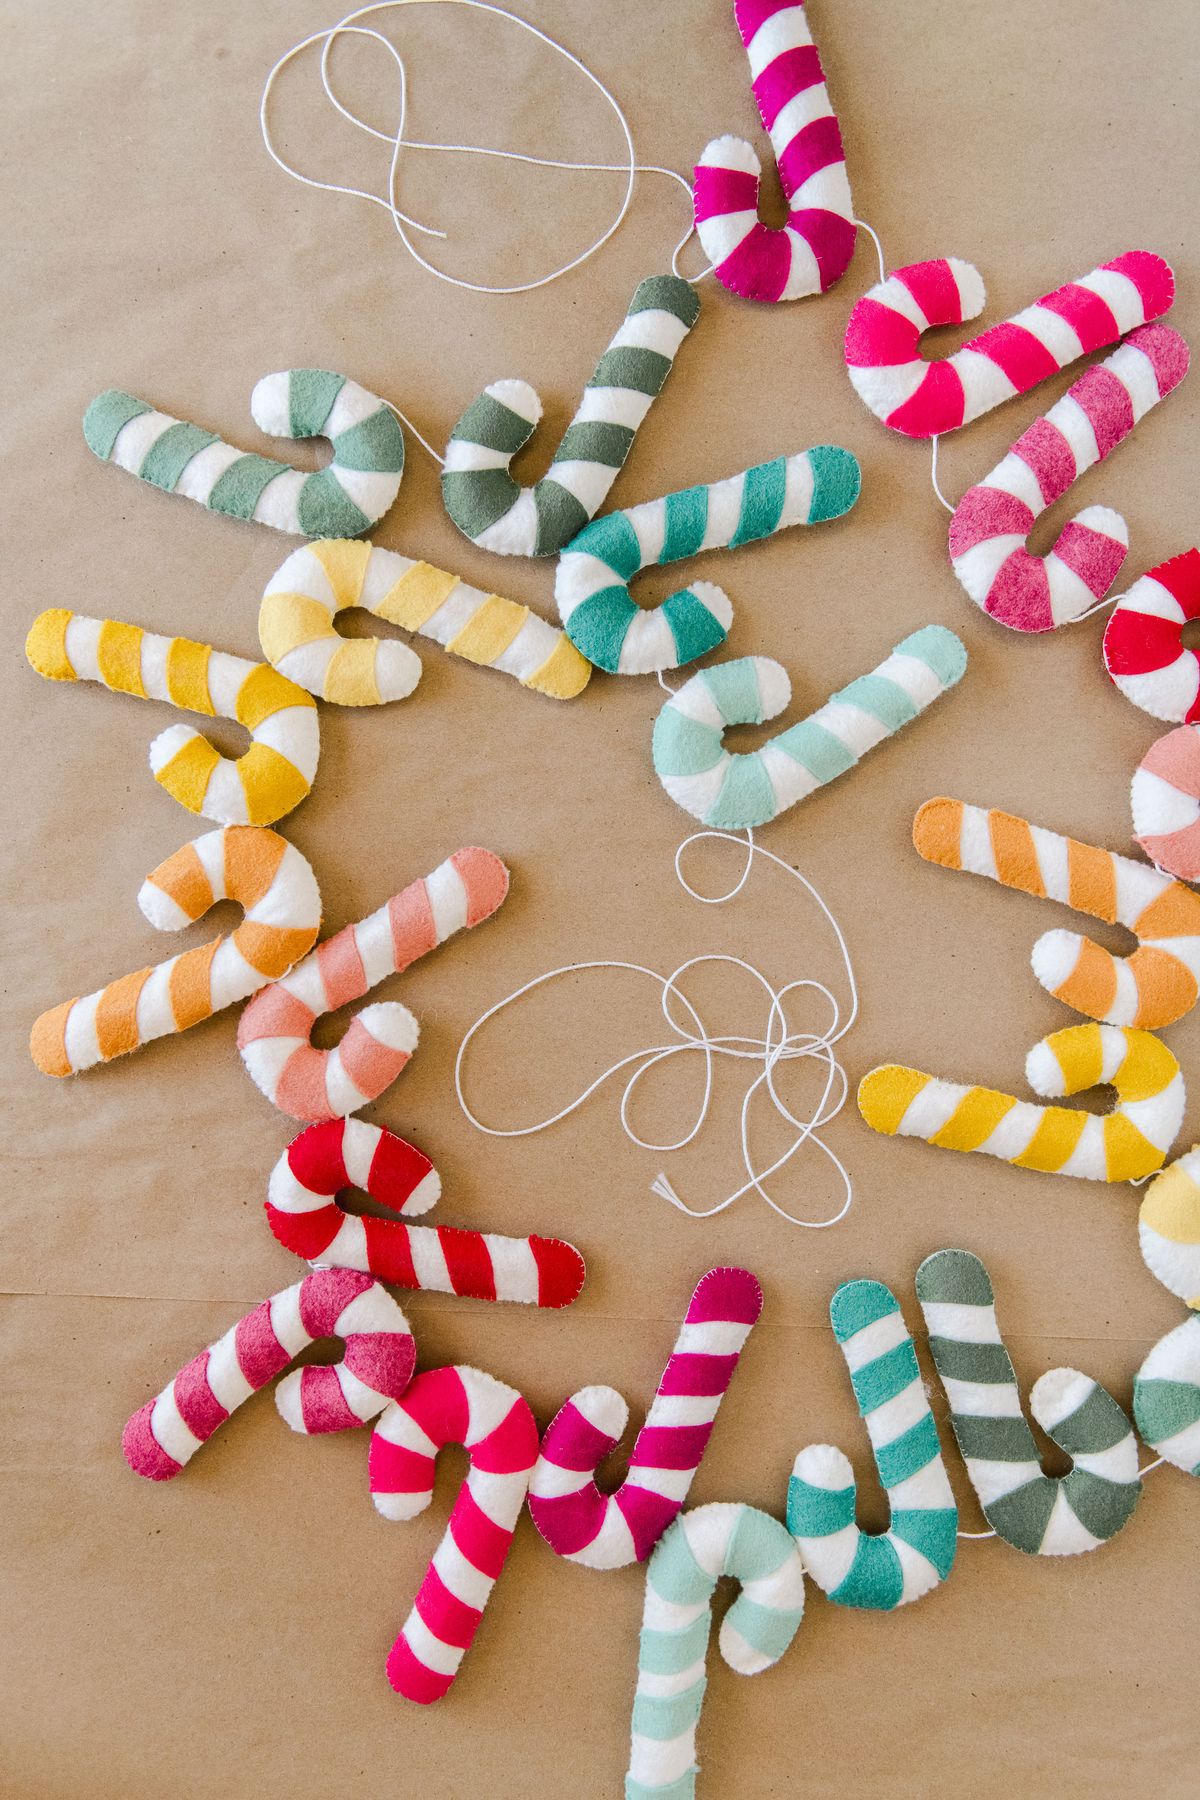
- Cut candy cane shapes from white felt and stripe them with pink, red, yellow, and orange felt scraps.
- Blanket-stitch or machine-stitch around each edge in contrast thread — the visible stitching is the charm, so don’t hide it.
- Cut a few round candy shapes and layer two colors on each.
- Thread a large-eye needle with white string and string the pieces 3 to 4 inches apart.
- Knot both ends and hang with a small brass tack or clear hook.
Total material cost: about $18 for felt sheets, thread, and string, which makes roughly 14 feet of garland. Compare that to $45 to $90 for a comparable store-bought felt garland and it’s not close. The one upgrade worth paying for is good wool-blend felt at about $2 a sheet instead of $0.50 acrylic — it holds shape better, doesn’t pill, and you’ll still be using this garland in five years. Great filler detail for a mantel or a kids’ room.
18. Striped Glass Candy Canes With Clear Sphere Bases
The clear spherical base at the bottom of each candy cane is what makes these feel like objects and not ornaments. It gives weight, it catches light from below, and it lets the pieces stand freely on a surface. Range them casually on a light wood tray with 2 to 3 inches between each one, in an odd number — five or seven reads better than four or six. Light them with a warm 2700K source from the side rather than overhead, and the red stripes will glow through the glass.
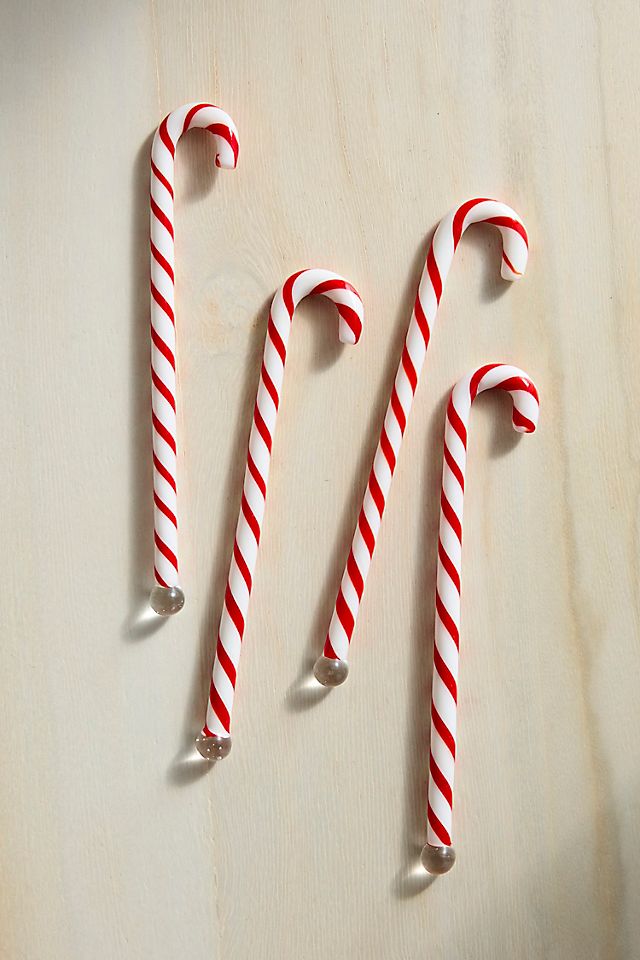
Style tip that costs nothing: resist the urge to add greenery to this grouping. The stripes plus the wood texture are already two patterns. A single pine sprig tucks in fine, but a full garland turns a clean, bright study in simplicity into a busy tabletop. These are the pieces to buy one at a time — a solid glass candy cane runs $12 to $25, and the light wood surface underneath does more for the composition than any extra prop would.
19. Red Candy Ornaments Down a Wooden Staircase Garland
Stair garland is the number one holiday decor injury source in most homes. Zip-tie the garland to the railing in at least three places, tuck every light strand cord toward the wall side, and never let it hang low enough that someone reaching for the handrail grabs greenery instead. If you have kids or guests who use the stairs at night, add a small clip-on light every 4 feet — it looks festive and doubles as a safety measure.
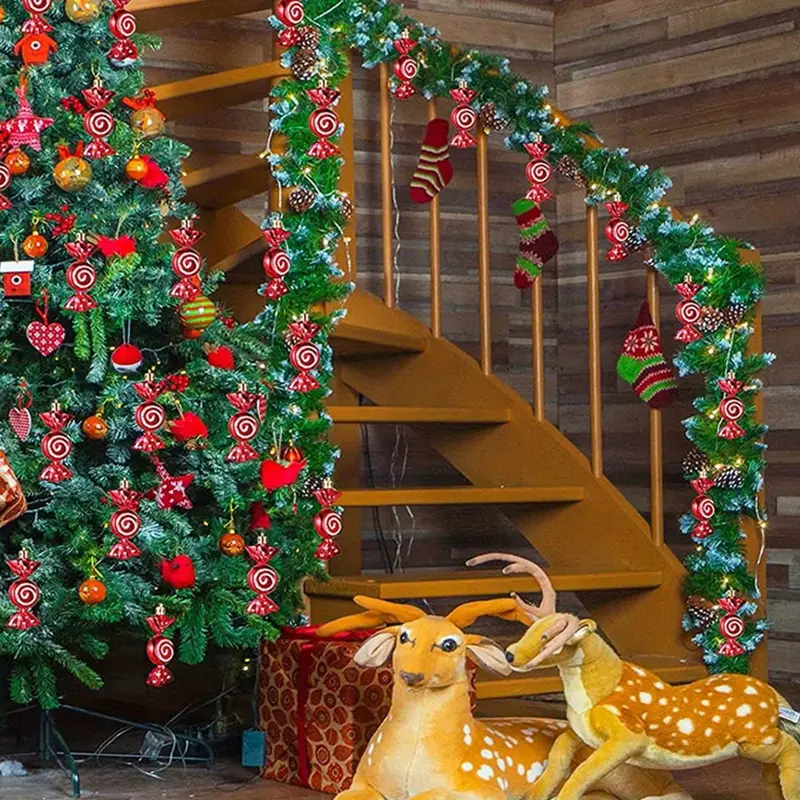
Why this look is holding strong into 2026: people have moved away from perfectly styled, single-palette stairs and back toward layered, collected displays. The mix here — red candy-shaped ornaments, knit stockings, plush deer figures, a white snow effect on the greenery — is deliberately a little nostalgic. That’s the direction holiday decor is heading, and it’s a good sign for longevity, because nostalgic pieces don’t date the way trend palettes do.
Cost to pull it off:
- Lit green garland, 9 feet: $45–$95
- Red candy-shaped ornaments, dozen: $18–$35
- Knit stockings, set of four: $40–$90
- Plush deer figures: $25–$60
- Snow spray or flocking powder: $10–$20
Total: $138–$300.
20. Pastel Nutcracker and Bottle Brush Trees on White Cloth
This vignette is sized for a console or tabletop, not a floor. A 24- to 30-inch stretch of white textured cloth handles the whole arrangement — the pink and blue nutcracker at 18 to 24 inches tall, a snow globe, a pink bottle brush tree, a sage ceramic tree, and small macaron and donut ornaments filled in between. Anything wider than 36 inches and the grouping loses its intimacy; the pieces start reading as separate objects instead of one display.
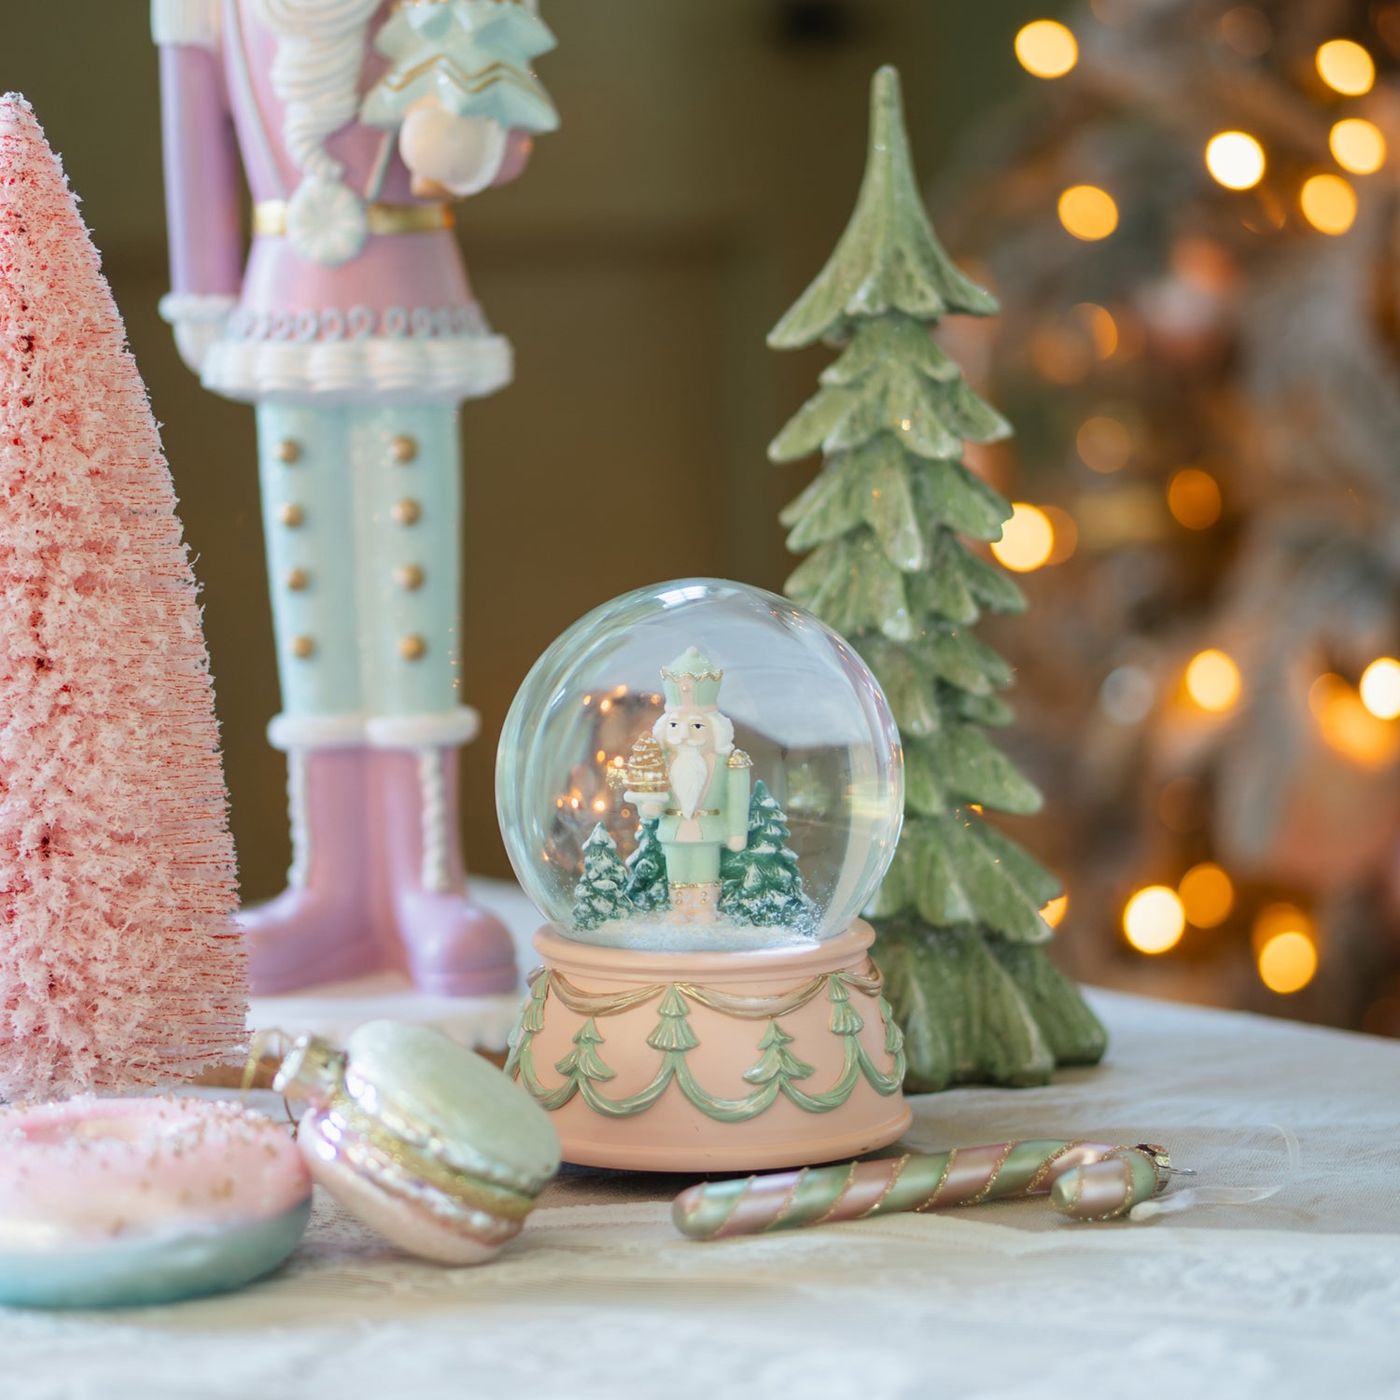
The formula: 45% white and cream base (tablecloth, snow globe, macaron ornaments), 30% pastel pink, 15% mint and sage green, 10% gold accents. Warm blurred string lights in the background supply the glow that ties it together. Switch the pink for powder blue and the sage for dusty rose and you get a completely different, equally sweet version with the same 45/30/15/10 structure. Just keep the largest pieces at the back and the smallest at the front — that’s what keeps a tabletop display from flattening out.
21. Woven Candy Canes Spilling From a Coiled Fiber Bowl
Woven and coiled-fiber decor is the easiest thing in this entire article to live with. No glitter shedding, no glass to break, no flocking on the floor. Dust it every couple of weeks with a dry microfiber cloth or a soft brush, and if it’s real natural fiber, keep it out of direct sun or the red and off-white stripes will fade unevenly within a season. Store the ornaments in a breathable cotton bag rather than plastic — natural fibers need air or they’ll pick up that attic smell by next December.
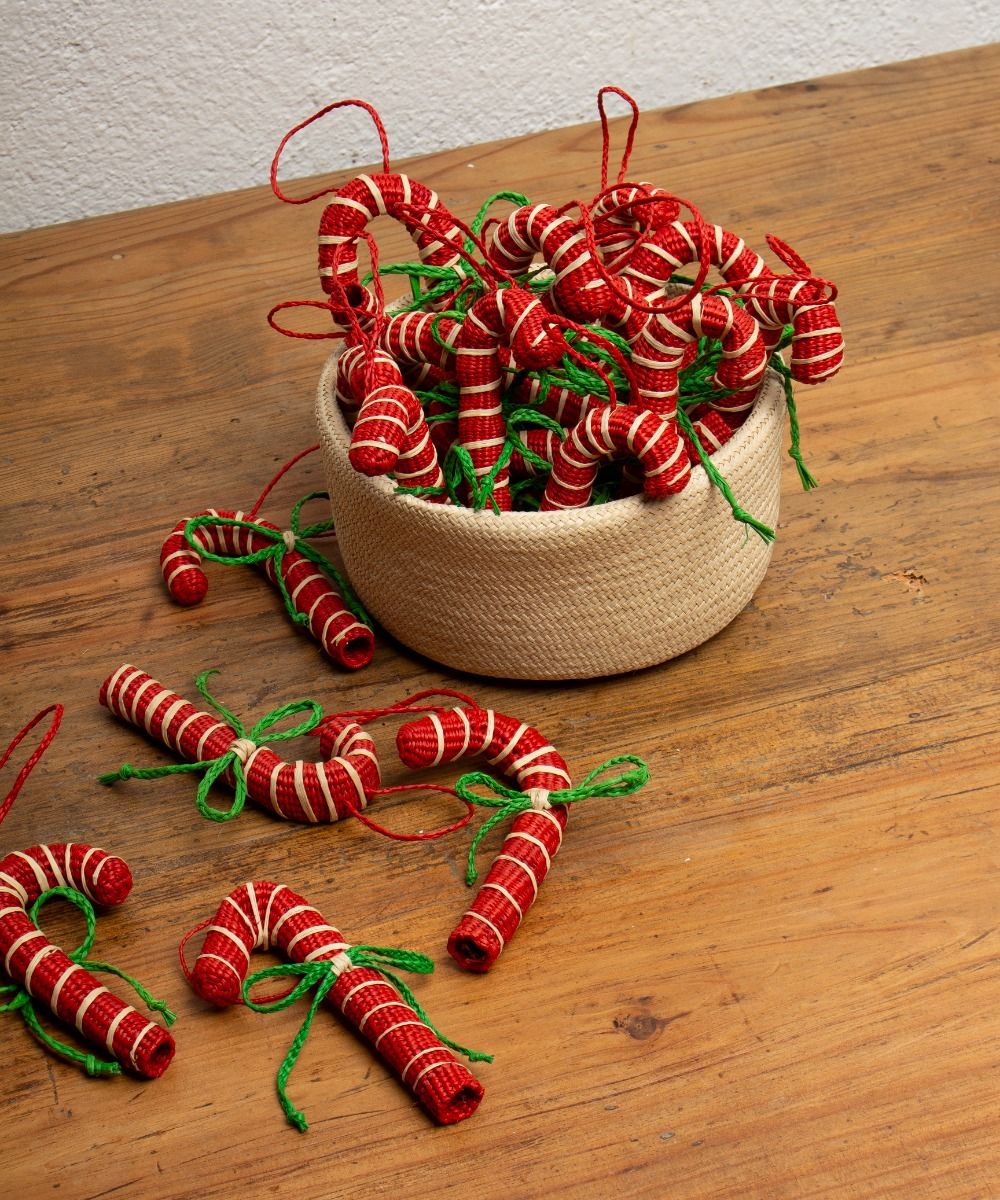
Price check: handcrafted woven candy canes like these run $8 to $16 each on Etsy, and the coiled fiber bowl is $25 to $55. That adds up fast if you want a full dozen. Budget version: dollar store baskets and a thrift-store rope bowl get you the same rustic texture for under $15 total, and mixing two or three woven materials actually looks better than everything matching. Buy five of the woven canes and fill the rest of the bowl with solid off-white pieces to stretch the look.
22. That Bold Red Warning Sign Every Candy Land Room Needs
Consider this your visual alarm. Candy land decorating fails at exactly the moment when one more prop stops adding sweetness and starts adding noise — and you never notice it happening because you’re adding pieces one at a time. The test: stand where you’d normally sit, and count focal points. If you count more than three candy-colored elements competing for your eye, you’re past the line. Remove the weakest one and you’ll like the room more, guaranteed.
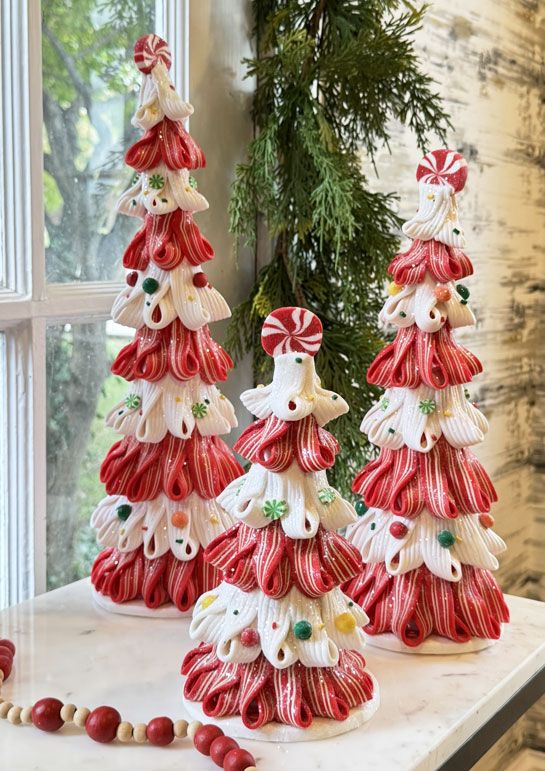
Practical fix from the trade: group candy props in odd numbers and vary size within each group by at least 40%. Three lollipops at 12, 18, and 26 inches tall read as a designed arrangement. Four lollipops all at 18 inches read as a store display. Also, give every candy cluster at least one neutral neighbor — a woven basket, a wood surface, a cream cushion — so the eye gets a rest between sugary moments.
23. Santa and Candy Stripe Garland on a Light Wood Table
Three ornament types, one garland, and the whole thing works because of a consistent 2-inch scale. Santa heads, candy cane striped pieces, and green textured tree shapes all sit in the same size range, so nothing overpowers anything else. The gold spheres are the only outlier, and they’re small enough to read as punctuation rather than competition. When you’re mixing themed ornaments, keeping them within about 30% of each other in size is the quiet rule that separates a collection from a pile.
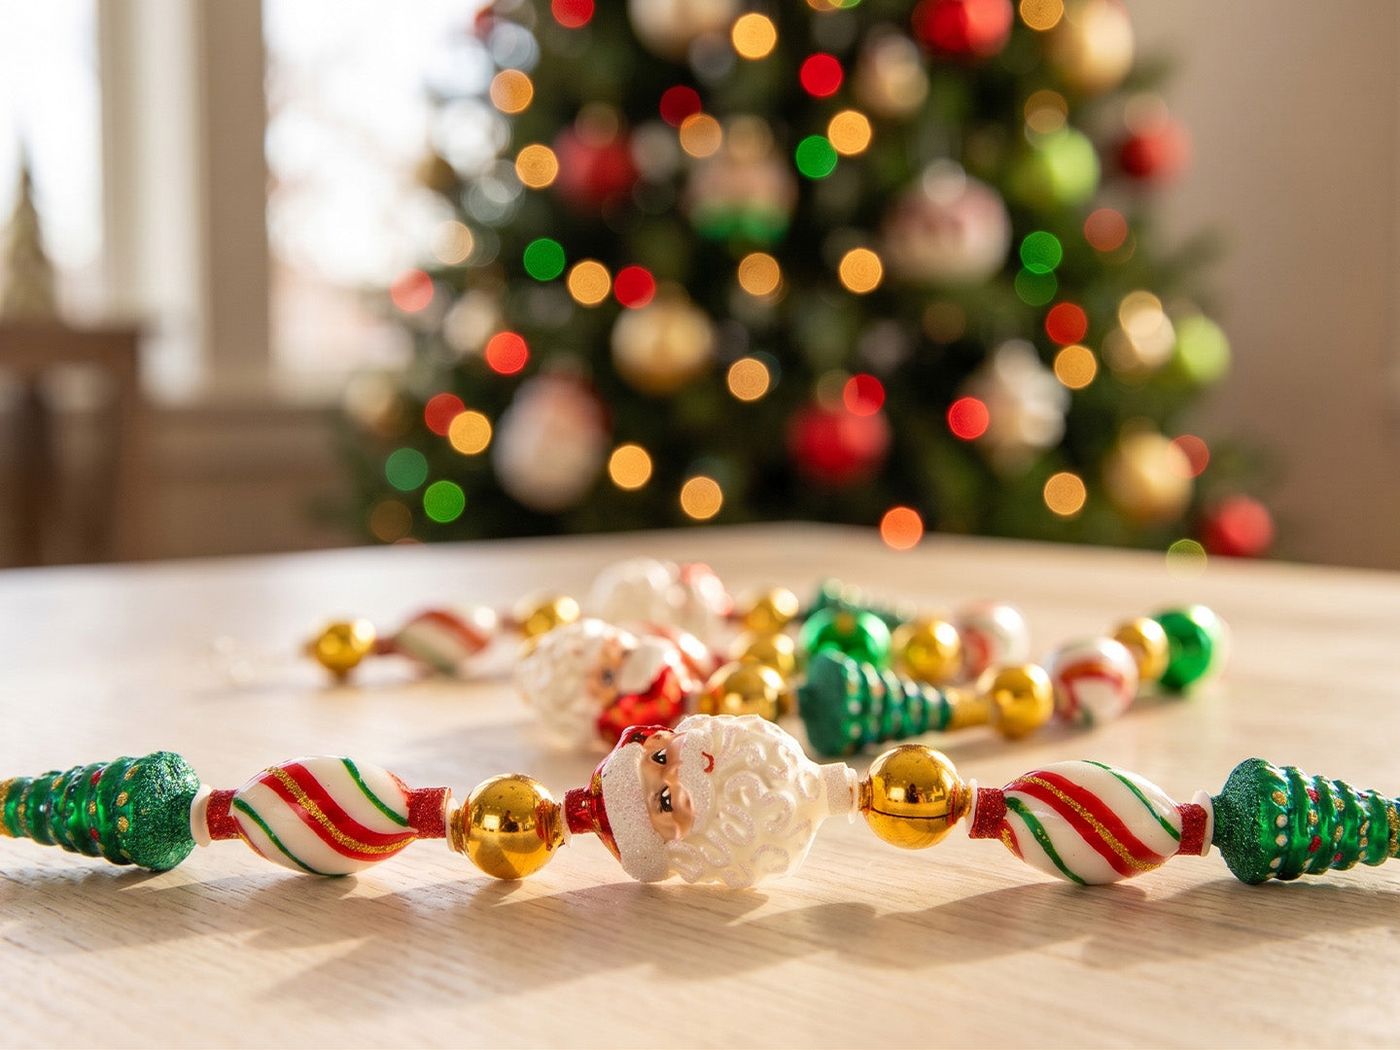
This is a table garland, so it’s built for a specific footprint: a 6-foot table takes roughly 9 feet of garland swagged in gentle curves, with about 18 inches of drop between swags. If your dining table is smaller than 5 feet, use a single 6-foot piece draped loosely instead of swagging — tight swags on a short table look cramped. For a longer 8-foot table, two 9-foot strands twisted together gives you the density without buying a third. It’s the same math whether the garland is candy-themed or plain.
24. Pastel Dessert Cone Trees With Lollipop Toppers
Three coordinated cone trees plus the tiered cake-style bases:
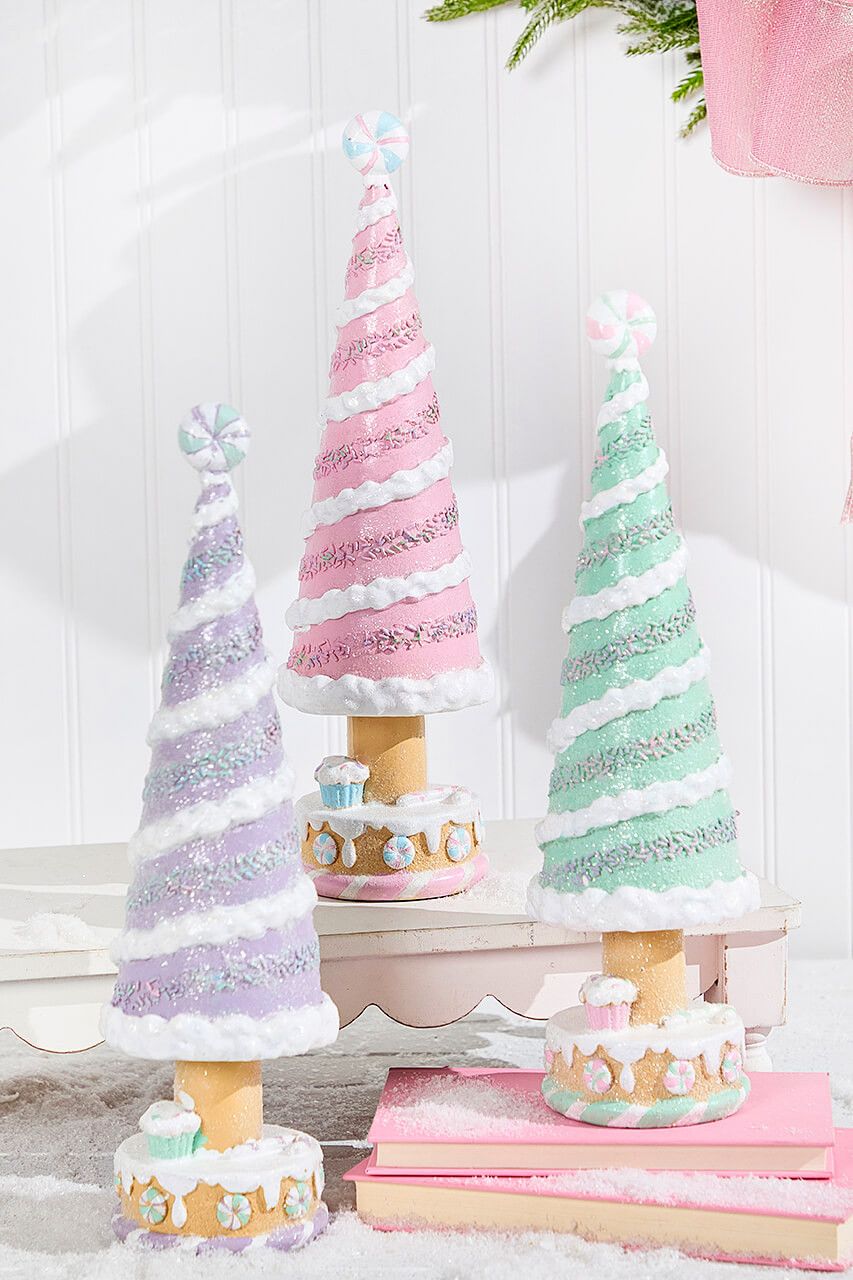
- Three foam or papier-mâché cones, 12 to 18 inches: $24–$45
- Pastel pink, mint, and lavender craft paint plus glitter: $20–$35
- White dimensional icing or puffy paint for the swirls: $8–$15
- Lollipop tree toppers, set of three: $15–$30
- Miniature candies and cupcake picks for the bases: $12–$25
- Faux snow and a light pink riser: $15–$30
Total: $94–$180.
make the glitter bands horizontal, not scattered. Thin, even stripes of glitter running around the cone mimic the look of a sprinkle-covered cake and give the eye a rhythm to follow. Apply them with painter’s tape as a guide and you’ll get crisp edges instead of glitter drift. It’s a $4 roll of tape doing the work of a steady hand.
25. Lime Green Top Hat Tree Topper With Candy Stripe Bows
The hat is the entire personality of the tree. A tree topper normally functions as a finial — it announces the top and disappears. This lime green top hat does the opposite: it stacks seven or eight inches of layered bows above the branches, with red and white stripes, a character-printed white ribbon, sheer gold, and red glittery curly picks all radiating outward. It gives the tree a crown with a silhouette. Swap it for a star and the tree drops back into being a nice candy-themed tree. Keep it and people ask about it before they even step inside.
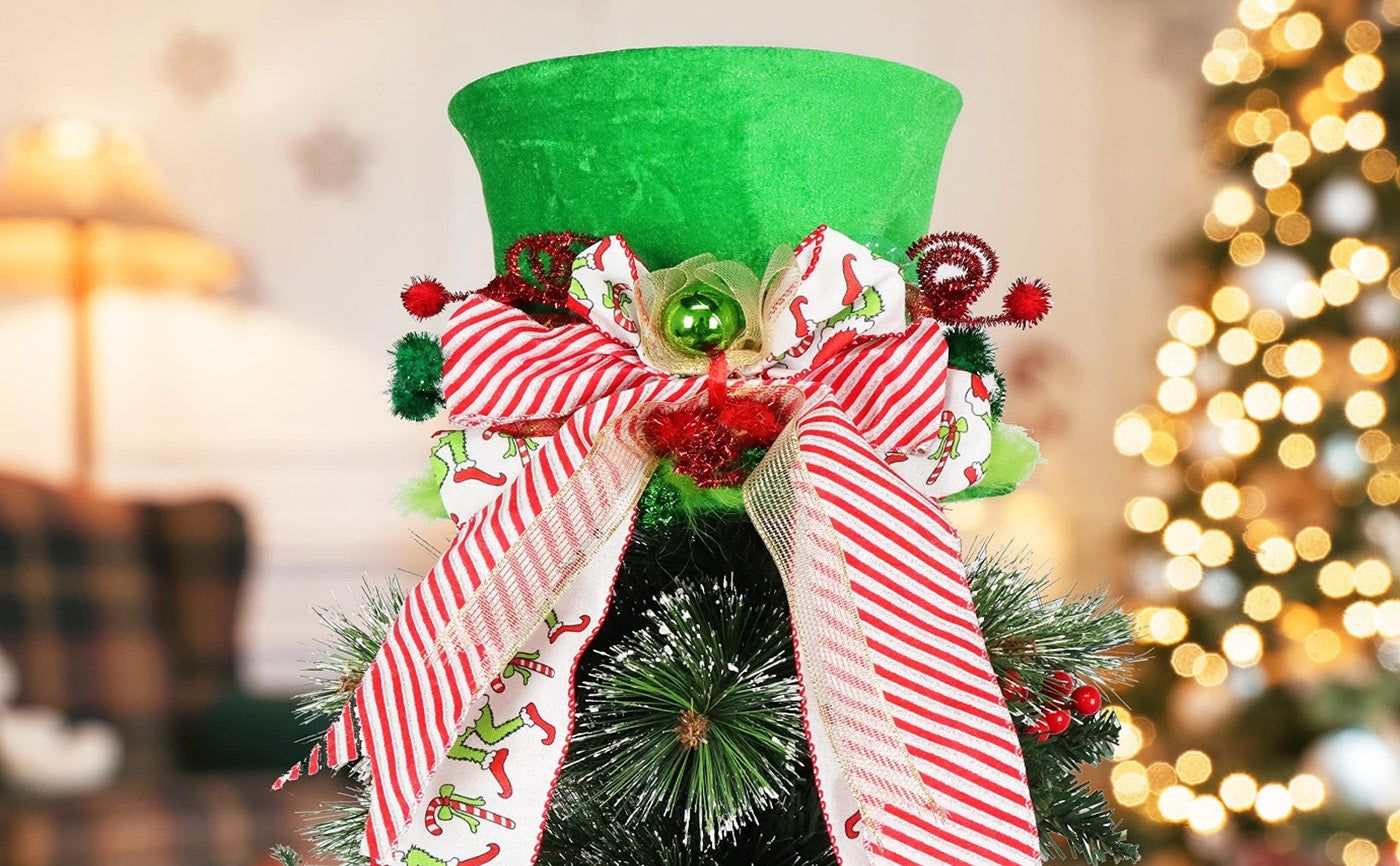
To build one:
- Start with a stiff green felt top hat, 7 to 8 inches tall, about $18.
- Wrap the band in 2.5-inch red and white striped ribbon, hot-gluing as you go.
- Build four loops of character-printed white ribbon and pin them to the hat’s left side.
- Layer two sheer gold loops behind the printed ones for a soft halo.
- Curl red glitter picks with scissors and tuck them at the base for volume.
- Add faux pine sprigs and red berries at the brim to anchor it visually.
26. Red Flag: Oversized Candy Props vs. Real Rooms
Numbers worth writing down before you buy anything oversized. In a room with 8-foot ceilings, keep hanging candy props under 24 inches tall and leave at least 12 inches of clear space above them. In rooms 10 by 10 feet or smaller, the largest floor-standing prop should not exceed one-third of the room’s ceiling height — so about 32 inches with an 8-foot ceiling. Anything bigger and the prop stops being decoration and becomes furniture you have to walk around.
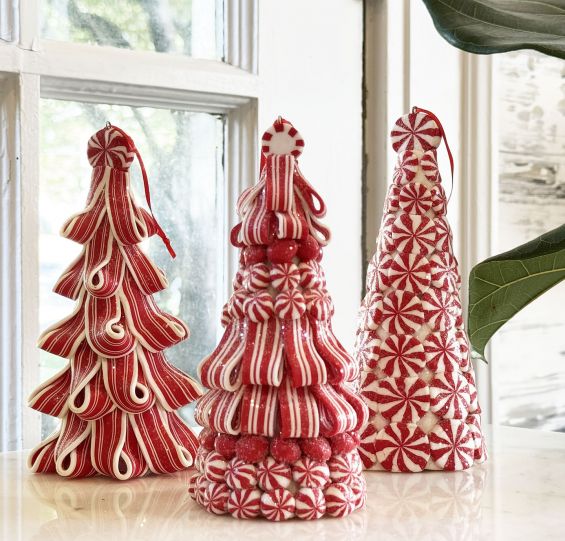
The trap is that oversized candy looks incredible in a photo taken in a big, empty, professionally lit room. In a real living room with a couch and a coffee table, the same piece fights for space. Before you commit, tape the prop’s footprint on the floor with painter’s tape and walk around it for a day. If you bump it twice, it’s too big. Sizing down by 25% almost always looks better at home than it did in the inspiration photo.
27. Candy Entryway With a Wreath Over a Wooden Console
Center the wreath above the console, not above the door — and hang the bottom of the wreath 10 to 12 inches above the tallest item on the tabletop. This creates one visual column instead of two competing ones. Then build the garland on the table in an S-curve rather than a straight line, weaving in candy swirl picks and red berries so it looks poured rather than placed. The white textured trees and red and white striped cones should sit at three heights: tall at the back, medium at one end, small clustered at the other.
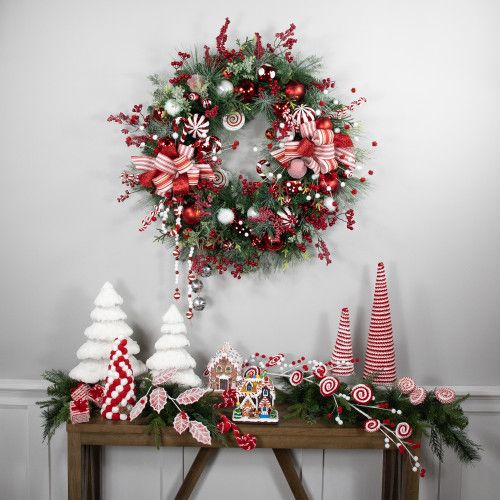
entryway surfaces collect keys the way trees collect ornaments. If this console is your drop zone, keep the garland short enough that a wallet can still land somewhere, and put the gingerbread house figurines at the back corners where nothing will knock them over. Skip fragile candy pieces entirely if you have a dog who jumps up to greet people.
- Measure the console depth — 14 inches minimum for candy decor to sit safely.
- Check the drop-zone reality: is this table actually usable, or decorative?
- Confirm the wreath hook can hold the finished weight.
28. Candy Cane Sign Wreath on a Red Woven Base
The red woven base is the reason this wreath looks handmade instead of purchased. Faux pine needles, red berries, swirl lollipops, peppermint discs, and candy canes layered over a woven red form give it real depth at the edges — where most wreaths go flat. The wooden-look candy canes sign sits front and center, and the multi-patterned bow ties it all together.
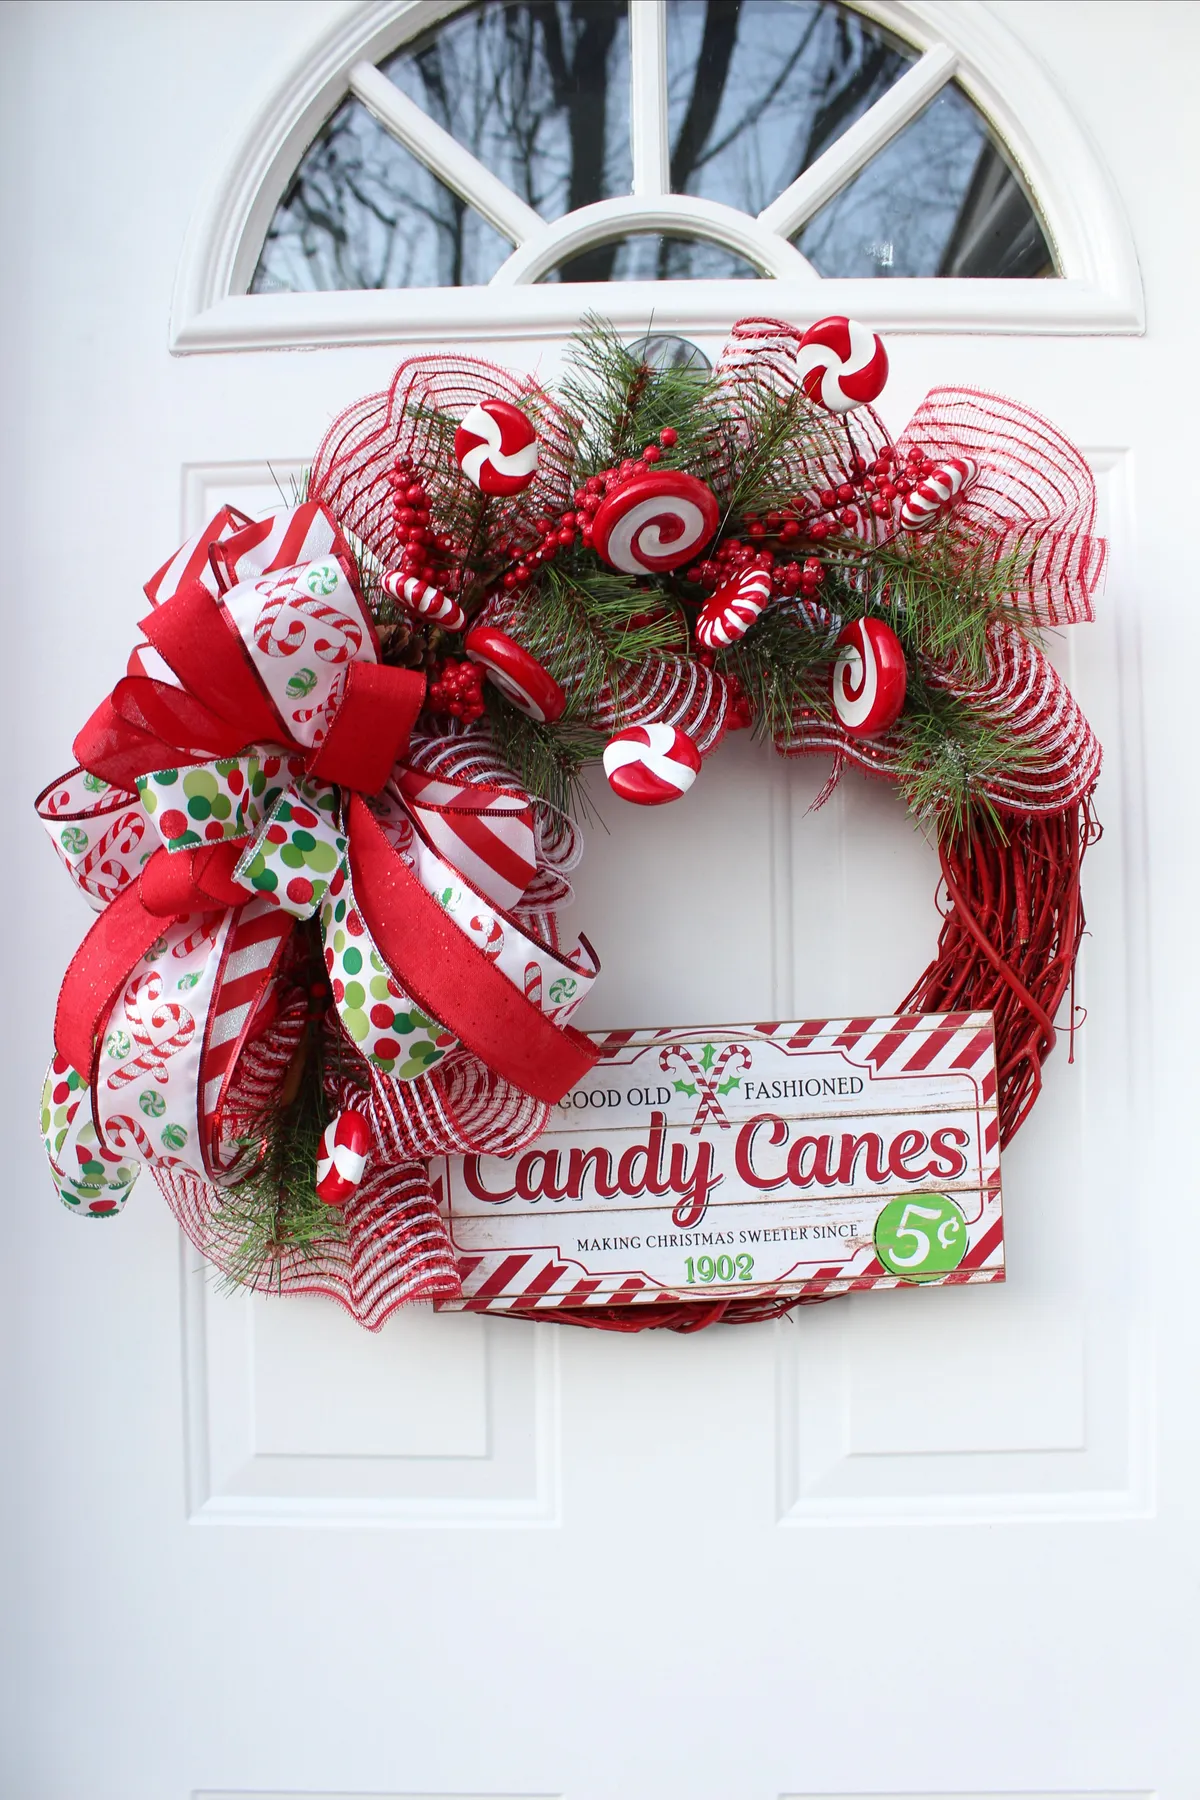
- Red woven wreath base, 20 to 24 inches: $20–$40
- Faux pine picks and red berry clusters: $15–$35
- Candy ornaments — swirls, peppermints, mini candy canes: $25–$55
- Multi-patterned ribbon for the bow: $15–$30
- Wooden candy canes sign: $12–$25
Total: $87–$185.
Why it works: the sign gives the wreath a center of gravity and a readable message, so the eye lands somewhere specific instead of wandering. That’s the same reason gallery walls need one large anchor piece among small frames — the human eye always looks for a starting point.
29. Candy Ornaments on a Flocked Tree Against Light Blue
Light blue walls have quietly become the go-to backdrop for candy-themed trees because they cool down the red without killing it. A red ornament on a warm beige wall goes orange-adjacent; the same ornament on light blue snaps to a crisp, peppermint red. That single wall color is doing as much for the flocked tree, oversized wrapped candy ornaments, and swirl lollipops as any of the decor.
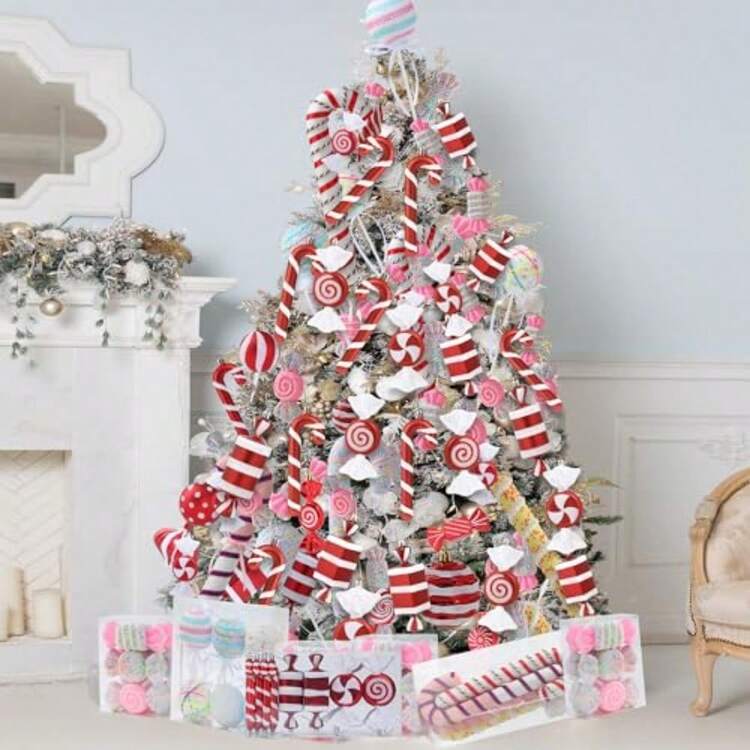
The palette math: 45% flocked white branches, 25% red and white candy ornaments, 15% pink accents, 10% light blue drawn from the wall itself, 5% silver and gold sparkle. The blue percentage is the sneaky one — you get it for free, which means the tree needs less ornament color than you’d think. Swap light blue walls for sage green and the reds go warmer and more traditional. If you have the white fireplace mantel with frosted garland nearby, keep the mantel greens cooler and don’t let the two displays echo each other ornament for ornament.
30. Candy Cane Mesh Garland Over a White Railing
Forty-five minutes per railing section, roughly $50 per 9 feet.
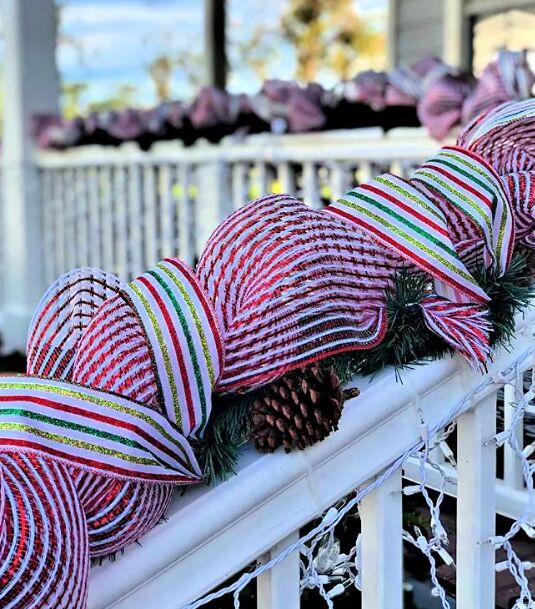
- Start with plain green pine garland as a base and secure it to the railing with outdoor zip ties every 18 inches.
- Run white string lights underneath, wrapping loosely around the railing rather than the garland, so the glow comes from behind.
- Weave 4-inch red and white striped mesh ribbon through in loose loops, keeping the mesh open rather than flat.
- Tuck in narrower red, green, and gold striped ribbon for a second scale.
- Finish with natural pinecones tucked into gaps — about one every 12 inches.
Maintenance honesty: outdoor garland fades faster than anything indoors. UV exposure will dull the red mesh ribbon within two seasons, and pinecones will drop if they get soaked. Take it down before the first hard freeze, store it in a sealed bin, and expect to replace the ribbon every other year for about $15. The pine base and lights will last four or five seasons if you store them dry.
31. Pink Glitter Candy Ornaments With Sprinkle Beading
Two small moves make this flocked tree look more expensive than it is. First, replace standard ornament hooks with soft grey ribbon loops about 3 inches long — metal hooks catch the light and read cheap next to glitter. Second, hang the pink glitter candy pieces so the multicolor bead sprinkles face the room, not the trunk. Sounds obvious, but on a densely decorated tree roughly a third of the ornaments end up facing backward, and after one season they’ve all twisted anyway.
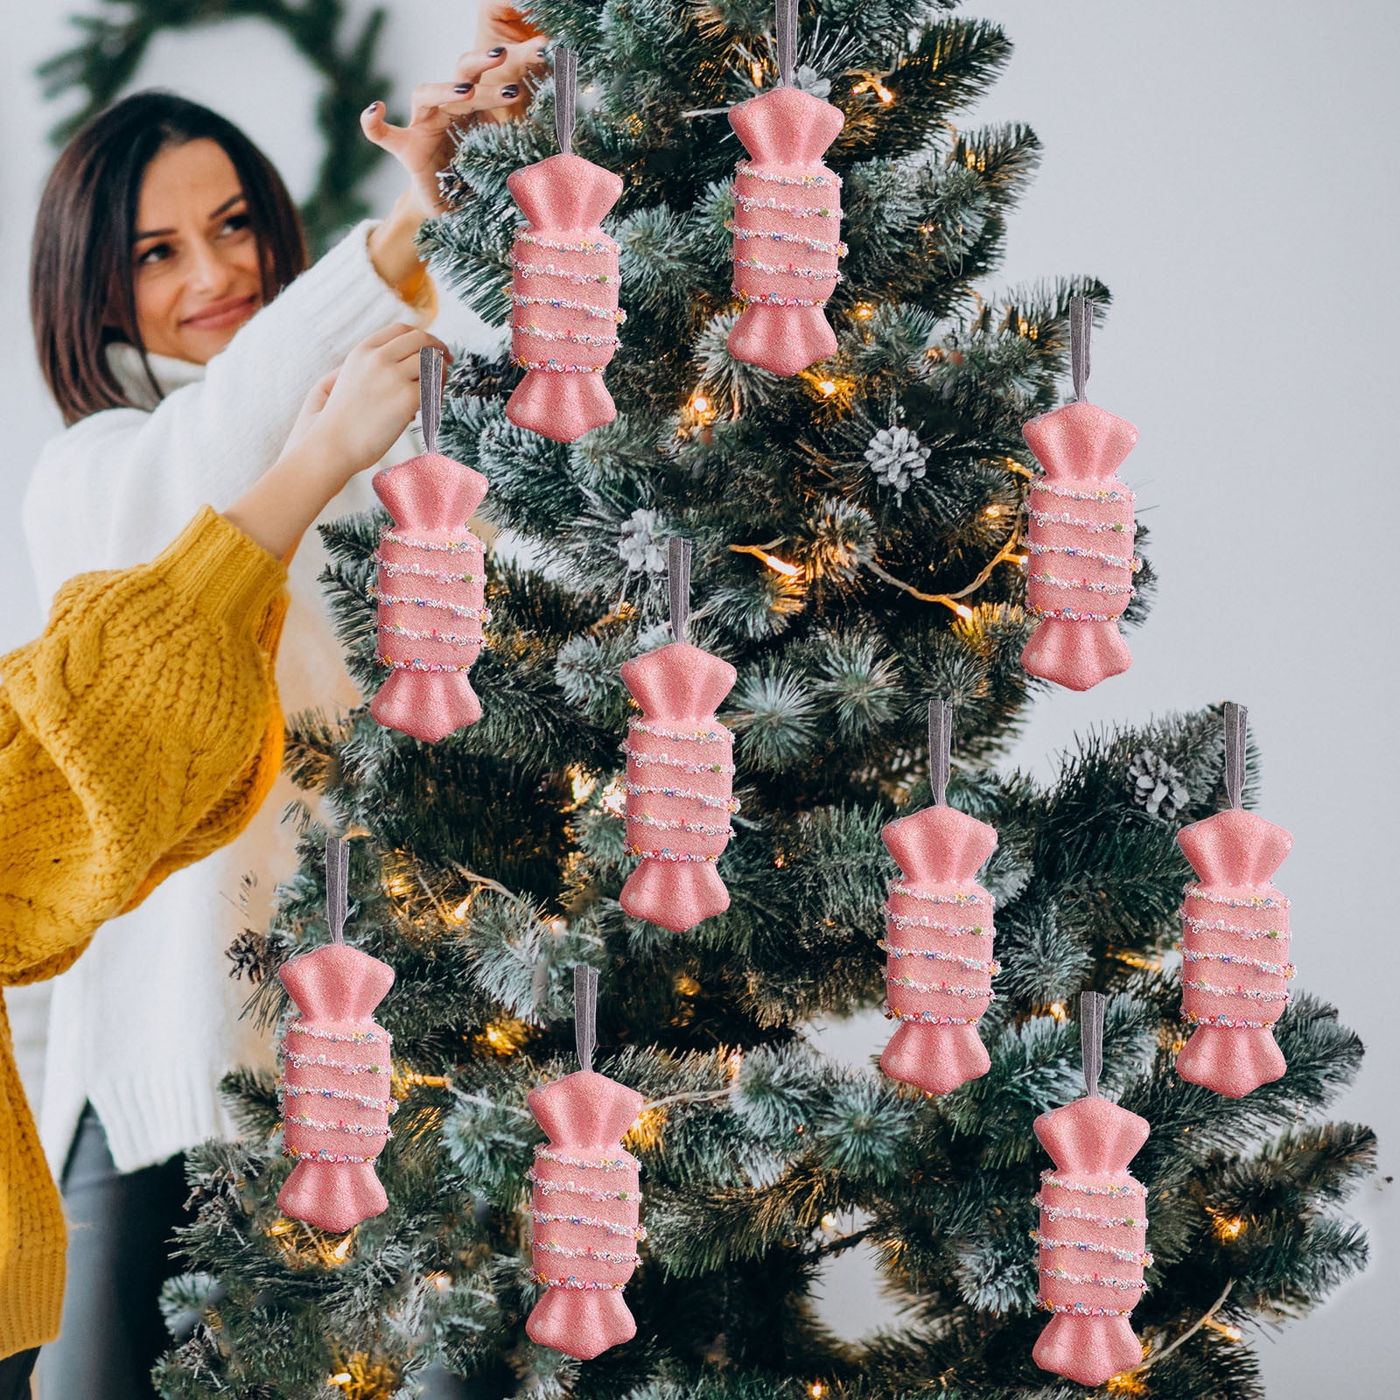
What makes this work is restraint in the flocking. The tree is heavily white-dusted, which means every pink glitter piece reads as a color event against a snowy field. If the tree were plain green, the same ornaments would look busy and slightly chaotic. Same ornaments, same lights, entirely different result — which is worth remembering if you already own pink candy ornaments and are deciding whether a flocked tree is worth the extra money. It usually is.
32. Giant Fabric Candy Canes Leaning on the Sofa
Floor-leaning candy canes have a Goldilocks zone: 36 to 48 inches tall. Under 30 inches they disappear next to a standard 32-inch sofa back. Over 60 inches they start looming and obscure the frosted white tree behind them. Two 42-inchers leaning at a slight angle against the arm of a cream upholstered sofa is the sweet spot, with about 8 inches of space between them so the ribbon bows don’t tangle. On light wood floors, add a felt pad under each tip or you’ll get scratches you’ll notice in February.
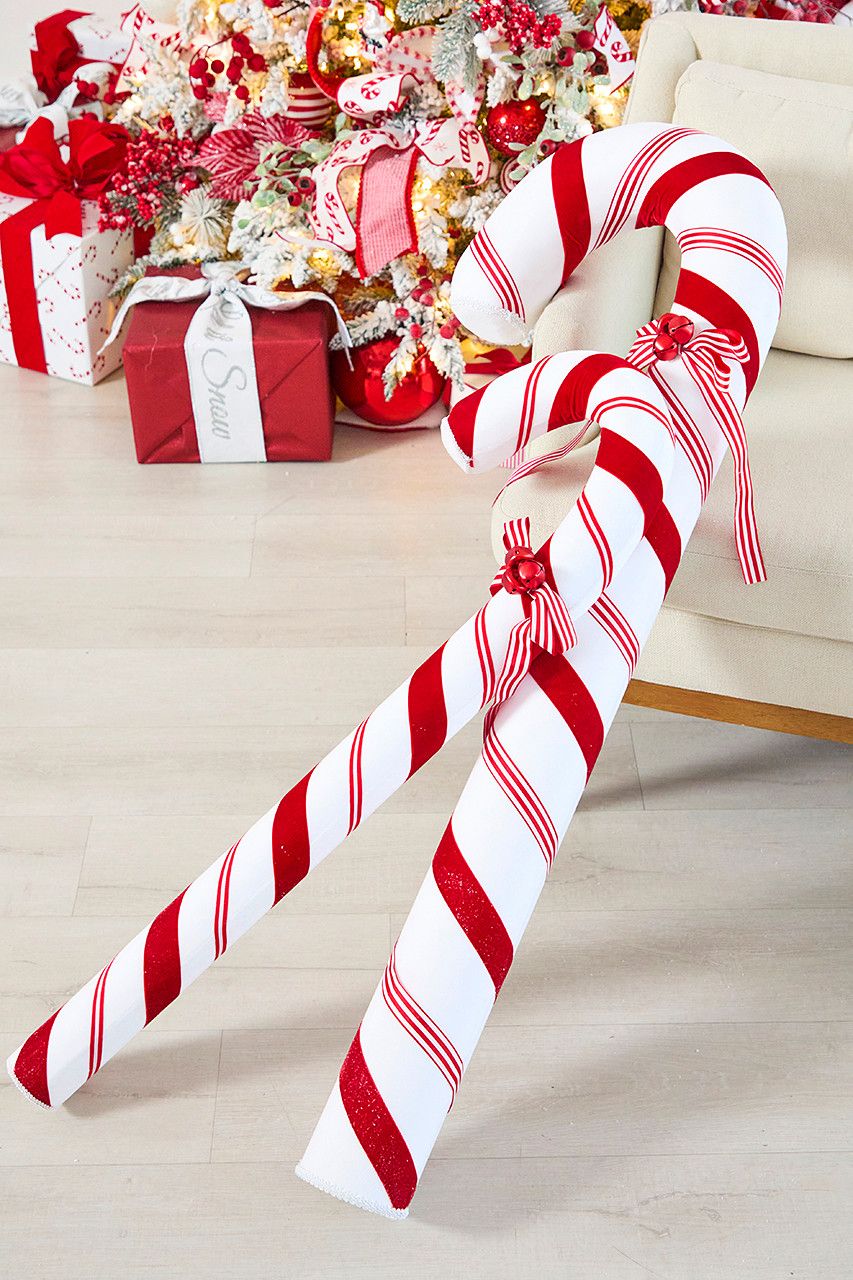
If store-bought giant canes feel steep at $35 to $70 each, buy a 4-foot cardboard tube from a shipping supply store for about $4, wrap it in white fabric, then spiral 2-inch red ribbon around it and glue as you go. Two of them for under $25 total. The bows on top are just three loops wired together — five minutes each. This is also the look people pay $120 for at boutique holiday shops.
33. Gingerbread Man Plate Ornaments With Tiny Cutlery
The detail that makes these charming is the mini silver cutlery. A red plate ornament with a gingerbread man on top is fine; the same ornament with a tiny fork and spoon beside it becomes a story. Group them in fours on a white wood-grain surface with faux green eucalyptus scattered loosely between — not tucked neatly, just dropped — and let the eucalyptus bridge the ornaments so they read as one tablescape. The cutlery pieces run about $6 for a set of twelve online.
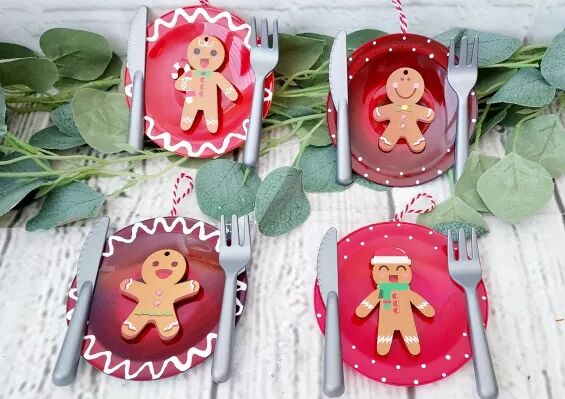
- Confirm your display surface is level and won’t be walked past by pets.
- Check the ornament hanging loops — thin ribbon holds better than string on small pieces like this.
- Decide in advance whether these are for the tree or a table vignette; they’re too detailed for both.
- Keep them out of reach of kids under three — tiny cutlery is a choking hazard.
34. Nutcracker and Kraft Paper Gifts Under the Tree
Kraft paper is the most forgiving gift wrap in existence, and it’s the reason this arrangement looks warm instead of over-styled. Plain brown paper with red and green ribbon costs about $6 a roll and hides imperfect corners better than glossy paper ever will. One caution: kraft paper tears easily if gifts get moved around, so if you have kids who dig under the tree, expect to re-tape. Also, the large painted nutcracker standing right beside the tree is top-heavy — put it against a wall or in a corner behind the gifts so a bump doesn’t send it over.
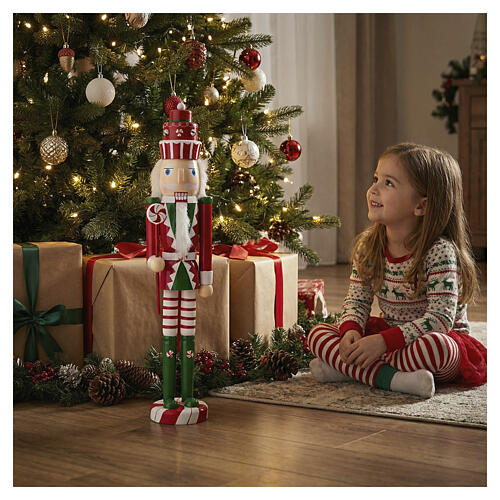
Budget version: buy a plain wooden nutcracker for $15–$30 and paint it yourself in red and green craft acrylics, about $6 total. Fabric ribbon beats paper ribbon for reuse — you’ll use the same red and green lengths for three or four years. And tuck the pinecone-and-berry garland at the base rather than weaving it up the tree; it covers the light cords, fills the gap between the lowest branches and the floor, and costs nothing extra. Altogether this base arrangement runs $40–$90.
35. Black Top Hat Wreath With Red Glitter Stars
The top hat lifts this wreath out of the standard red-and-white candy lane. Everything else on it is familiar — flocked white spheres, plush candy canes, glittered berry branches, red and white patterned bows — but the black hat and the red glittered star leaves push the whole thing into a playful, slightly theatrical register. Remove the hat and you have a very pretty candy wreath. Leave it on and you have a piece people photograph.
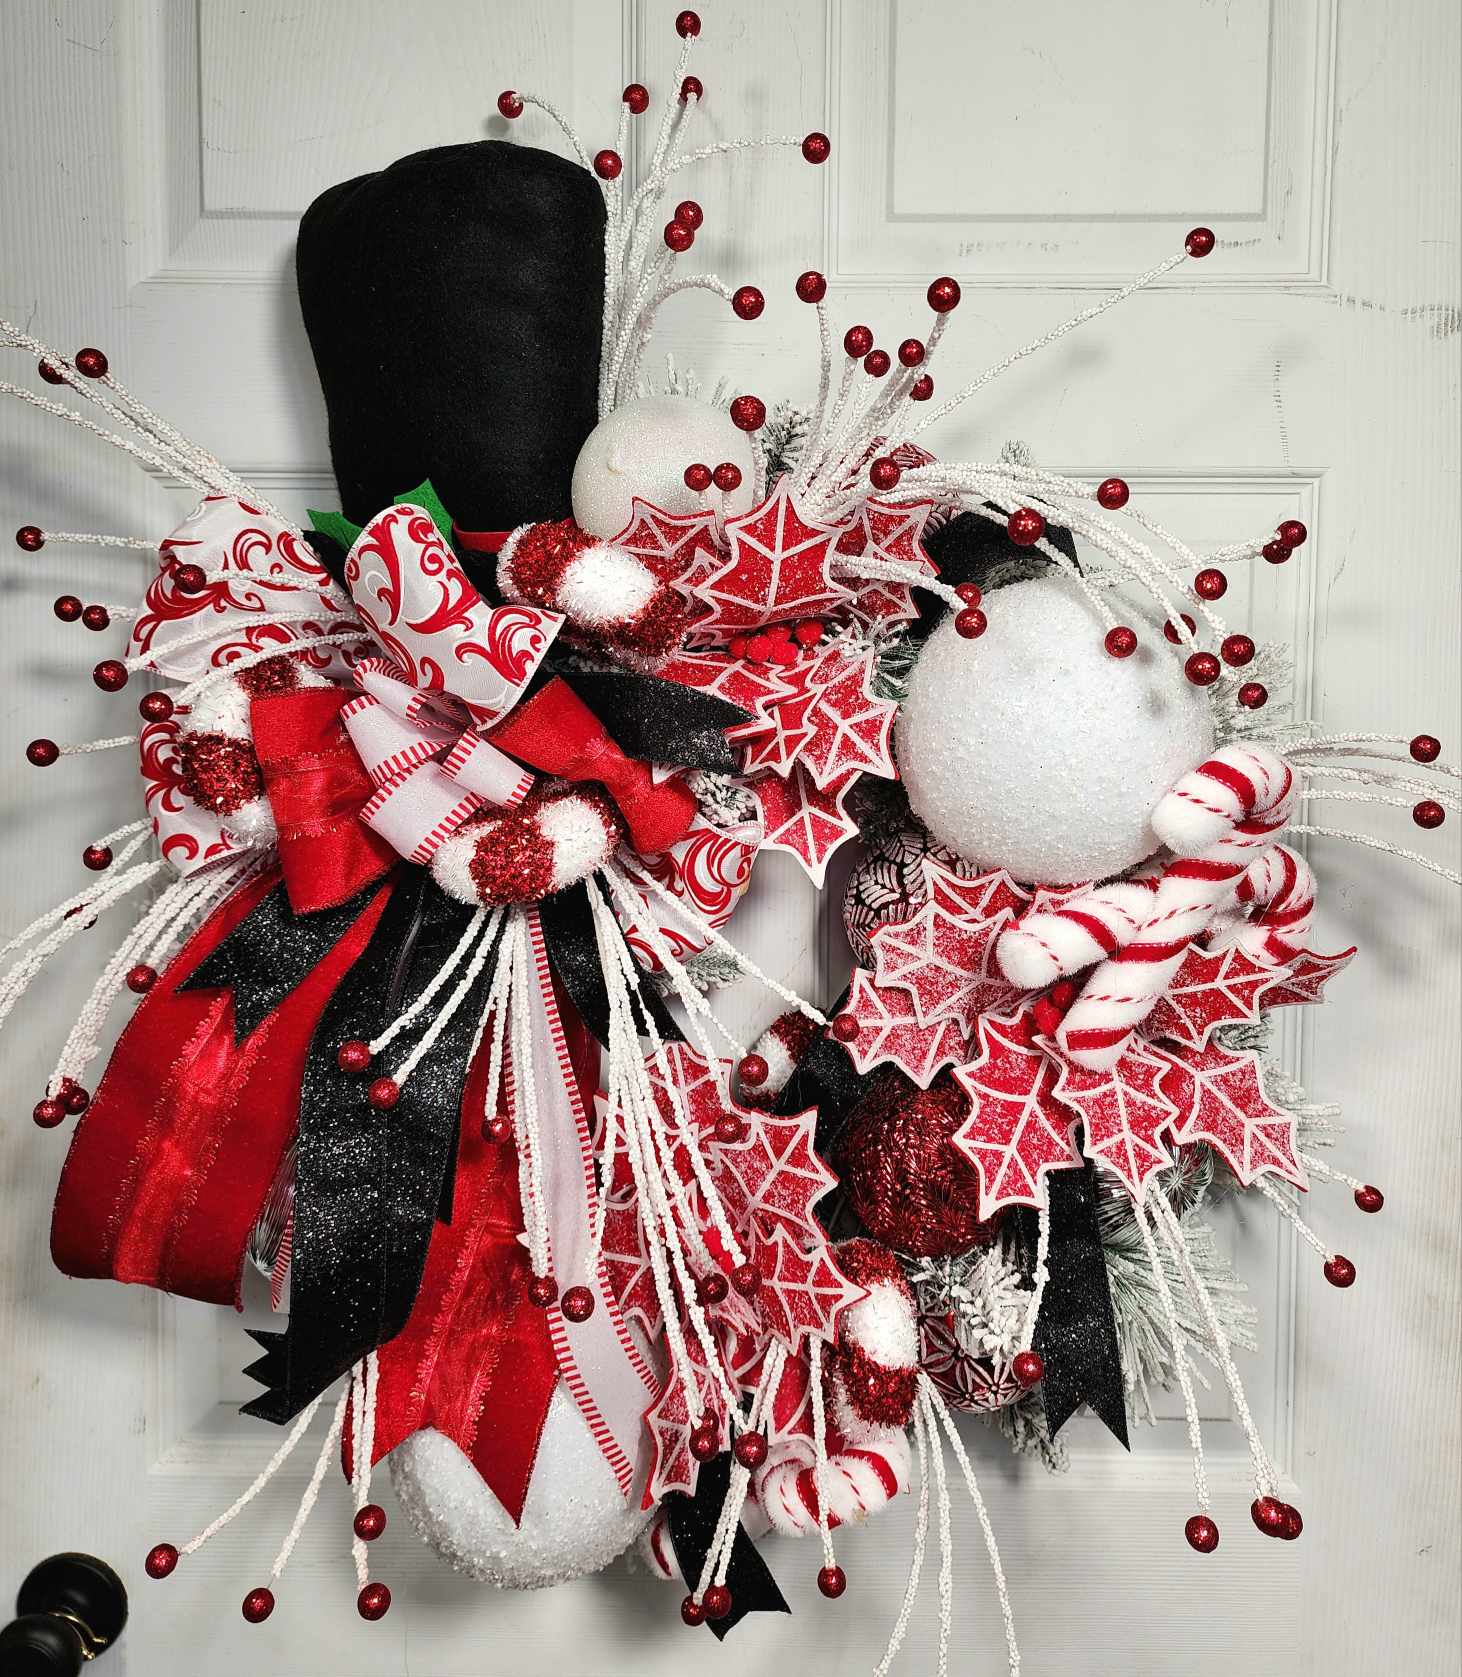
The reason this reads current rather than costumey is that high-contrast black has moved into holiday decor across the board, from black Christmas trees to black-and-white ribbon schemes. It’s a reaction against the all-red-and-green tradition that dominated the last decade. Black gives candy land a graphic edge, and it’s the kind of look that holds up for years because it isn’t tied to a single trend cycle. Red, white, and black simply doesn’t expire.
Your Candy Land Christmas Starts With One Good Stripe
You don’t need all 35 of these ideas — you need two or three that fit your actual square footage, your actual ceiling height, and your actual tolerance for glitter on the floor. Start with the tree or the wreath, live with it for a week, and add the next layer only once you know the first one works.
📌 Save this to Pinterest for later — you’ll want to revisit these ideas when the decor bins come down from the attic.